Retired In Kalifornia's Italian Aircraft Model Builds In Progress Photos

Post in-progress or completed model pics here
User avatar
RetiredInKalifornia
Generale di Divisone Aerea
Posts: 463
Joined: Fri Jun 14, 2019 6:34 pm

FIAT G.12T Tri-Engine Transport

Post by RetiredInKalifornia » Sat Jun 29, 2019 5:58 pm

The all-metal FIAT G.12 designed by Giuseppe Gabrielli (1903-1987) powered by three 800hp-plus FIAT A.74 R.C.42 supercharged 14-cylinder radial engines first flew on October 15, 1940 as an civilian airliner for Avio Linee Italiane though was immediately adopted by the Regia Aeronautica Italiana (RAI) as a tactical passenger & cargo transport aircraft. Briefly flown post WWII by Alitalia airlines it was the bases of the 1,065hp Pratt & Whitney Twin Wasp R-1830-S1C3-G 14-cylinder radial engine-powered G.212 civilian & military passenger & cargo transport. One hundred-four G.12s in eleven versions were built 1941-1944 most being G.12T (Transporti) in RAI, Aeronautica Nazionale Repubblicana, Aviazione Cobelligerante Italiana, Deutsche Luftwaffe, Hungarian Magyar Királyi Honvéd Légierő service well as with the post WWII Aeronautica Militare Italiana.

The 2018-vintage 1/72 scale SEM Model 72020 FIAT G.12T resin kit based on the Aerodim 72-03 kit are the only ones available in any scale of the FIAT G.12. Adequately detailed with elevator, tailfin & rudder options for various model build versions the resin castings are quite heavy particularly the massive one-piece main wings, through-fuselage reinforcement with quarter-inch plastic dowels being necessary to securely anchor them to the fuselage; no parts for navigation lights & pitot tubes were provided these I'd fabricated. The fuselage castings were inwardly warped to where a massive amount of under fuselage puttying/filing/sanding work was necessary complicated by there being a structural ridge element along most of the fuselage it being better reproduced with a separately molded glued-on kit part. Fuselage & main wing engine nose mounting areas were poorly molded necessitating having to guess where to mount the FIAT A.74 engine parts on them relative to the engine cowlings. Main landing gear & tires required significant pre-assembly planning insofar as making sure they’d not break apart from the weight of the model, through-wheel to landing gear assembly weight-bearing bars are recommended though luckily was able to get by without them – for now.

The SEM Model comes with decal options for RAI (two), Hungarian & Avio Linee Italiane versions I choosing to build MM.60673 “606-2” 606 Squadriglia, 148 Gruppo Transporto Ciampino, Italy c. February-March 1942 in FIAT-style Schema C1A/C1B Mimetico mottles with Humbrol, Testors & Model Master enamel paints, not having access to photos of this aircraft employed “artistic license” with respect to the mottle pattern.

Image

Image

Image

Image

Image

Image

Image

Image

Image

Image

Image

Image

Image

Image

Image

Image

Image

Image

Image

Image

Image

Image

Image

Image

User avatar
Editor
Site Admin
Site Admin
Posts: 2181
Joined: Thu Jul 24, 2003 3:53 pm
Location: Canada
Contact:

Re: Retired In Kalifornia's Aircraft Model Builds In Progress Photos

Post by Editor » Sat Jun 29, 2019 6:55 pm

Great job Richard, this is your best to date!

User avatar
RetiredInKalifornia
Generale di Divisone Aerea
Posts: 463
Joined: Fri Jun 14, 2019 6:34 pm

Thanks!

Post by RetiredInKalifornia » Sat Jun 29, 2019 7:29 pm

Editor wrote:
Sat Jun 29, 2019 6:55 pm
Great job Richard, this is your best to date!
Certainly wasn't one I'd wanted to build that's for sure! Next up is the Xotic/Aviation Usk FIAT RS.14, several build photos of it up on the Internet, need to study them tomorrow, following it is the "what-if" five-cannon G.55 likely the last FIAT I'll build this year barring re-release of the Italian Kits Wings (IKW) G.50V. I need to get these builds done before August 1st, want to clean the rugs soon thereafter comes the Cunarmodel Piaggio P.108T/Special Hobby P.108 conversion build, was going to build the Omega Model Caproni Ca.335 & BroPlan Ca.316 kits but will get to them late summer into the fall this winter.

Have now decided to build all P.108 kits I've got in stock this year, i.e. Special Hobby SH 72065 P.108A Artigliere & SH72035 P.108B I/II Serie Bombardiere well as the Cunarrmodel P.108T conversion. Recently I'd read Airmodel released the very first 1/72 scale P.108 kit AM-403 P.108B I Serie (vacuform) via Aviation Usk in 1996 Special Hobby releasing their injected plastic P.108B I/II Serie & P.108A kits in 2005 & 2006 respectively; Scalemates says they're re-releasing the P.108B as SH72406 this year. I'd also read Flying Machines released the FM72001 P.108B I/II Serie injected plastic kit sometime ago it presumably being a brand re-boxing of the Special Hobby kit. Special Hobby SH72035 includes clear nose parts for I and II Serie variants, I'd very much wanted to build an early production I Serie in Mimetico but will instead assemble interchangeable noses for each in Tavola X livery given how extremely expensive SH72035 kits are going for these days, if indeed SH72406 becomes available will build it in Mimetico.

Save for the Cunardmodel & SEM Model Macchi C.207 & C.205N-1/2, FROG, Hasegawa & Italeri C.202/5, IKW G.50V well a any new "Italian" kit releases worth considering hereon will be building multi-engine "Italians". The last "Italian" kit build will be the RS Models Reggiane Re.2007 in 2021 again barring any new "Italian" kit releases worth considering meantime, am reasonably sure they'll be.
Last edited by RetiredInKalifornia on Sun Jun 30, 2019 9:01 pm, edited 4 times in total.

User avatar
Editor
Site Admin
Site Admin
Posts: 2181
Joined: Thu Jul 24, 2003 3:53 pm
Location: Canada
Contact:

Re: Thanks!

Post by Editor » Sun Jun 30, 2019 10:09 am

RetiredInKalifornia wrote:
Sat Jun 29, 2019 7:29 pm
Certainly wasn't one I'd wanted to build that's for sure!
The G.12 is a great subject, its a great looking transport and most people don't even know about it!

User avatar
RetiredInKalifornia
Generale di Divisone Aerea
Posts: 463
Joined: Fri Jun 14, 2019 6:34 pm

Don't Forget About The G.18!

Post by RetiredInKalifornia » Sun Jun 30, 2019 10:37 am

Editor wrote:
Sun Jun 30, 2019 10:09 am
RetiredInKalifornia wrote:
Sat Jun 29, 2019 7:29 pm
Certainly wasn't one I'd wanted to build that's for sure!
The G.12 is a great subject, its a great looking transport and most people don't even know about it!
Italian Kits Wings IW04 FIAT G.18/18V may be re-released as IKW7203 sometime in the future:

Image

I'd put it in the same category as their G.50V, i.e. will believe so after I'd bought them!

User avatar
RetiredInKalifornia
Generale di Divisone Aerea
Posts: 463
Joined: Fri Jun 14, 2019 6:34 pm

Xotic-72 FIAT RS.14 Build In Progress

Post by RetiredInKalifornia » Sun Jun 30, 2019 7:55 pm

The FIAT CAMSA (Costruzioni Meccaniche Aeronautiche Società Anonima) RS.14 long-range maritime strategic reconnaissance seaplane was the most well known well as numerous aircraft type designed & built by this Genovan-based subsidiary, 186 including two prototypes manufactured 1939-1943.

Aviation Usk AV-1020 with scale injection molded with vacuformed clear & brass etched parts released in 1996 along with the c.2000-vintage re-boxed Czech produced Xotic-72 AU1020 are the only 1/72 scale kits of the RS.14. Derided by some modelers as crude and inaccurate the kits nevertheless remain sought after by Regia Aeronautica Italiania aficionados myself having taken over two years to obtain a no doubt many times owned & resold unopened example, glad indeed am I to have bought it well as finally building the critter!

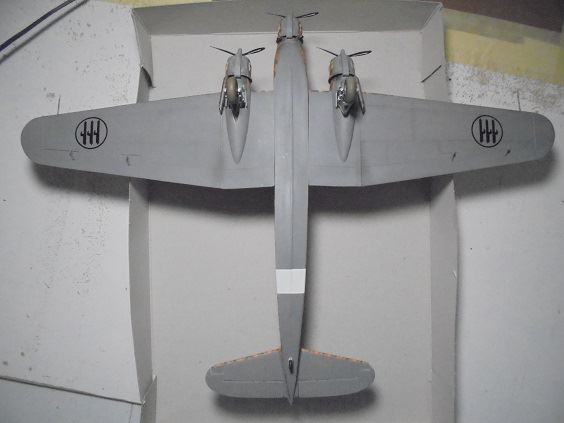
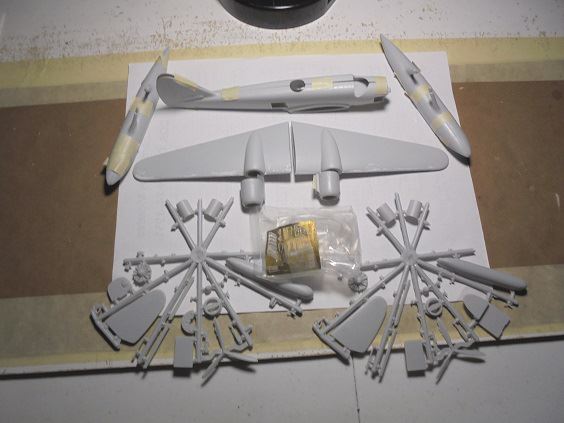
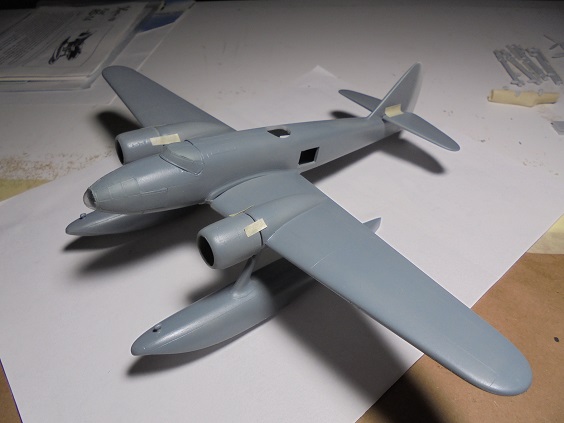
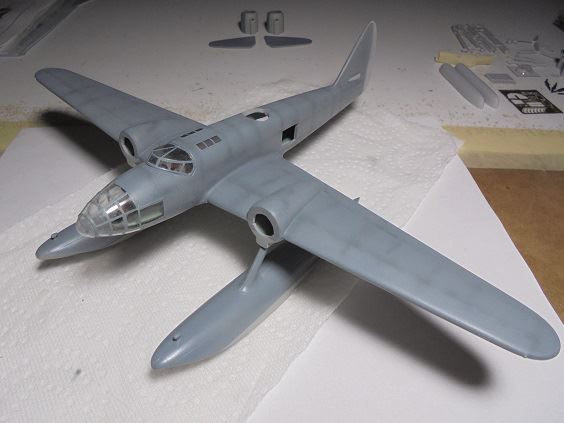
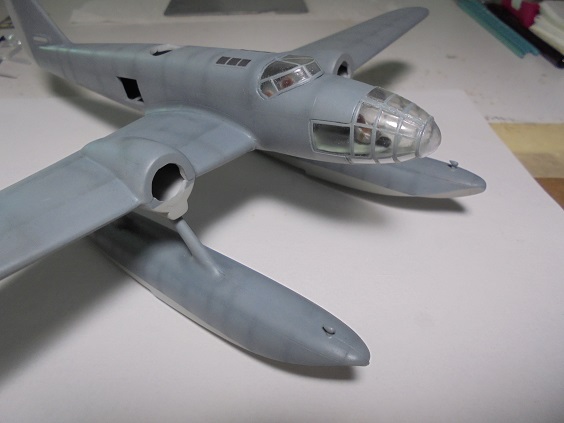
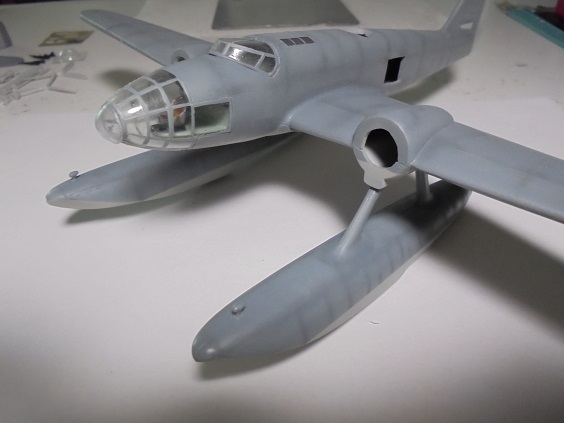
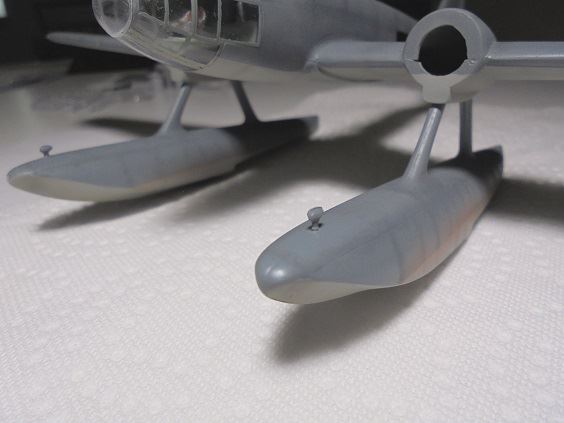
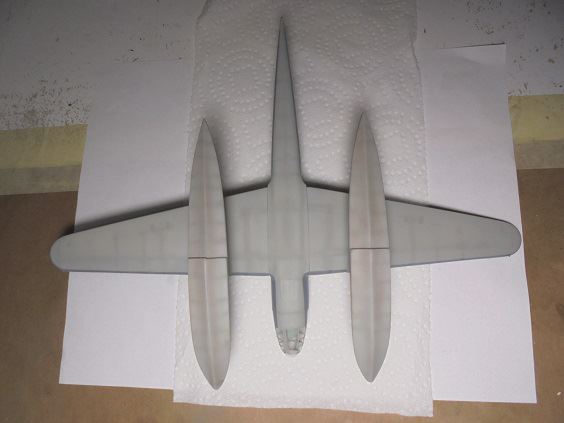
Below is my first build-in-progress photo; mainwings, floats, flight deck sans pilot & copilot seats are assembled, fuselage halves prepped for assembly:

Image

July 1, 2019 Update:

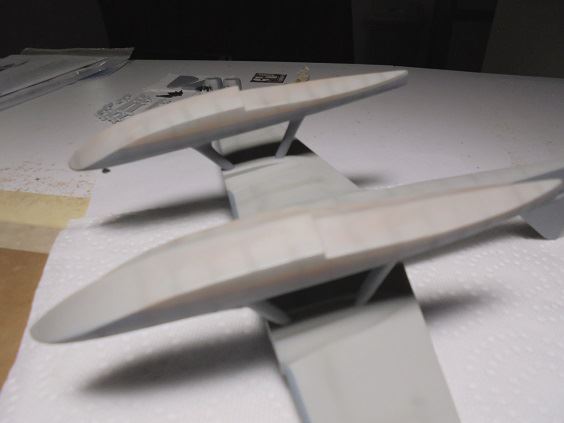
Mainwings sand finished; floats mostly sand finished additional putty filling was necessary more sanding later; engine cowlings glued together, putty filling & sanding next. Model kit instructions outline three cockpit canopy assembly options two requiring cutting out fuselage halve portions, inserting portions of the vacuform cockpit canopy, am choosing the third least invasive, i.e. cutting out only the vacuform canopy windscreen top & painting in cabin windows, getting to that assembly challenge later this week!

July 3, 2019 Update:

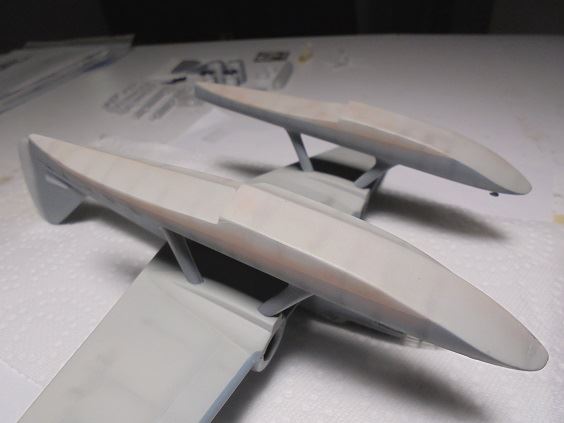
Floats & engine cowlings sand finished, fuselage & cowling interiors painted Humbrol 78 Matt Cockpit Green + Testors Flat White 50/50 mix + 36% White shading replicating Verde Anticorruzione.

Image U.S. Independence Day 2019 Update:

Flight deck seats & control wheels painted & assembled, seat belts fabricated from painted Scotch Magic Mending Tape, glued in place on seats.

July 6, 2019 Update:

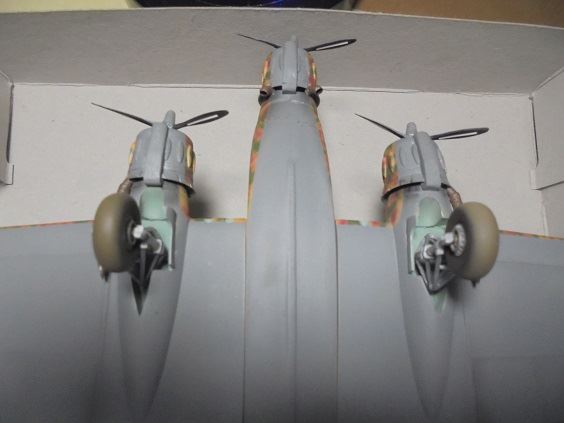
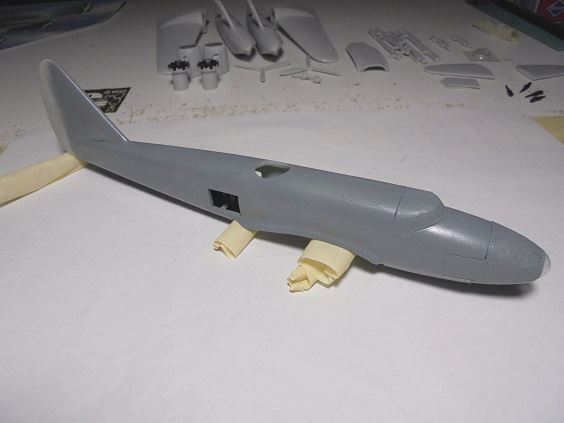
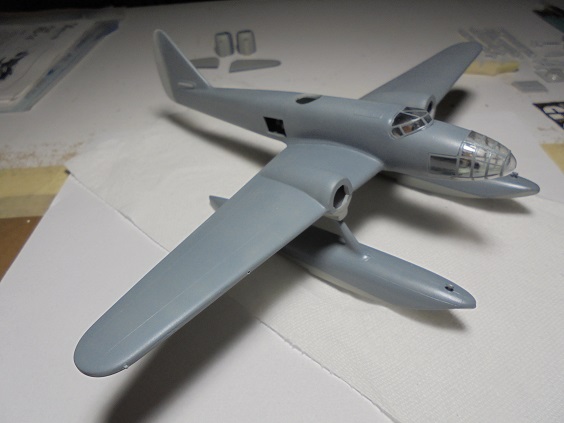
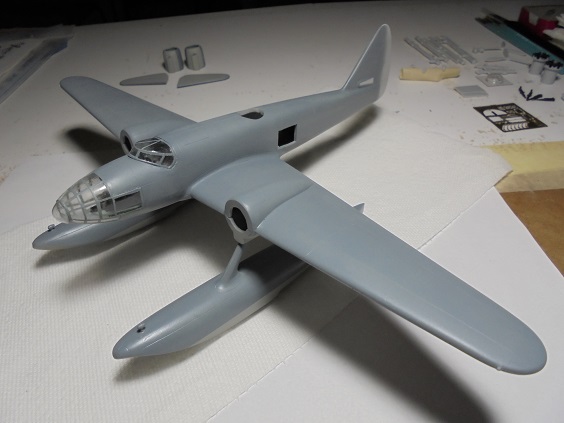
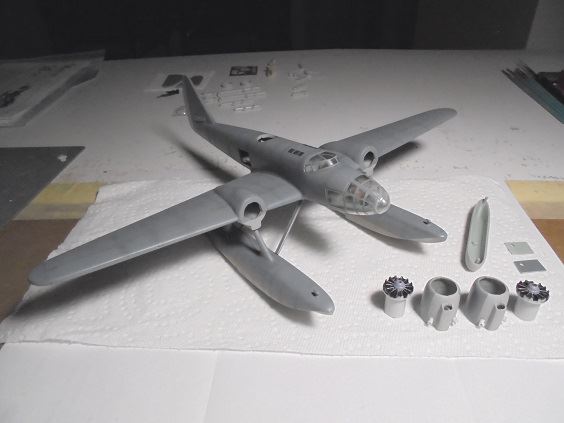
Majority of model kit parts molded in two identical circular trees, highly economical though same pitch direction propellers, engines rotated opposite directions, one propeller cut part, pitch direction reversed. Kit lacked propeller shafts, used circular plastic stock, drilled holes though engines subsequently glued on circular mounts, propeller hubs & spinners, glued spinners on shafts, they & cowling parts dry fit assembled. Vacuform nose "greenhouse" assembled, considerable trim, file & sanding work necessary, seam puttying required as well, sanding them over tomorrow.

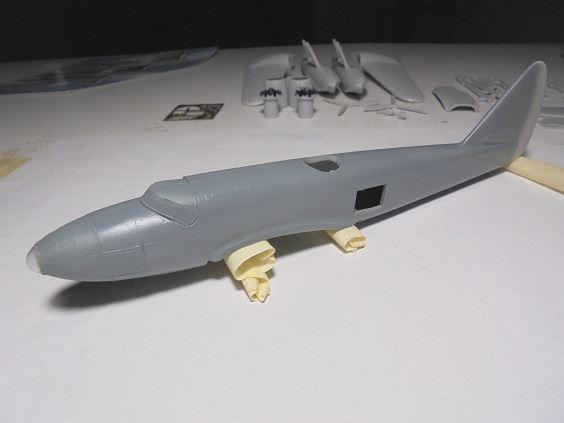
July 7 & 8, 2019 Update:

Sheet plastic wedge shims glued in place on fuselage halves forward of cockpit to ensure good vacuform nose "greenhouse" to fuselage joins, dry fitting sessions went well :thumbup: Vacuform cockpit canopy cut trimmed, filed & sanded to fit, dry fitting sessions also went well :thumbup: Forgot to paint crew seat upholstery :oops: retro with Testors Flat Rust enamel 
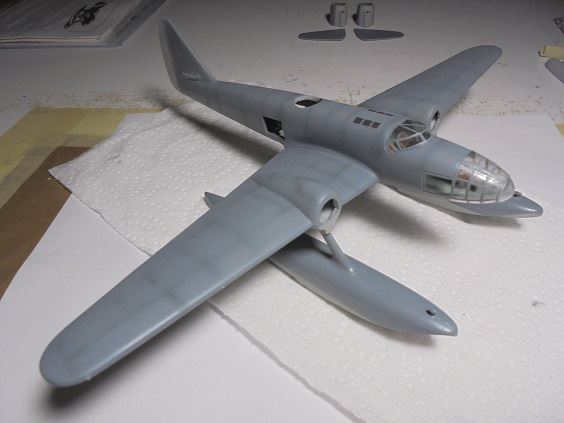
somewhat replicating rust-colored leather seen on Italian aircraft seats. Kit provided etched brass beam gun mount parts painted Testors Flat Aluminum enamel, glued in place on fuselage halves. Cockpit instrument panel painted & glued in place on port fuselage halve; kit provided etched brass & clear plastic sheet printed instrument panel parts glued together they glued on plastic backing it held in place with glued-on sheet plastic shim, flight deck assembly subsequently glued in place on port fuselage halve. Fuselage halves glued joined, good results :thumbup: nose shims putty filled later today.

July 9, 2019 Update:

All fuselage seams finished sanded, some additional puttying required. Cockpit canopy panes masked then glued in place on fuselage; canopy cut out of one-piece vacuform part intended for grafting onto cut-out fuselage area too narrow :evil: dry-fits didn't reveal this, starboard side upper fuselage join noticeably misaligned :evil: Nose "greenhouse" panes masked then glued in place OK, port fuselage join slightly off, vacuform part creeped over fuselage edge whilst gluing down side window in slot, didn't catch the creeping :frown: Cockpit canopy & nose greenhouse base painted Humbrol 78 Matt Cockpit Green + Testors Flat White 50/50 mix + 36% White shading replicating Verde Anticorruzione, entire fuselage except rudder (will be painted Verde Oliva Scuro 2) Humbrol 125 Satin U.S. Dark Grey + 36% Testors Flat White enamels replicating Giorgio Azzurro Chiaro 3:

Image

Image

Humbrol satin paint dries slow, set fuselage aside to dry next two days, resuming work on other kit components tomorrow.

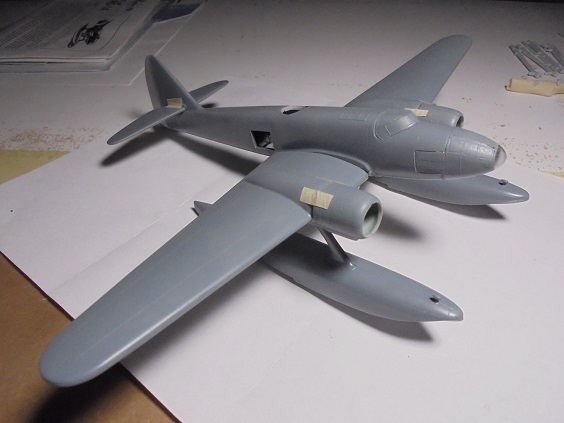
July 10, 2019 Update:

Mooring bollards glued on float topsides some millimeters back from bows based on RS.14 Internet photos. Single piece plastic "teardrop", two-piece etched brass "T" style kit options provided, chose teardrop based on wartime RS.14 photos, brass parts likely breaking off whilst handling the model during construction. Floats glued in place on main wing engine nacelle undersides; disregarded kit instructions to drill holes for inserting float strut pegs, cut them off, glued struts directly on the nacelles instead, good alignments, better than having drilled holes knowing they'd be misaligned!

July 11, 2019 Update:

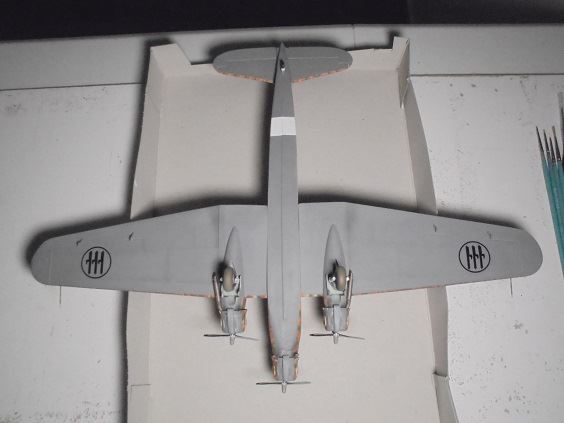
Topsides of all major model assembly units painted Humbrol 125 Satin U.S. Dark Grey + 36% Testors Flat White enamels replicating Giorgio Azzurro Chiaro 3; underside fuselage structural part supporting mainwings glued in place allowing dry-fitting major assembly units:

Image

Image

Forward underside fuselage structural part supporting mainwings glue join uneven, was re-puttied, will be smooth sanded Saturday.

July 12, 2019 Update:

Model kit did not have navigation lights or pitot tube parts, drilled holes for them on mainwings, cut sheet plastic stubs replicating the former glued in place, pitot tube will be fabricated later. Undersides of all major model assembly units except the fuselage painted Model Master 1726 Flat Gull Grey + 36% Testors Flat White shading enamels replicating Grigio Azzurro Chiaro 1.

July 13, 2019 Update:

Nose greenhouse canopy interior dirty :x nose cap pried off, interior cleaned, cap glued back on after painting fuselage undersides. Starboard upper cockpit canopy join to fuselage area scraped smoothed & sanded to appear better. Extensive filing & sanding underside fuselage structural part supporting mainwings & fuselage join areas, extensive sanding of fuselage wing roots & mainwing ends as well. Mainwings glued on fuselage, extensive wing root puttying necessary. High heat conditions here, set model aside to dry, resuming work on it tomorrow.

July 14, 2019 Update:

Mainwing-fuselage joins filed & sanded; spray painted over top & underneath seams many imperfections revealed, several more file & smooth sanding passes required, good results achieved after second paint-over. More areas around cockpit canopy-fuselage join required trimming & sanding, good results achieved after spray & brush paint-overs. Cockpit canopy & nose greenhouse swabbed cleaned after removing all paint masking tape, nose cap glued back on after sanding & scraping off residue:

Image

Image

Model weathering painting commences tomorrow.

July 15, 2019 Update:

Fuselage & mainwing upper sides "weathered" with sprayed-on out-of-bottle Humbrol 125 Satin U.S. Dark Grey enamel replicating Giorgio Azzurro Chiaro 3 then lightly over sprayed with 125 + 36% Testors Flat White enamel mix for "softening". Radio compartment skyline "windows" spray painted on, Testors Flat Black + 5% White "special mix" base coat enamels over sprayed with "special mix & "Testors Flat Silver spot mix, set model aside for drying:

Image

Image

Floats will be weathered tomorrow; weathering this model taking more time & effort than had anticipated, expecting all of it done by Thursday.

July 16, 2019 Update:

Float upper sides weathered:

Image

Image

July 17, 2019 Update:

Fuselage & mainwing undersides "weathered" with sprayed-on out-of-bottle Model Master 1726 Flat Gull Grey enamel replicating Gigio Azzurro Chiaro 1, 1726 + 36% Testors Flat White shading lightly over sprayed on several "weathered" areas for "softening". Float undersides weathered tomorrow.

July 18, 2019 Update:

Float undersides "weathered" with sprayed-on out-of-bottle Model Master 1726 Flat Gull Grey enamel replicating Gigio Azzurro Chiaro 1, 1726, "rust" with Testors Flat Rust + White spot mix:

Image

Image

Image

Image

Image

July 19, 2019 Update:

Float struts top & undersides respectively spray painted Humbrol 125 Satin U.S. Dark Grey + 36% Testors Flat White shading enamels replicating Giorgio Azzurro Chiaro 3 & Model Master 1726 Flat Gull Grey + 36% Testors Flat White enamels replicating Grigio Azzurro Chiaro 1 then glued in place after drying.

EZ Line stretch thread replicating float-mainwing tension wires glued in place.

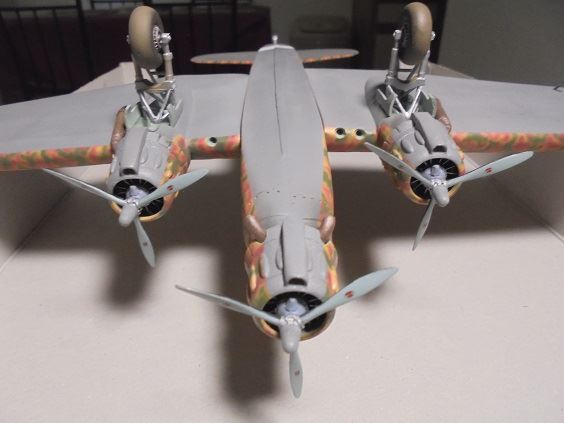
Engine details brush painted Model Master 2105 Dark Blue Grey & Testors Flat Aluminum.

Engine exhaust pipe parts drilled out, trimmed & glued in place on engine cowlings (one required putty filling on a side) for later painting.

Weapons pod part trimmed to "seat" over fuselage underside, clear plastic dowels glued on interior ends, holes drilled in fuselage; Elmer's White Glue will be used to hold it in. Pod exterior painted Model Master 1726 Flat Gull Grey + 36% Testors Flat White shading enamels, retractable beam gun station cover exteriors painted Humbrol 125 Satin U.S. Dark Grey + 36% Testors Flat, pod & cover interiors sprayed Humbrol 78 Matt Cockpit Green + Testors Flat White 50/50 mix + 36% White shading replicating Verde Anticorruzione:

Image

Image

Image

July 20 & 21 2019 Updates:

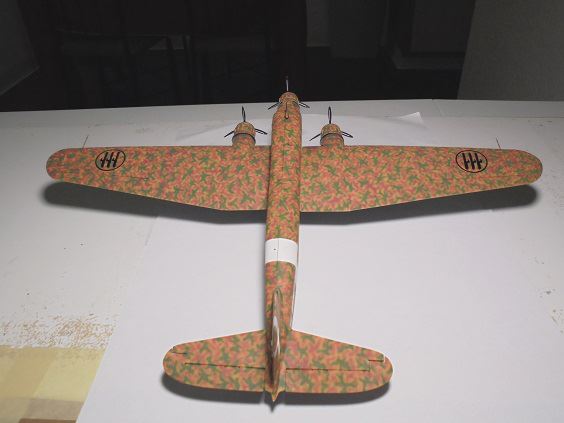
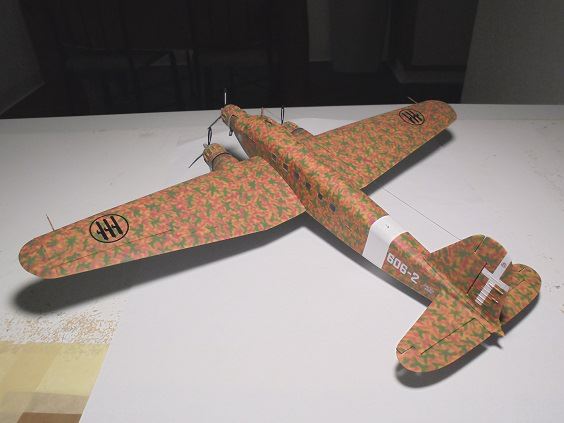
Seam lines along rudder sail & tailplane uppersides "weathered" with sprayed-on out-of-bottle Humbrol 125 Satin U.S. Dark Grey enamel replicating Giorgio Azzurro Chiaro 3 then lightly over sprayed with 125 + 36% Testors Flat White enamel mix for "softening".

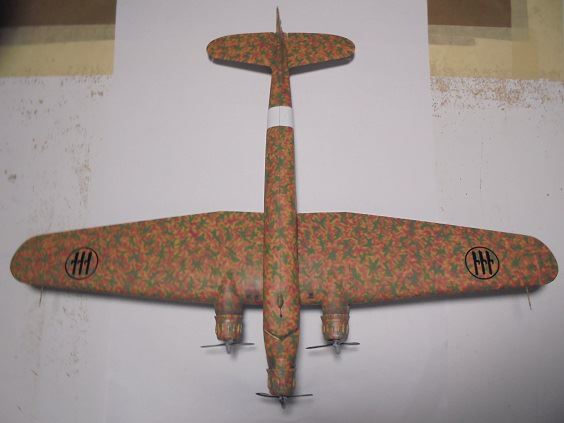
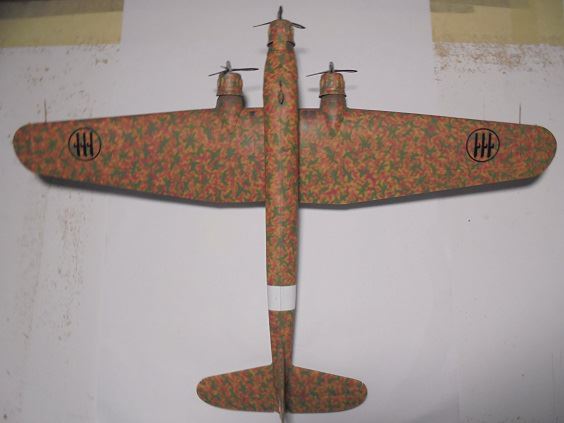
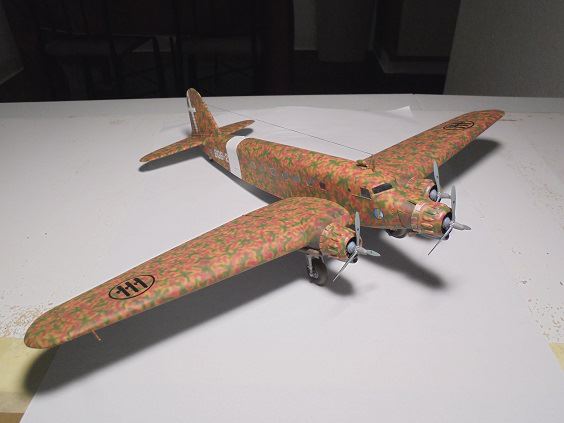
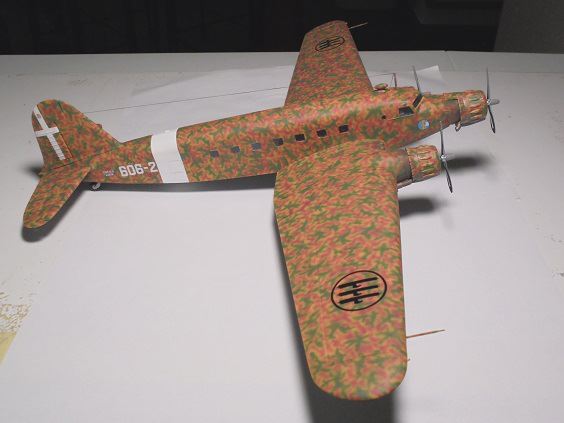
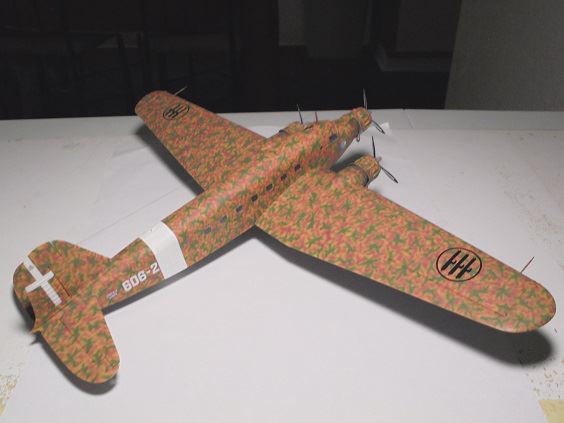
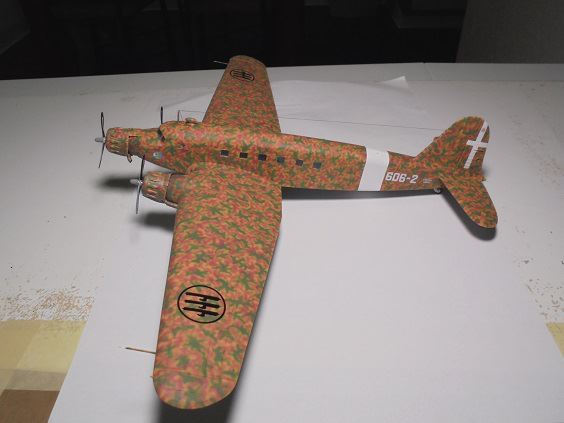
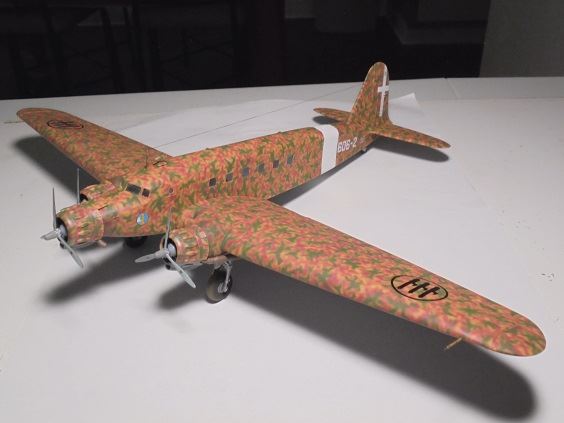
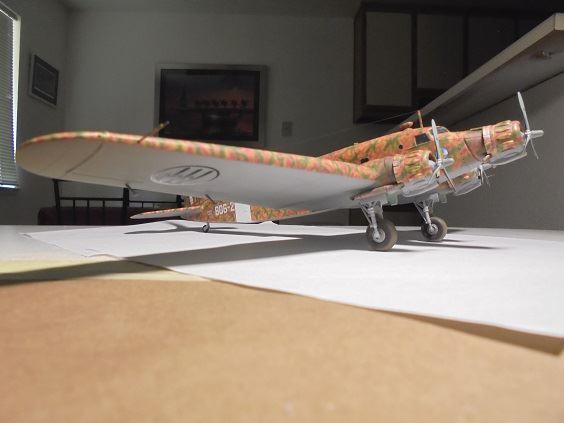
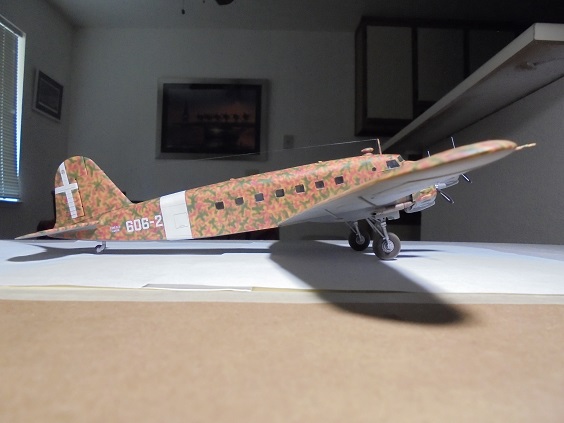
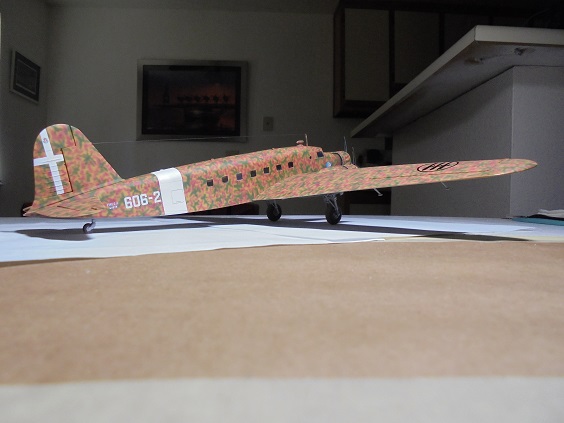
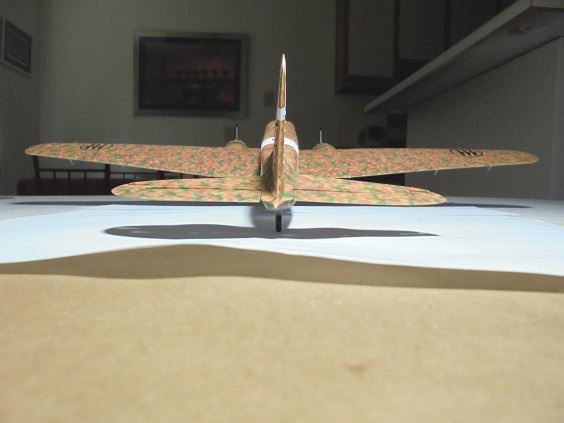
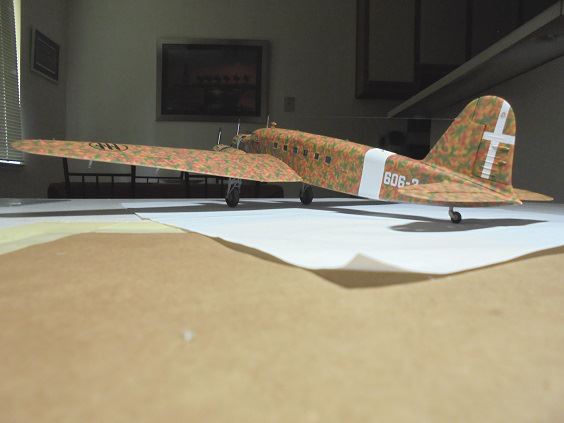
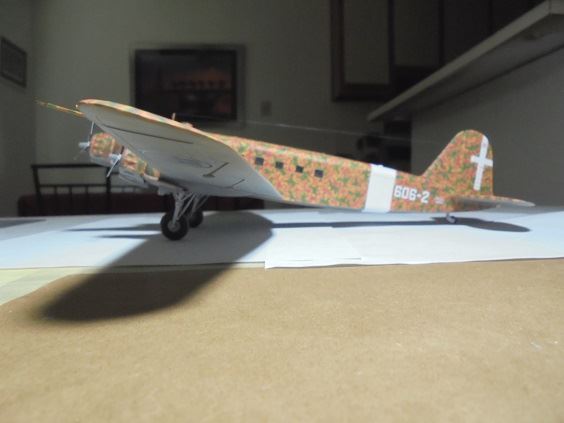
Rudder painted Humbrol 91 Matt Black Green + 36% Testors Flat White shading enamels replicating Verde Oliva Scuro 2, white Distintivo di Guerra cross over it well as a white fuselage band for identification purposes.

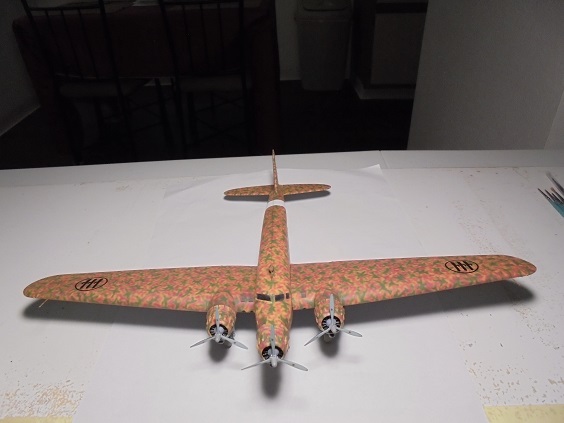
Model kit & SKY Models 72-019 decals for a 287a Squadriglia Serie III RS.14 were applied.
Last edited by RetiredInKalifornia on Wed Jul 24, 2019 1:08 pm, edited 36 times in total.

User avatar
veltro54
Comandante di Gruppo
Posts: 46
Joined: Thu Jul 19, 2007 10:32 am

Re: FIAT G.12T Tri-Engine Transport

Post by veltro54 » Wed Jul 03, 2019 10:36 am

RetiredInKalifornia wrote:
Sat Jun 29, 2019 5:58 pm

Image
good job on assembly but the base color is wrong, it's too dark and orange it should be GM1 or close to a sand. As I recall the Vito charts have the correct color to use for G.12s.

User avatar
RetiredInKalifornia
Generale di Divisone Aerea
Posts: 463
Joined: Fri Jun 14, 2019 6:34 pm

My Reply come Excuses...

Post by RetiredInKalifornia » Wed Jul 03, 2019 1:43 pm

veltro54 wrote:
Wed Jul 03, 2019 10:36 am
RetiredInKalifornia wrote:
Sat Jun 29, 2019 5:58 pm
good job on assembly but the base color is wrong, it's too dark and orange it should be GM1 or close to a sand. As I recall the Vito charts have the correct color to use for G.12s.
Your comments are taken with regard. Right or wrongness discussions regarding model aircraft paint coloration is old as the hobby particularly with respect to the “authoritative” information its based upon, whether that information is readily available to modelers if at all is a separate discussion altogether.

My G.12T model was built based on readily available information regarding the aircraft via the Internet, including Vincent Tassone’s STORMO Regia Aeronautica and ANR Colors and Camouflage Schemes 2006 monograph. I’d seen two colors photos of a G.12 appearing to had been painted GM1 up on the Internet, interesting yes but chose not to model it instead for what I thought “606-2” might had looked like knowing full well it likely be wrong regarding paint coloration never mind the Mimetico Schema. Till now I was completely unaware of the “Vito Charts” specifically referencing the G.12, sadly it just wasn’t readily available when I’d stared the kit build.

It’s flat impossible for me to build “the perfect model”; Alan Hovhaness destroyed 1,000 of his musical pieces during the 1930s & 1940s, all my “Italians” have inaccuracies, not doing same with them, damn things cost a fortune to buy & build! Those who build perfectly researched & constructed models live in other Universes, best I can do is build models am pleased to spend a bigger fortune on dust-proofed display cases for!
Last edited by RetiredInKalifornia on Wed Jul 03, 2019 7:04 pm, edited 2 times in total.

User avatar
veltro54
Comandante di Gruppo
Posts: 46
Joined: Thu Jul 19, 2007 10:32 am

Re: Retired In Kalifornia's Aircraft Model Builds In Progress Photos

Post by veltro54 » Wed Jul 03, 2019 4:46 pm

Vince's Color Guide says nothing specific about the G.12, I think you're confusing the CMPR Color Chips and Camouflage Schemes which provide general guidelines or a range of colors to use for the G.12, namely GM 1-3 for the base color. The Vito Charts have been around since the 1970s and there should be an article on this website about it. And as I recall Vince was planning to incorporate the Vito Charts into his Color Guide as a part 2.

User avatar
RetiredInKalifornia
Generale di Divisone Aerea
Posts: 463
Joined: Fri Jun 14, 2019 6:34 pm

*Updated* Fine Enough...

Post by RetiredInKalifornia » Wed Jul 03, 2019 5:14 pm

veltro54 wrote:
Wed Jul 03, 2019 4:46 pm
Vince's Color Guide says nothing specific about the G.12, I think you're confusing the CMPR Color Chips and Camouflage Schemes which provide general guidelines or a range of colors to use for the G.12, namely GM 1-3 for the base color. The Vito Charts have been around since the 1970s and there should be an article on this website about it. And as I recall Vince was planning to incorporate the Vito Charts into his Color Guide as a part 2.
...IF I'd done the searches here but did not simply because I'd not known about them, do wish Vince had incorporated them! Really didn't matter to me how was going to paint the G.12T, thing ain't gonna appear in any scale modeling contests that's for sure, will try to find the "Vito Charts" if they'd not disappeared when the website went down. Barring Italian Kits Wings re-releasing their G.50V kit, new subject pre & WWII-era FIAT aircraft kit releases, won't be building any more FIATs, do have several Savoia-Marchetti kits to build in Mimetico.

Even though I've been interested in Italian aircraft since 1964 I've only been actively looking & acquiring information about them since 2004. I've known about STORMO for years might even had given Vince a PayPal donation to keep it going, became a member last year blissfully unaware what a treasure trove of information the website is, maybe I should ask others here first before grabbing the airbrush from now on!

Update

Came across this whilst doing "Vitochart" Internet web searches:

Modellismo ala Buona: Vitocharts Italia 1916-1943 posted by kruaxi June 4, 2011

Google Translation:

The famous, for some notorious, VITOCHARTS chips dedicated to aeronautical direction. Born in the 70s [1977], they were a 'bible' for Italian model makers, except for falling into oblivion very soon. Today someone reevaluates them. I don't have enough information to make judgments. They are scanned with the greatest possible fidelity with an excellent scanner. If you have a well-adjusted monitor the yield should be good.

Scanning the Italian text found one reference to FIAT G.12 coloration in with Savoia-Marchetti S.73 & S.81 Libia (Libyan) aircraft:

10 - Colore 4 - In Variante Sabbia

20 - Verde Mimetico (1916) Anche Verde Mimetico (1940 - FIAT)

22 - Colore 10 - Bruno Chiaro In Variante

Color 10 appears to be the base color of the G.12T photos I've seen on the Internet. Am going to save the images of the posting for reference.

When this research was published in 1977 I'd hadn't resumed scale modeling, way, way too bad given if I'd still been might had came across it to build whatever "Italians" were on the market after then - oh does it so hurt :(

User avatar
Editor
Site Admin
Site Admin
Posts: 2181
Joined: Thu Jul 24, 2003 3:53 pm
Location: Canada
Contact:

Re: Retired In Kalifornia's Aircraft Model Builds In Progress Photos

Post by Editor » Wed Jul 03, 2019 6:36 pm

Fiat used GM1 and GM3. The error Richard made was that he applied the colors he used for the G.50 and CR.42DB (see the builds above), which are correct, to his G.12 - incorrect. The camouflage scheme Richard used isn't correct either, even though it's clearly set out in the Colour Guide as C1B, Richard used C1A (branched). I think everyone knows I don't often critic peoples work, mostly because I don't have to but, but I would rather have an attractive build that fills a gap in the Gallery than none at all. As the Gallery fills up with more-accurate builds I do prune the Gallery from time to time.

Modeling should be fun but to many it's also an art and serious business and that means being accurate, both historically and with respect to the final build, so yes I agree with you Mike (... and Jean, and Vince, and Dan etc) that we should be as accurate as possible. And just for your information I was getting a little bit concerned about populating the Gallery with too many inaccurate builds! They end being used as talking points on other sites on what not to do. Stormo has a pretty good rap for being accurate and I want to keep it that way.

There are several color photos of G.12s. The first few G.12s were airliners and were repainted in the three tone camo scheme, the first 4 planes being painted this way and the remaining were finished in VOS2. The Germans are often credited with evacuating Tunisia, often citing only Ju.52s in English texts, this is wrong, the brunt of the work was carried out by Italian transports and the G.12 played an important part often being confused with the Ju.52.

Below is a photo of MM.60651 605-4 148o Gruppo, Sciacca 1943. The finish is quiet clearly GM 1, corresponding to color chip "10 - Colore 4 in variante sabbia" in the Vito Charts (less green, more yellow). I never felt strongly about the Vito Charts because the color combos, especially for C.202s looked wrong. Mike is right, I was planning to add a second page to the Color Guide devoted to the Vito Charts, but this approach would have taken allot of time to do correctly so its been sitting on my shelf for about 10 yrs, I do have about 100 other projects to look at, but I may do a quick and dirty Vito Chart since this keeps coming up. One thing to note about this photo is the rudder, its movable surfaces which have been repainted in VM2 (Foliage green) and GM4 (middelstone) - Macchi Colors.

Richard: what did the kit instructions recommend for paints?

Image

User avatar
RetiredInKalifornia
Generale di Divisone Aerea
Posts: 463
Joined: Fri Jun 14, 2019 6:34 pm

Thanks For The Reply Post!

Post by RetiredInKalifornia » Wed Jul 03, 2019 6:55 pm

I'd tossed the instruction sheet after building the model but do remember it showed several paint schemes that for "606-2" in a yellow similar to GM3 in C1-ish mottle. Whenever other modelers post photos of their G.12 builds ya'll can withdraw mine though hope y'all won't take those down of it I'll be posting on a "collections" thread in the future.

Didn't catch the rudder coloration, possibly a depot repaint with whatever paints on hand?

User avatar
Editor
Site Admin
Site Admin
Posts: 2181
Joined: Thu Jul 24, 2003 3:53 pm
Location: Canada
Contact:

Re: Retired In Kalifornia's Aircraft Model Builds In Progress Photos

Post by Editor » Wed Jul 03, 2019 7:55 pm

Yes definitely field applied, note how shot up the plane is - the plane probably went through a number of re-paints and repairs. The photo was taken about the time Tunisia was being evacuated. And shame on SEM, that's an expensive kit and the instructions need to be on par with the fabrication which is excellent. Is there detail on the undersurfaces?

User avatar
RetiredInKalifornia
Generale di Divisone Aerea
Posts: 463
Joined: Fri Jun 14, 2019 6:34 pm

Indeed...

Post by RetiredInKalifornia » Wed Jul 03, 2019 8:38 pm

Editor wrote:
Wed Jul 03, 2019 7:55 pm
Yes definitely field applied, note how shot up the plane is - the plane probably went through a number of repairs. The photo was taken about the time Tunisia was being evacuated.
...by that time during the war lotta Italian aircraft had undergone field repaints one kind of another especially those reassigned between units. Years ago I'd read an amusing article about how finicky the Lufwaffe allegedly was in paint finishing & marking their aircraft insofar as not allowing any to be sortied if they so much had a 87-octaine triangle marking missing, 1939 yes but not by time of Operation Husky given the chaos associated with withdrawing flying units from Sicily beforhand.

User avatar
RetiredInKalifornia
Generale di Divisone Aerea
Posts: 463
Joined: Fri Jun 14, 2019 6:34 pm

Well...

Post by RetiredInKalifornia » Wed Jul 03, 2019 10:32 pm

Editor wrote:
Wed Jul 03, 2019 7:55 pm
...And shame on SEM, that's an expensive kit and the instructions need to be on par with the fabrication which is excellent. Is there detail on the undersurfaces?
...can't fault SEM entirely on the kit, believe its from the Aerodim 72-03 mold, doesn't appear to have been modified. Undersurface detail is fair, least its recessed more been nice, mold detailing adequate elsewhere, bulkhead scribing misaligned mid-fuselage to tail planes on both sides though. Kit instructions were photographs of part assemblies, not many parts to start with, figuring out placements easy though rear landing gear A-Frame struts had to be trimmed to fit. The heavy one-piece main wings required through-fuselage weight supporting dowels, fuselage underside seams & nose areas requiring massive putty filling well as filing & sanding work, fuselage & main wing engine mountings areas badly distorted nevertheless was able to glue on engine parts somewhat properly aligned. Decals were excellent though whilst applying starboard upper wing fasci tore parts of it, was successful reattaching them. The kit though well molded is only for those experienced in building all resin models, not the worse one I'd built but certainly one am glad I'll never build again!

Post Reply