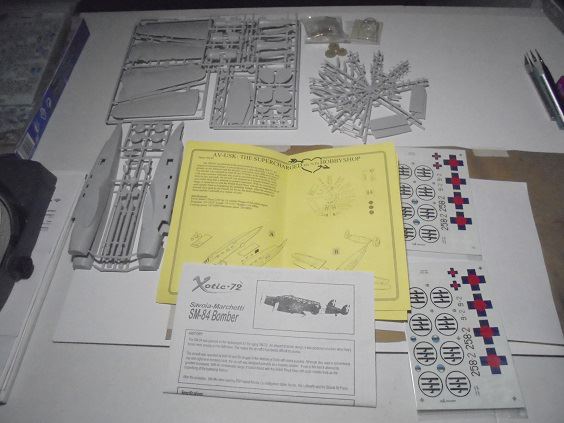
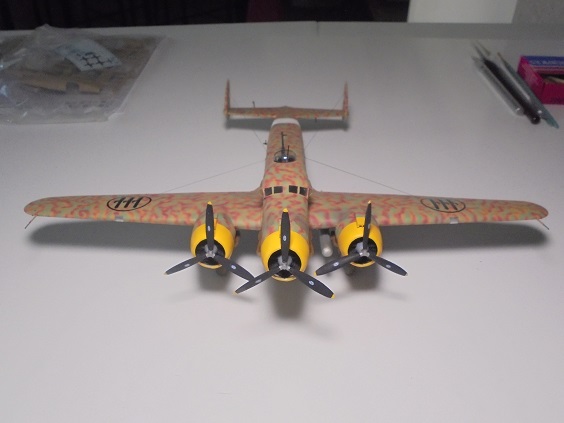
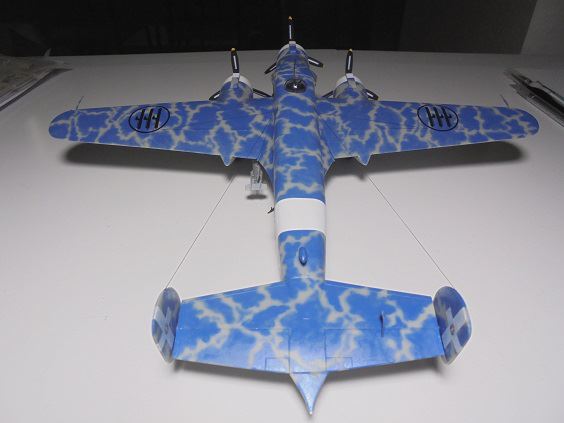
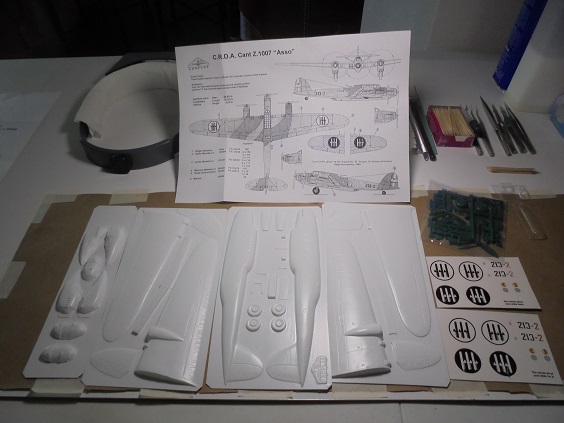
The 1/72nd scale Polish
BroPlan styrene plastic vacuforms with injected-plastic parts are the last Italian aviation scale model kit builds of 2020, possibly the last ever pending any new or reissued Italian military subject kit releases of interest now till end of 2022 when absolutely for sure will retire from scale model kit building after 61 on-off years.
Build Progress Reports Will Be Continuously Posted Here, Photos Of Built Models Will Be On Separate Postings
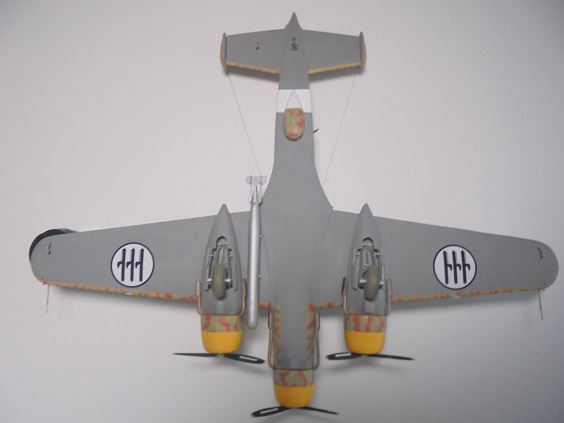
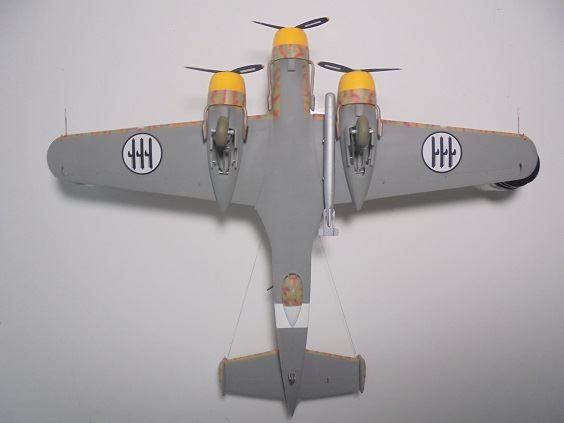
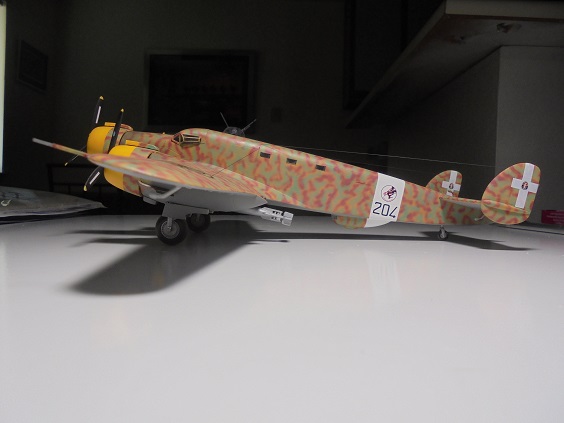
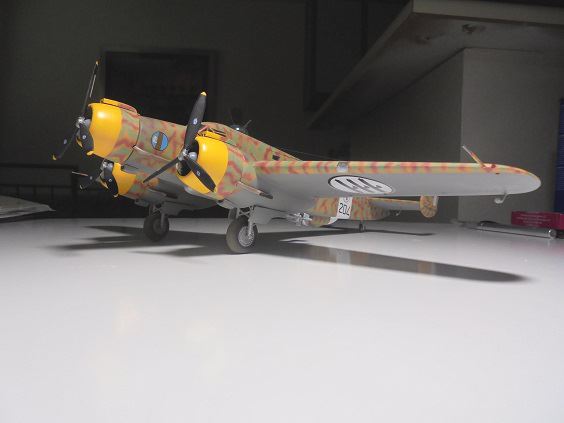
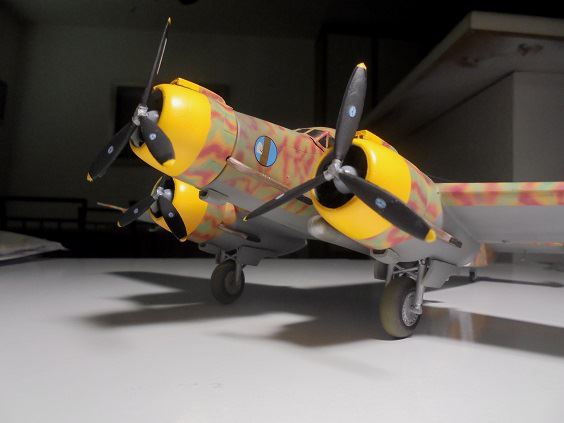
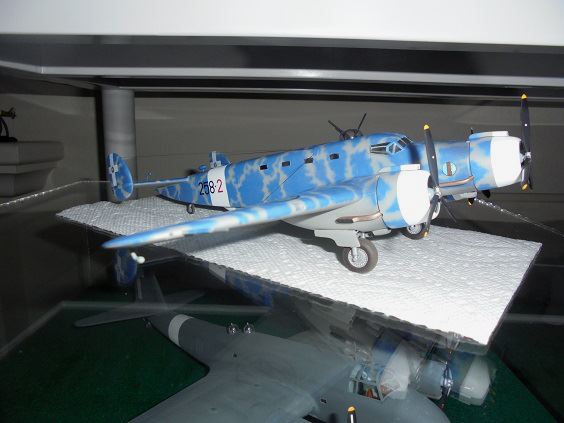
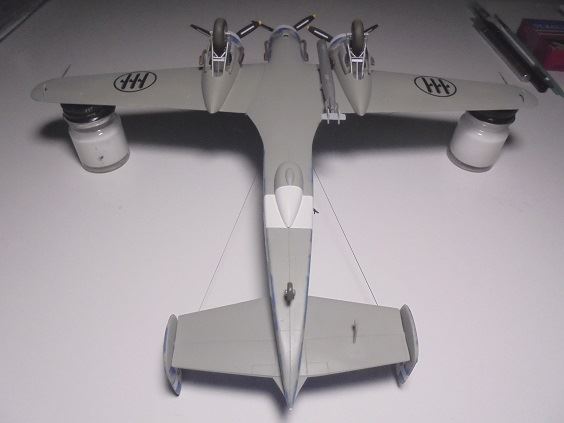
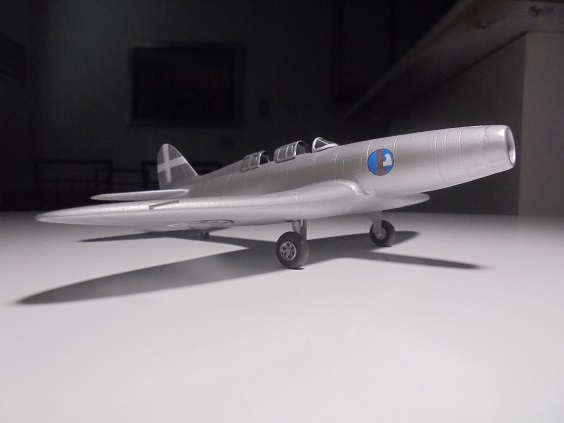
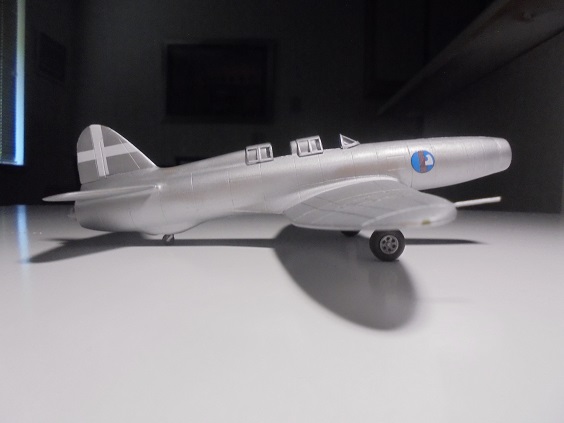
The prototype & 34 first production
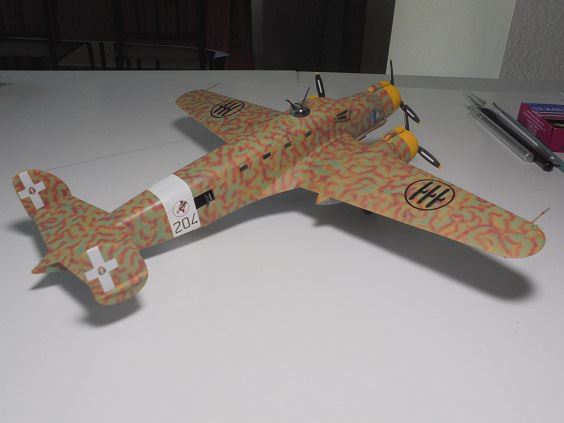
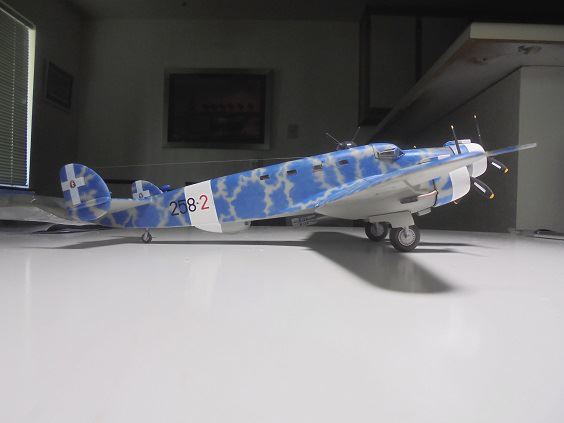
Cantieri Aeronautici e Navali Triestini (CANT) Z.1007 Alcione (Kingfisher) three-engined medium bombers were powered by 825hp 12-cylinder upright-V
Isotta Fraschini Asso XI RC.40 engines, assigned to flying units before Italy's entrance into WWII owing to engine unreliability & high maintenance requirements well as inadequate defensive armament none were flown operationally most subsequently being employed as bomber flight crew trainers.
The
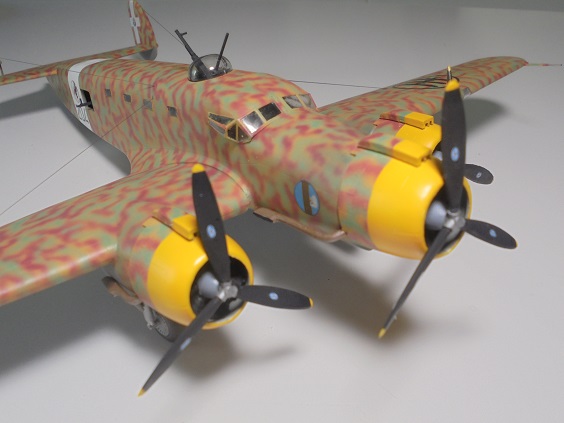
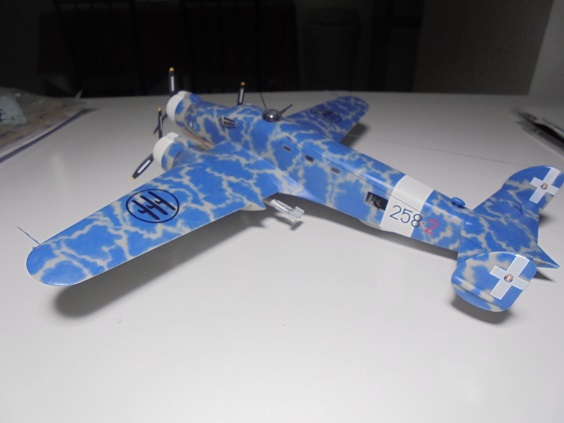
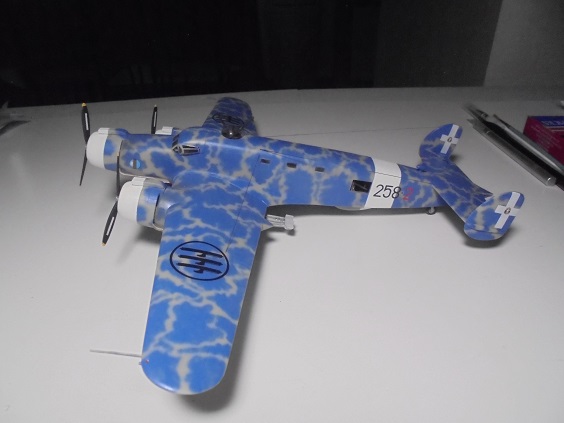
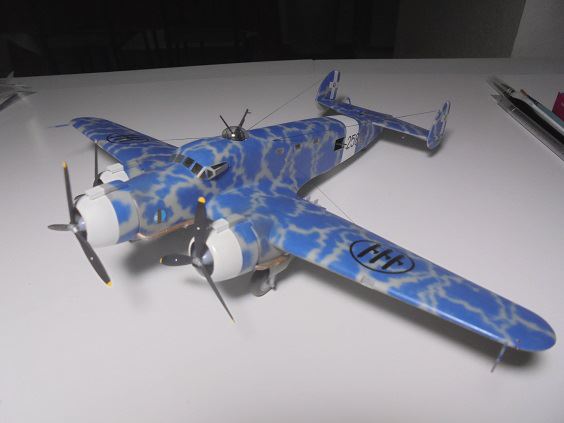
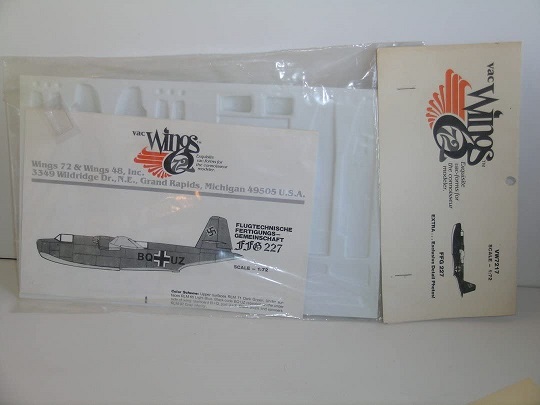
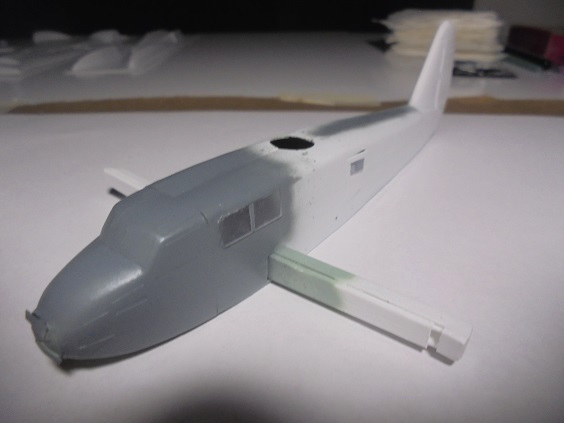
BroPlan MS-97 is the only scale model kit of the CANT Z.1007 Asso variant, my first vacuform build attempt since the Vac Wings 72 Flugtechnische Fertigungs Gemeinshaft 227 (Czech Flugtechnische Fertigungsgemeinschaft Prag actually built it), quarter scale Blohm und Voss 238 research aircraft in 1982:
 August 22, 2020
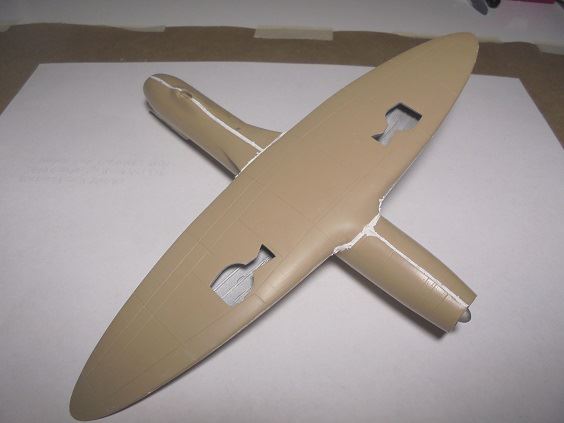
- > Fuselage halve forms cut-separated from molding sheets; thin & supple vacuforms easily separable unlike late 1970s-vintage thick & hard Vac Wings 72 FFG-227 kit ones.
- > Extensive knife-trimming, filing & edge-sanding necessary, more later prior to glue-joining halves.
- > Molded-in fuselage halve cockpit greenhouse areas cut out, will be replaced with a kit-provided single-piece clear vacuform plastic one.
- > Fuselage halve ventral & dorsal gun mount spaces cut out; minor edge cracking whilst cutting out dorsal mount spaces, glue-patched over with cut styrene plastic sheet pieces, form-sanding edges tomorrow.
- > Fuselage halve portal windows drilled out, square ones cut out & edge filed.
August 23, 2020
- > Fuselage halve, dorsal & ventral gun mount edges smooth-sanded, some putty filling necessary.
- > Alignment tabs cut from styrene sheet plastic, glued in place inside port fuselage halve edges, halve join test fits made, some tabs trimmed, more working on later.
- > Clear vacuform cockpit greenhouse cut-separated from molding sheet, general alignment test fits made,
much more working on later!
- > Fuselage engine exhaust stack holes drilled out, molding defects around port side stacks knife-trimmed off.
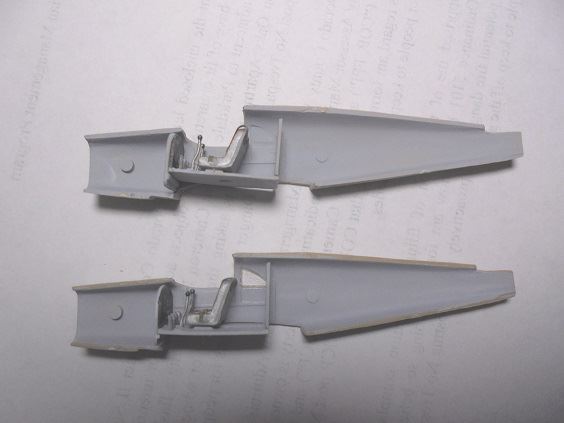
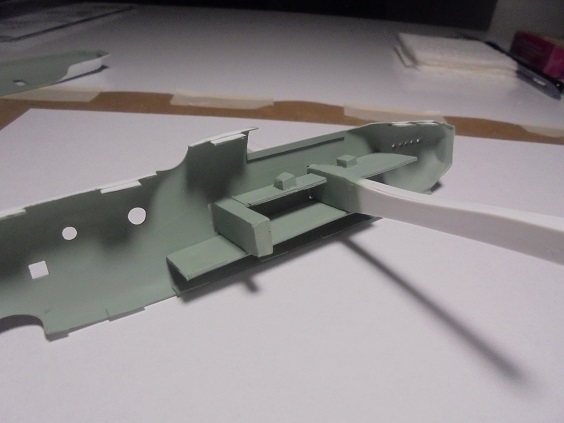
- > Fore & aft fuselage-mainwing structural support parts cut-separated from molding sheets & assembled, OK results.
- > Aft support assembly easy, fore support helluva bear

parts molding misalignments taking hours to correct,
absolutely must remember "lessons learned" for upcoming CANT Z.506C, Caproni Ca.316, Savoia-Marchetti SM.95 fuselage-mainwing structural support parts assembly work:
 August 24 & 25, 2020
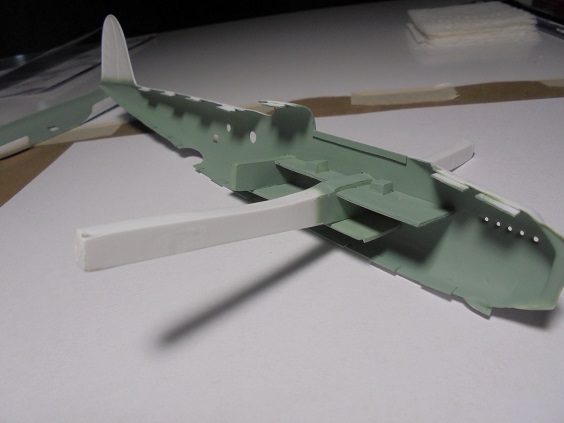
- > Fore & aft mainwing support assemblies glued in place inside port fuselage halve.
- > Fuselage halve cockpit canopy greenhouse alignment rails cut from styrene sheet plastic, glued in place.
- > Large rectangular traverse fuselage interior floor part cut-separated from molding sheet, knife-trimmed, glued-positioned underneath fore & aft mainwing support assemblies, rear portion extended aft of dorsal gun station.
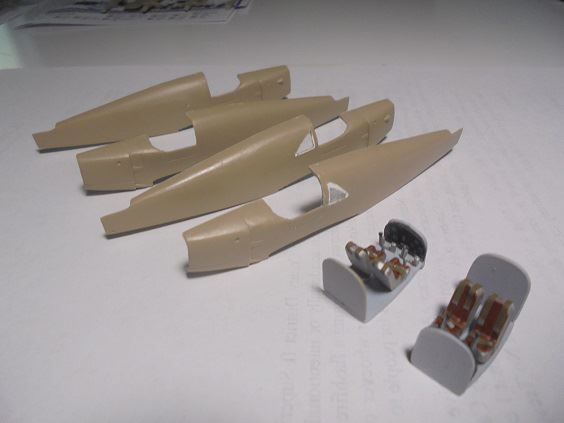
- > Pilot & co-pilot floor parts cut-separated from molding sheet, knife-trimmed, glued-positioned fore & aft mainwing support assemblies.
- > Fuselage halve interiors & glued in place parts spray painted Humbrol 78 Matt Cockpit Green + Testors Flat White 50/50 mix + 36% Flat White shading enamels replicating Verde Anticorrosione:
 August 26, 2020
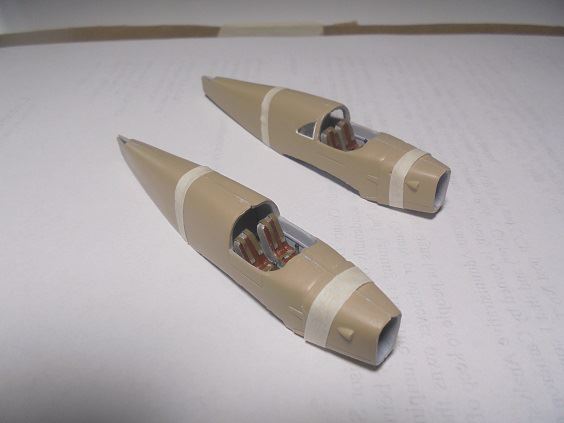
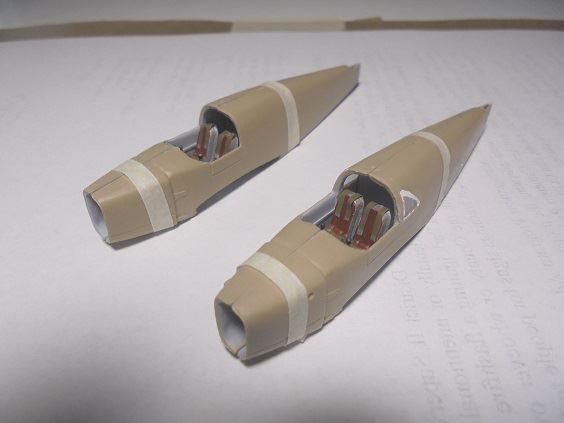
- > All fuselage halve windows glued in place, very good results

- > Kit provided clear windows scribed on vacuform plastic sheet way too thin

fabricated replacements cut & knife-shaped from thicker clear plastic sheets, remarkably little effort in doing so well as gluing them in place

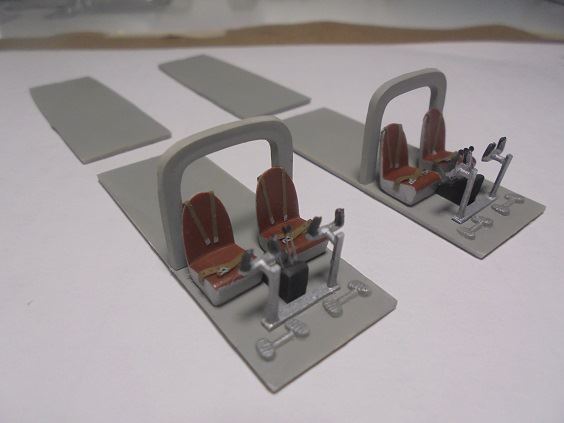
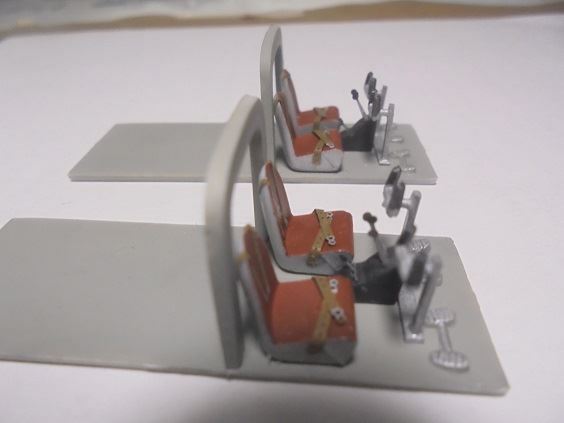
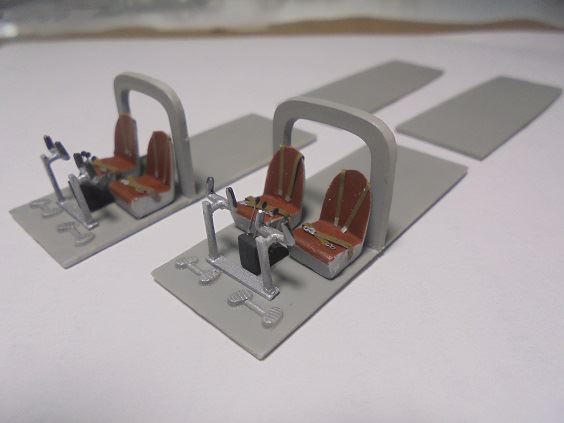
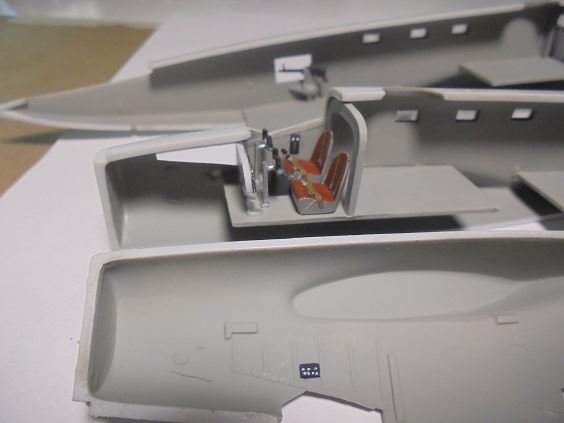
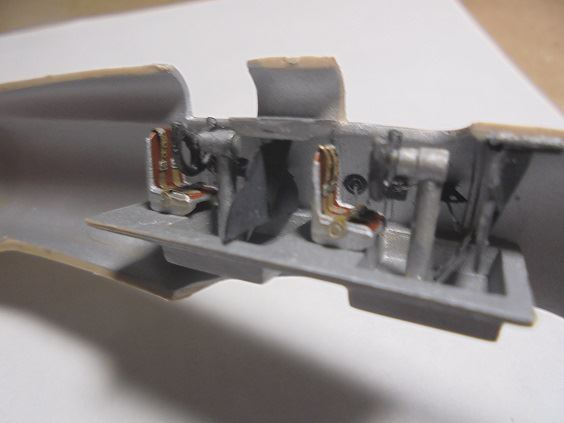
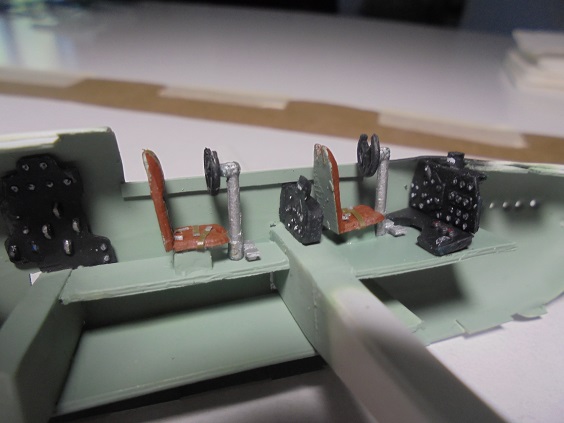
- > Strangely colored kit provided injected-plastic flight crew seats, control columns & instrument panels cut from sprues, prepped & glue-assembled ready for painting.
- > Flight crew seats base spray painted Testors Flat Rust Humbrol 78 Matt Cockpit Green + Testors Flat White 50/50 mix + 36% Flat White shading enamels replicating Verde Anticorrosione, set aside to dry till tomorrow.
- > Kit lacked crew torso & seat belts, sprayed Humbrol 29 Matt Dark Earth enamel over Scotch Magic Mending Tape, set aside to dry till tomorrow when will cut strips to fabricated belts from.
- > Assembled & single-piece instrument panel units spray painted Testors Flat Black & White "special mix", set aside to dry till tomorrow.
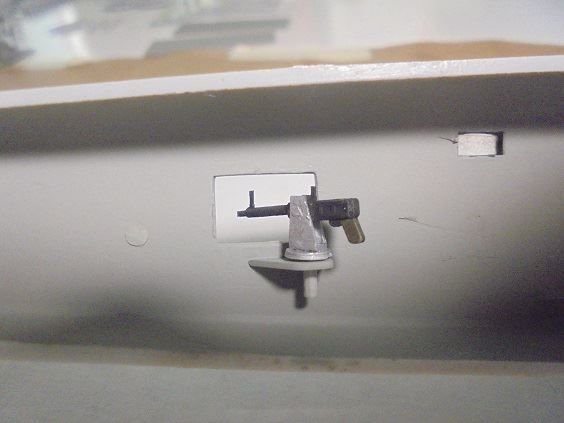
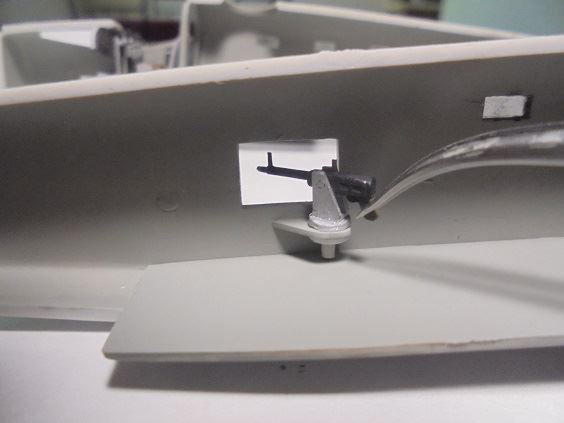
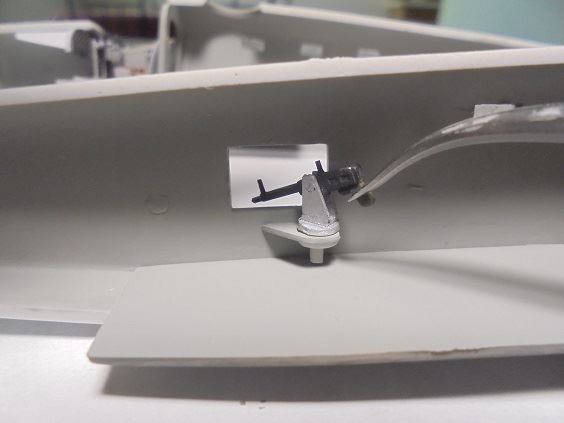
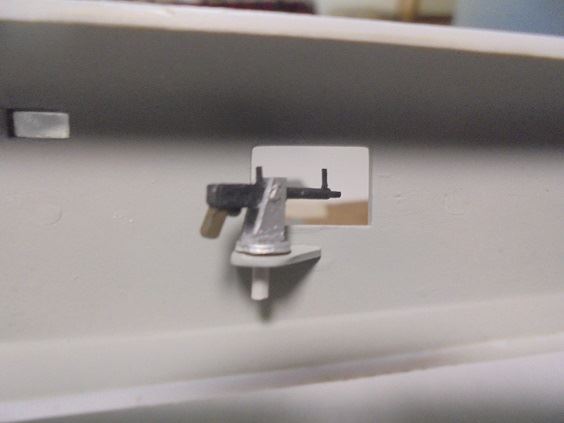
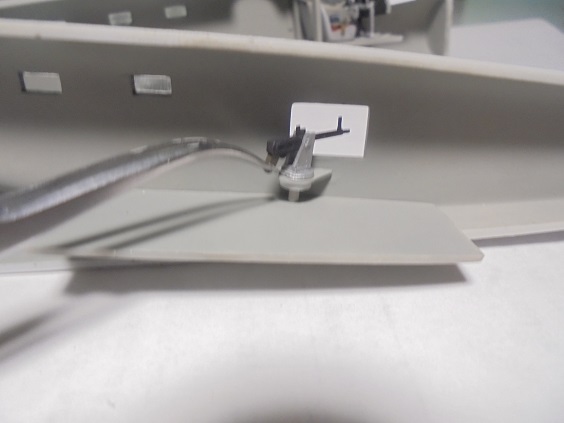
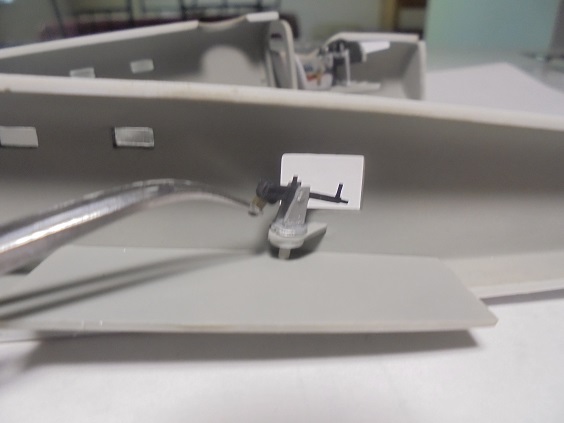
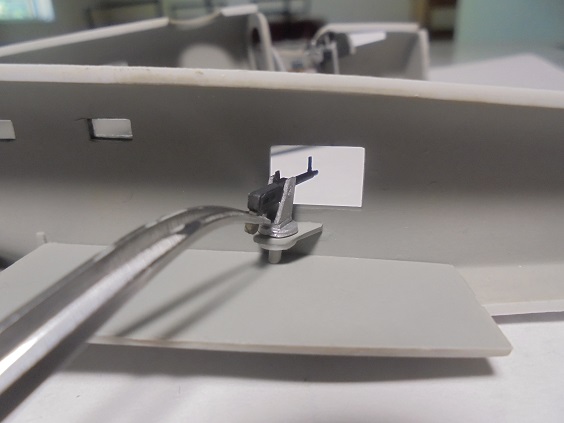
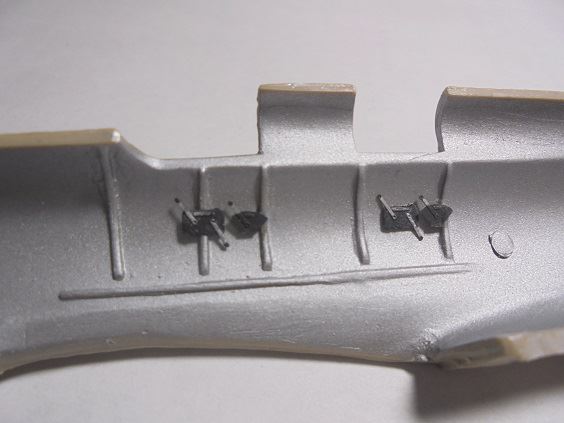
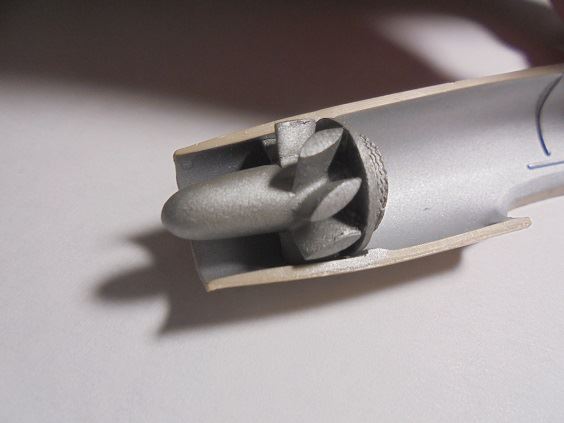
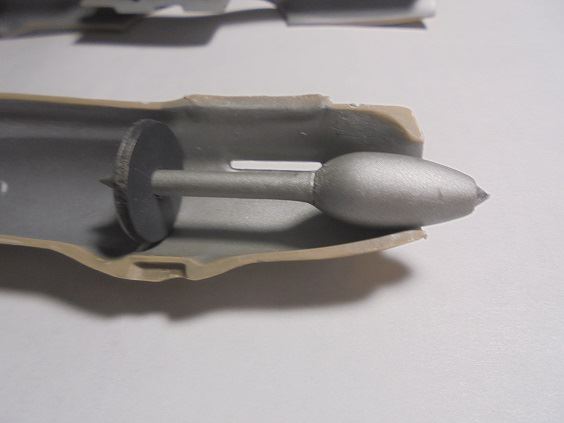
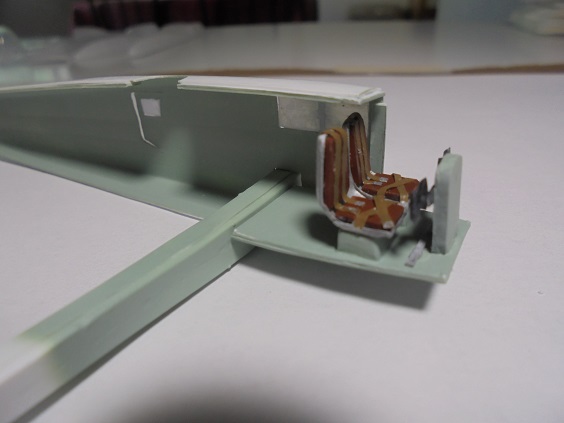
- > Kit provided fuselage dorsal gun base mount part cut-separated from molding sheet, filed & shape-sanded, sprayed Verde Anticorrosione, set aside to dry till tomorrow.
August 27, 2020
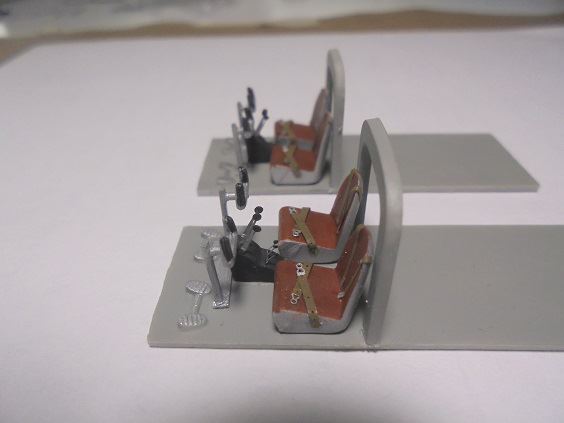
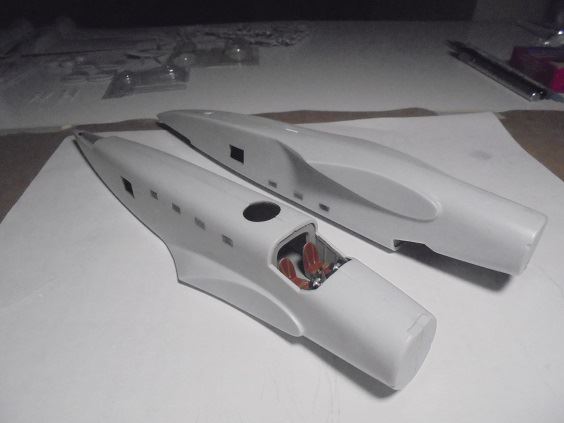
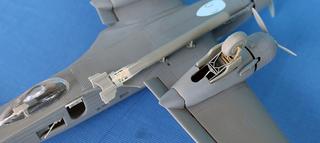
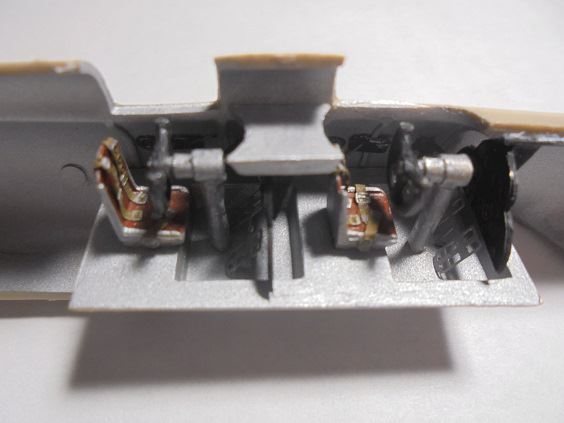
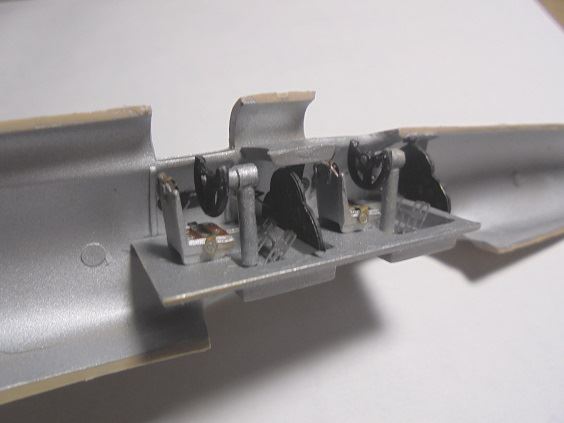
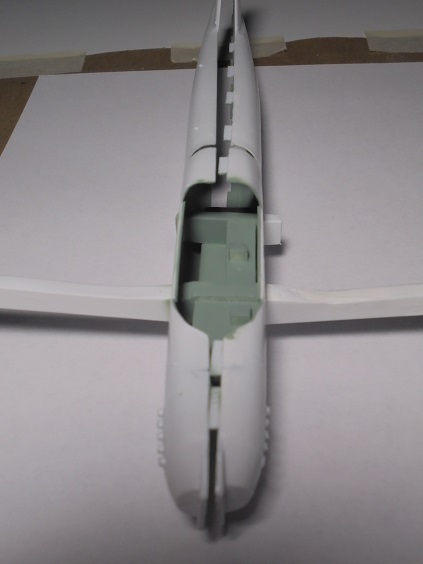
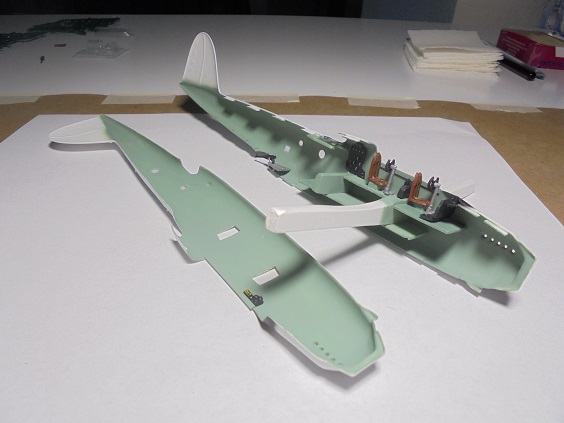
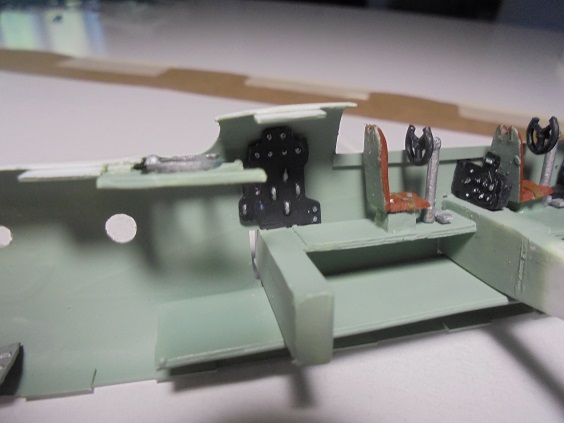
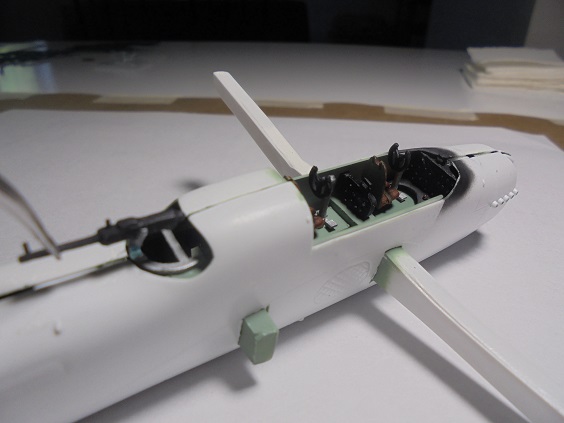
- > Fuselage interior detailing fully painted, assembled, glued in place, gratifying results
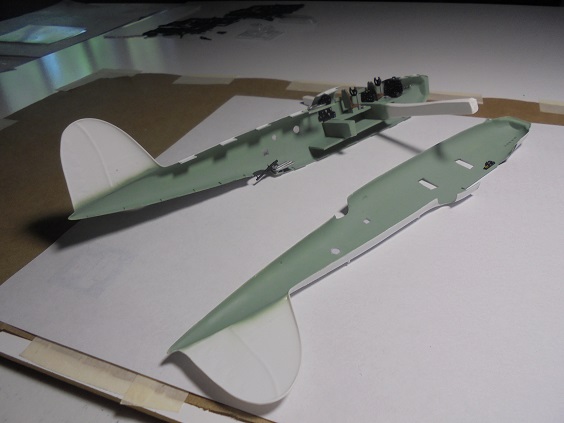
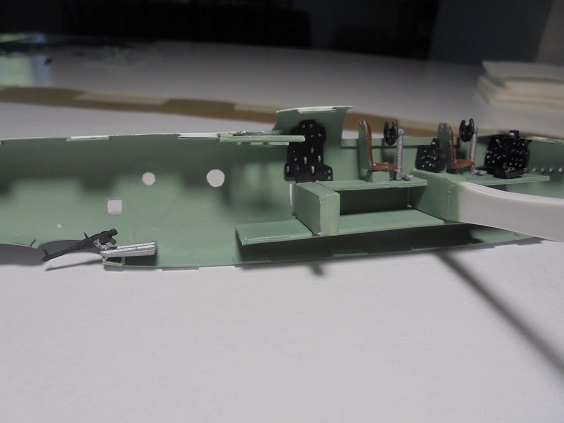
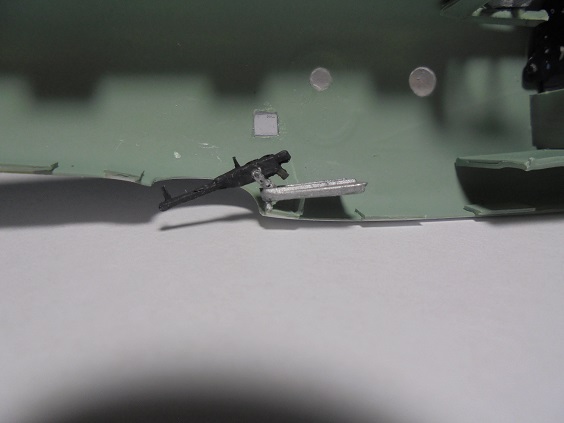
- > Fuselage ventral machine gun mount raised, tilted & aligned over cut styrene plastic risers angling gun barrel downwards:
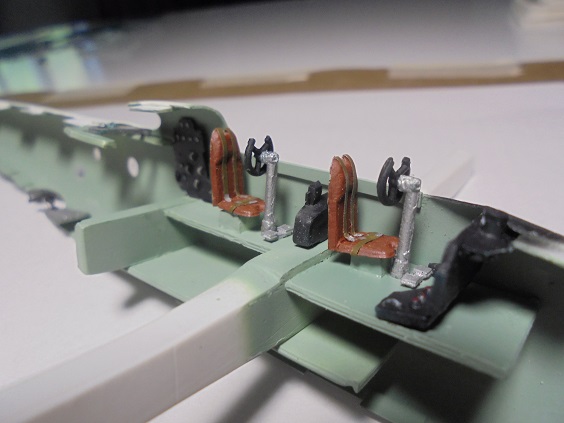
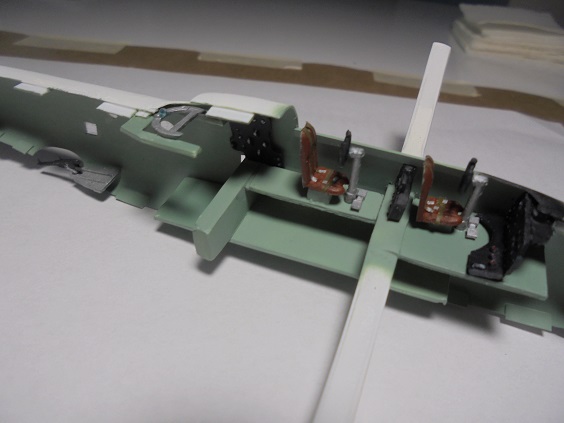
- > Fuselage halve test fits, no apparent need for adjusting any fuselage interior detail assemblies:
- > Shown fuselage ventral machine gun glued in place, not able to do so after fuselage halves are joined:
- > Shown fuselage dorsal machine gun to be glued in place later:
 August 28, 2020
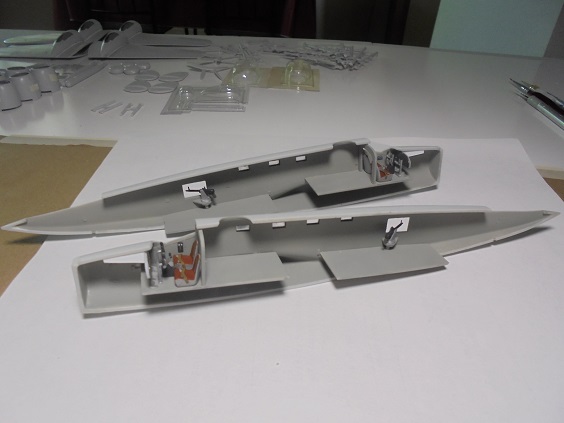
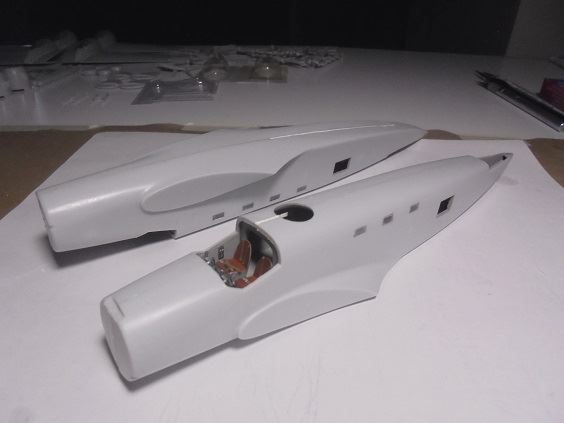
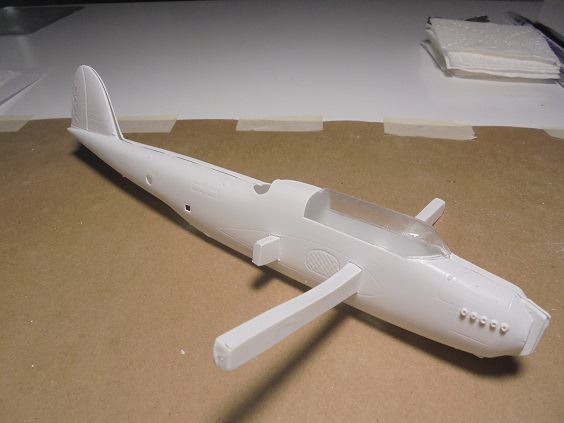
- > Fuselage halves glued together, tricky work, OK results.
- > Aft dorsal join kept popping loose
judiciusly applying liquid styrene glue coaxed it to say iin place

- > All join seam puttied over, pray none will pop open smooth-sanding them over tomorrow

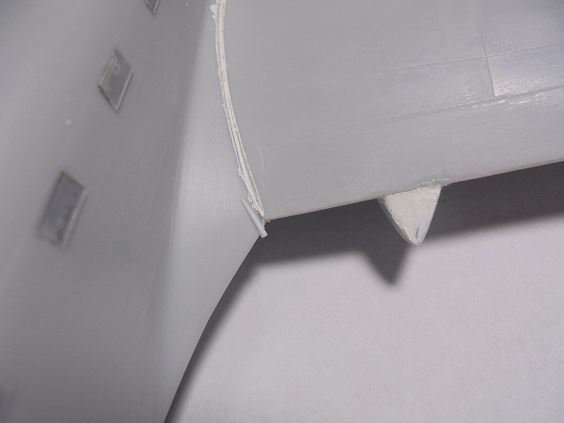
- > Upper starboard fuselage hallve rudder sail leading edge shorter than port's due to flawed molding
extensive puttying necessary building it up, shape-sanding all rudder sail edges tomorrow.
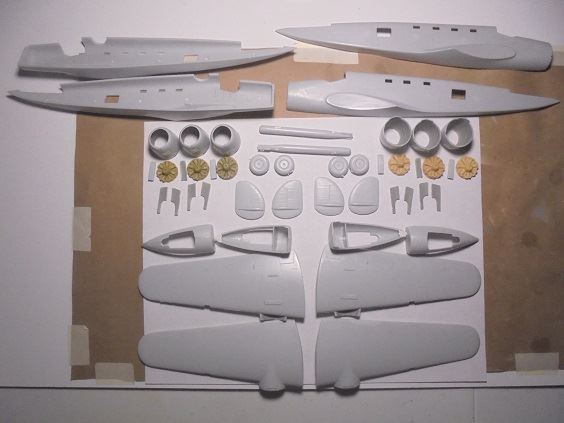
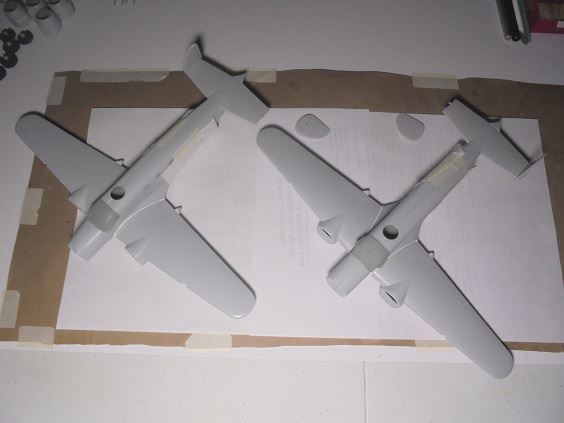
- > Mainwings & tailplane vacufrom parts cut-separated from molding sheets, getlting back to them later.
August 29, 2020
- > All fuselage halve join seams sand-finished, all day spent working on them

OK results.
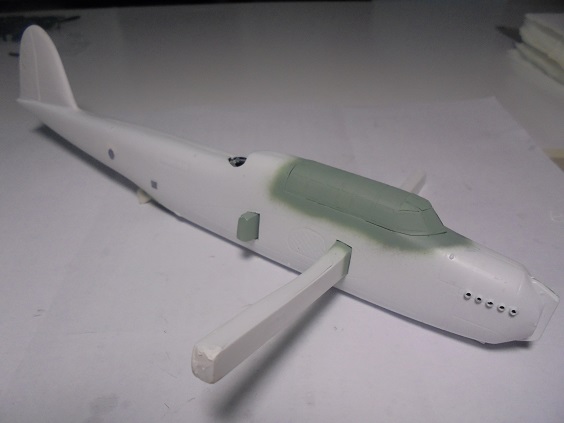
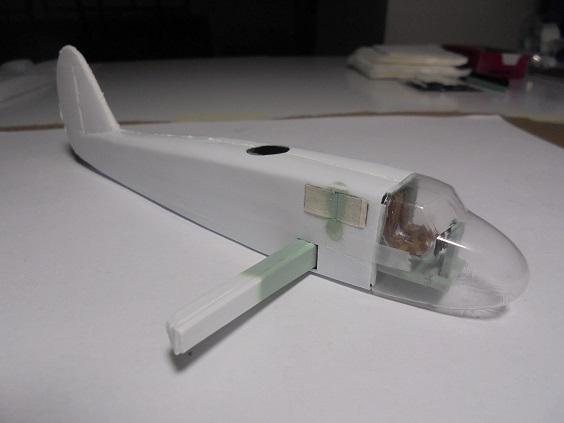
- > Clear vacuform cockpit canopy greenhouse part shape-sanded, test fits good, window pane masking tomorrow.
August 30, 2020
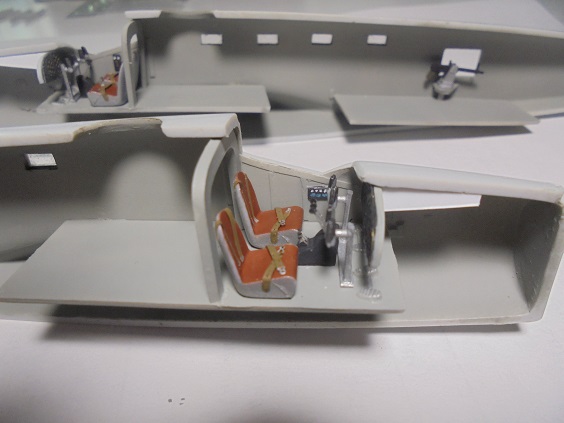
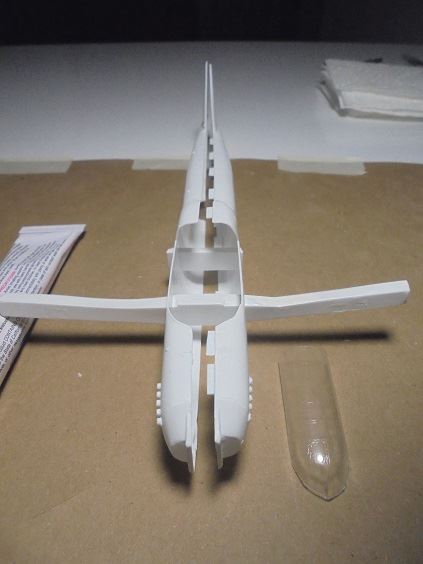
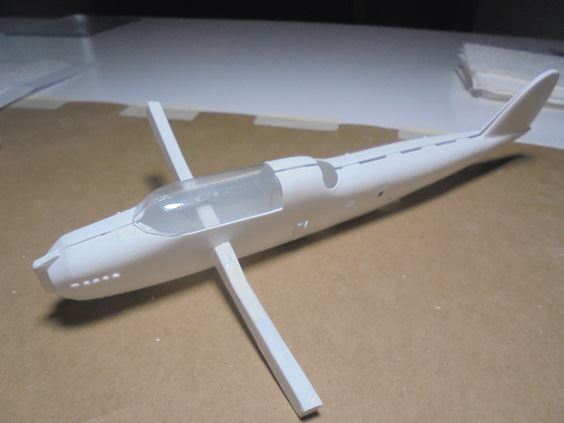
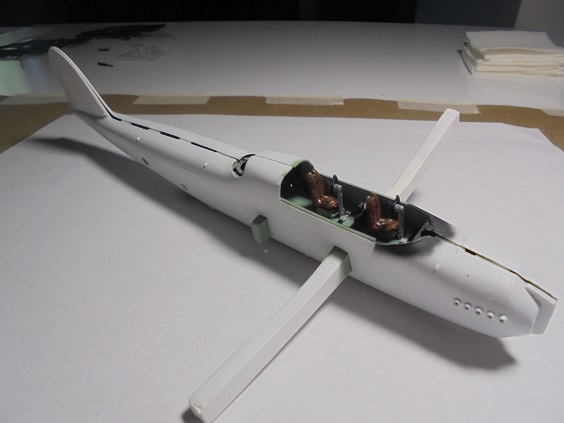
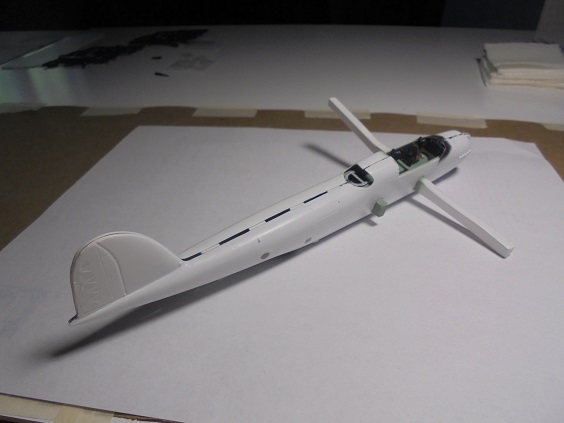
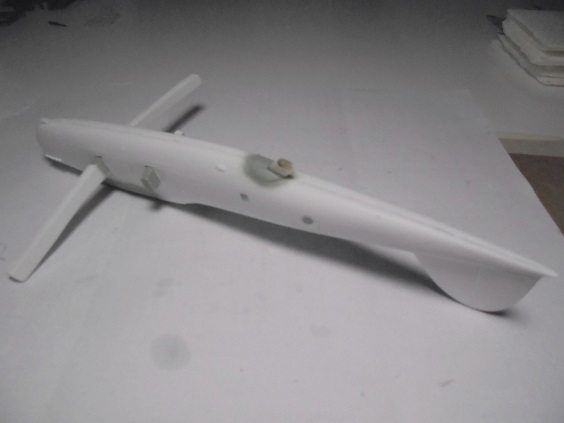
- > Fuselage constuction complete, acceptable results

- > Cockpit greenhouse sand-trimed, glued in place, window panes masked for spray painted.
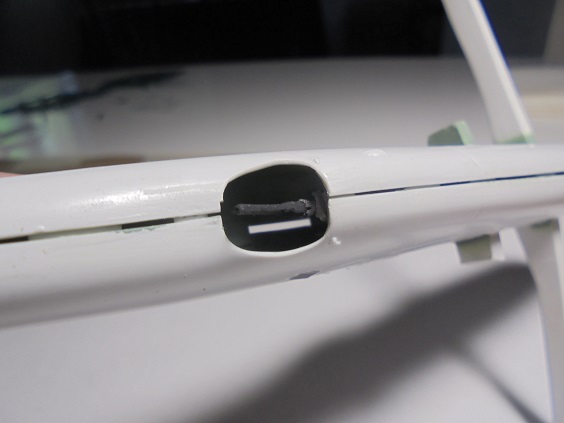
- > Clear vacuform ventral gun station window part cut-separated, starboard side split whilst cutting out gun port area
trimmed & glued back in place, visible glue scar partially conceled when masking for spray painting.
- > Window part glued in place over ventral gun station cavity; cut clear styrene plastic tabs glued on edges positioned the part.
- > Very rough window part glue seam gingerly though successfully putty filled, knife-shaped & sanded, masked for spray painting.
- > Masked parts spray painted Humbrol 78 Matt Cockpit Green + Testors Flat White 50/50 mix + 36% Flat White shading enamels replicating Verde Anticorrosione:
 August 31, 2020
- > Fuselage rudder base painted Testors Flat White, set aside to paint other Italian tri colors later.
- > All mainwing halves knife & filed-trimed well as edge sanded, tedious work
- > Inlet holes for leading mainwing edge oil radiators filed out.
- > Kit lacked oil radiator parts, generic ones fabricated from cut styrene sheet plastic, glued in place inside lower mainwing halves.
- > Areas surrounding oil radiators spray painted Humbrol 78 Matt Cockpit Green + Testors Flat White 50/50 mix + 36% Flat White shading enamels replicating Verde Anticorrosione.
- > Oil radiators spray painted Testors Brass enamel.
- > Cut styrene plastic retaining tabs glued in place inside upper port side mainwing halves, necessary fo aligning, retaining, gluding mainwing wing halves together, tedious work
- > Test fits OK though after considerable shape-filing work, applying experience whilst assembling starboard mainwing halves
- > Port side mainwings halves glued together in stages, delicate well as tedious work
applying experience whilst assembling starboard mainwing halves
- > Mainwing assembly glue seams puttied, sand-finishing them later.
September 1, 2020
- > Fuselage rudder masked-off, spray painted Testors Flat Green & Model Master Insignia Red enamel Italian tri colors, good results.
- > Starboard side mainwings halves glued together in stages, delicate though not as so tedious work
- > Mainwing assembly glue seams puttied, sand-finishing them later.
- > All tailplane vacuform part edges knife-trimmed, filed, sanded, test fitted, sets glued together, retaining tabs weren't necessary.
- > Tailplane assembly glue seams puttied, sand-finishing them later.
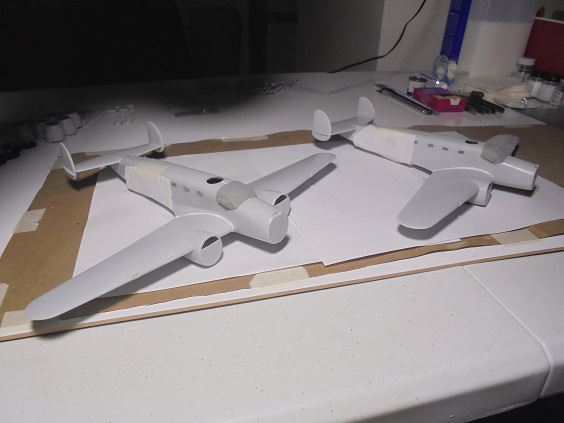
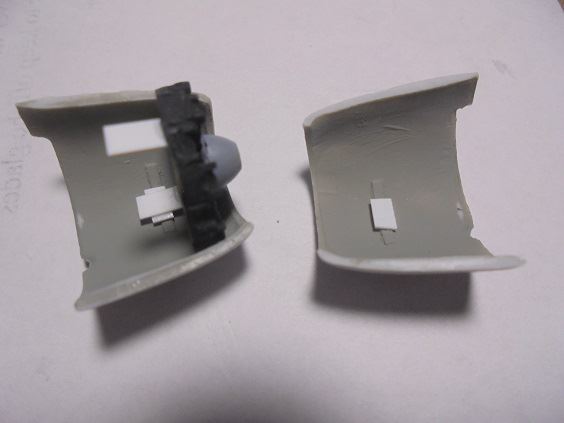
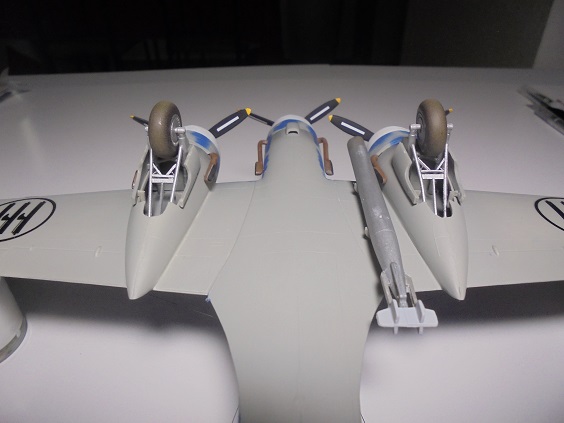
- > Vacuform mainwing engine / landing gear nacelle parts knife-trimmed, exhaust stack holes drilled out.
- > Landing gear covers cut out of nacelle parts, edges knife-trimmed, filed & sanded; kit-provided covers too large, nacelle ones used instead.
- > All engine cowling parts knife-trimmed, exhaust stack holes drilled out.
- > More nacelle & cowling knife-trimming, filing & sanding later.
September 2, 2020
- > Puttied tailplane assembly seams sand-finished, more work than anticipated
good results.
- > Tailplane but- ends joining fuselage rudder sail knife-shaped & sanded, tailplanes positioned & glued on rudder sail, some seam puttying & over-sanding nessary, good results.
- > All puttied mainwing edges sand-finished, some seam puttying & over-sanding necessary, work about that had anticipated, good results.
- > Mainwing butt-ends joining fuselage will be knife-shaped, edge sanded & test fitted tomorrow, glue-joining them later.
September 3, 2020
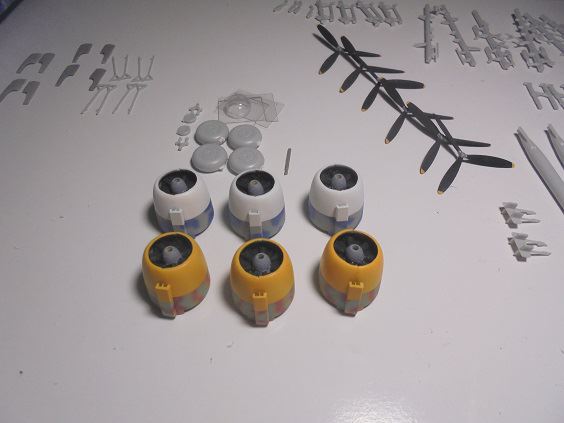
- > All engine cowling parts filed, sanded, glued together, no retaining & positioning tabs necessary, OK results, glue join puttying, more aft area trimming & sanding work later.
- > All engine / landing gear nacelle parts glued together, cut styrene plastic retaining & positioning tabs well as seam puttying necessary.
- > Additional starboard nacelle knife-cut shaping necessary around aft landing gear welll edges, didn't anticipate that

- > All puttied over engine / landing gear nacelle glue joins shaped & finish-sanded, interiors spray painted Humbrol 78 Matt Cockpit Green + Testors Flat White 50/50 mix + 36% Flat White shading enamels replicating Verde Anticorrosione, good results
- > Starboard mainwing leading edge underneath nacelle area spray painted Verde Anticorrosione, starboard nacelle edges joining on starboard mainwing knife-trimmed & test fitted numerous times, glued on mainwing, OK results.
- > Nacelle-mainwing glue joins puttied over, sand-finishing them tomorrow.
September 4, 2020
- > Kit lacked mainwing navigation lights, holes driled on wing leading edges, light parts fabricated from eliptical crossection spare resin part, glued them in place, good results.
- > Starboard engine / landing gear nacelle - starboard mainwing puttied over glue joins sand-finished, OK results.
- > Starboard mainwing butt-end joining fuselage sanded to sit closely as possiible over starboard fuselage, excellent test fits after several sanding passes
- > Starboard mainwing glued on starboard fuselage halve; tight fits all around, good dihedral alignmet
gratifying results
- > Port mainwing leading edge underneath nacelle area spray painted Verde Anticorrosione, port nacelle edges joining on starboard mainwing knife-trimmed & test fitted numerous times, glued on mainwing, OK results.
- > Port engine / landing gear nacelle - starboard mainwing puttied over glue joins sand-finished, OK results.
- > Nacelle-mainwing glue joins puttied over & sand-finished, OK results.
- > Upper port mainwing butt-end joining fuselage sanded to sit closely as possiible over port fuselage, good test fit after several sanding passes
- > Lower port mainwing butt-end joining fuselage & aft wing taper cut too short in places
- > Aft wing taper built up with puttied over cut styrene sheet plastic & shape sanded, OK results.
- > Port mainwing glued on port fuselage halve; tight upper fuselage-mainwing fits, OK dihedral alignmet, good results generally
- > Underneath mainwing-fuselage glue join gaps extensively putty-filled & sand-shaped, acceptable results.
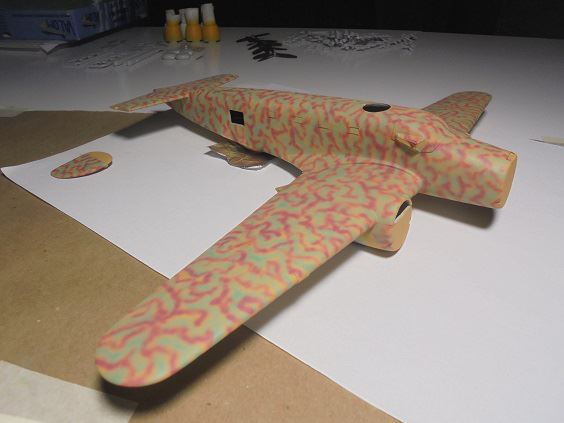
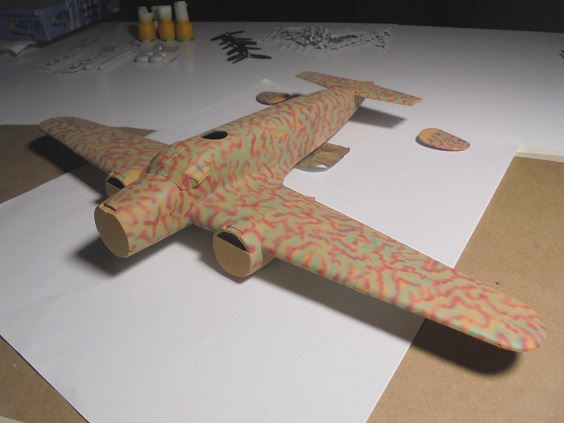
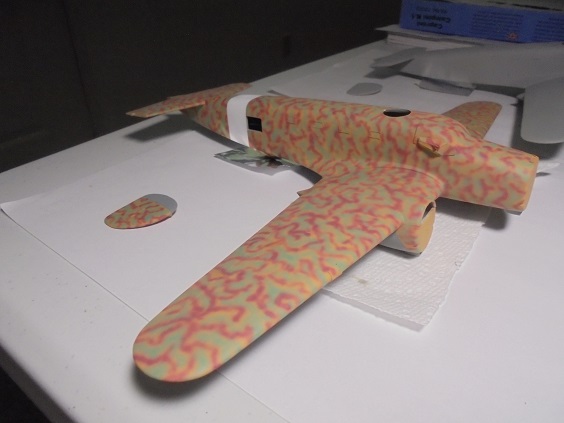
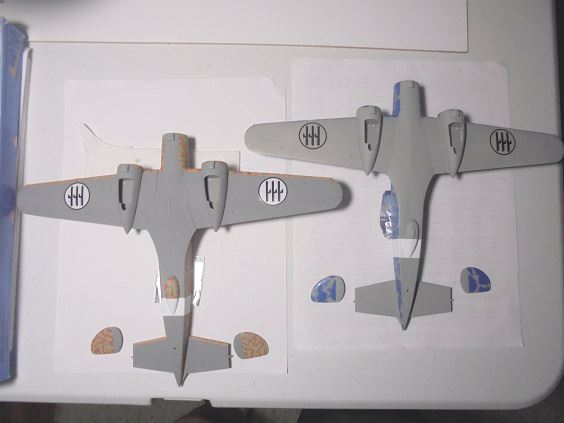
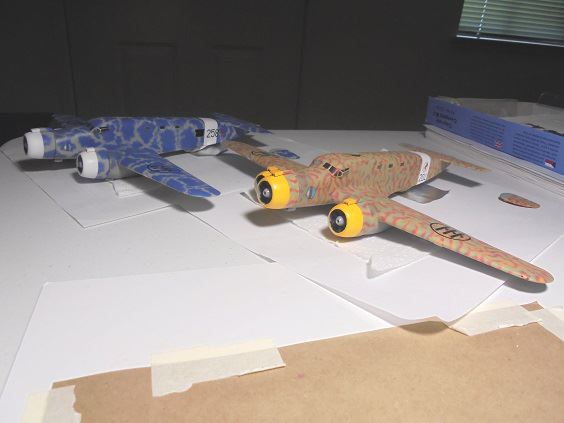
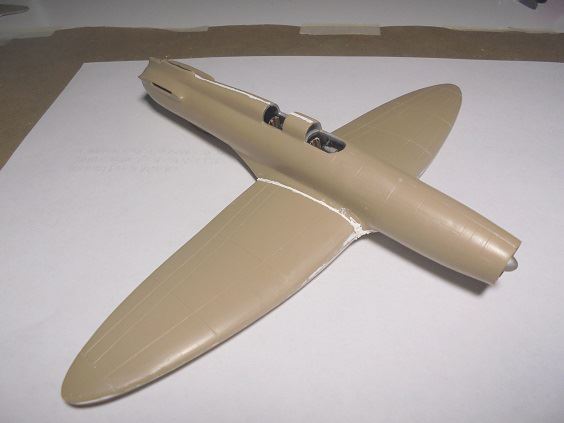
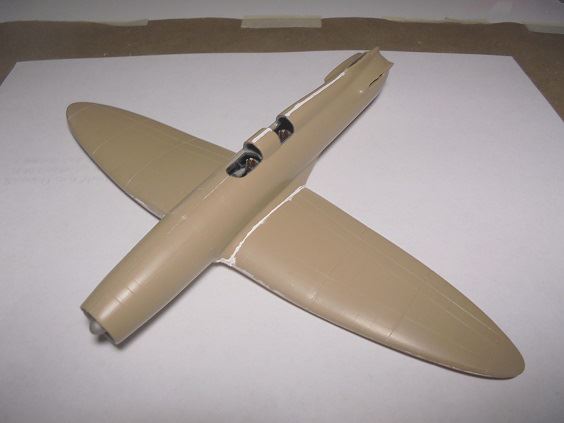
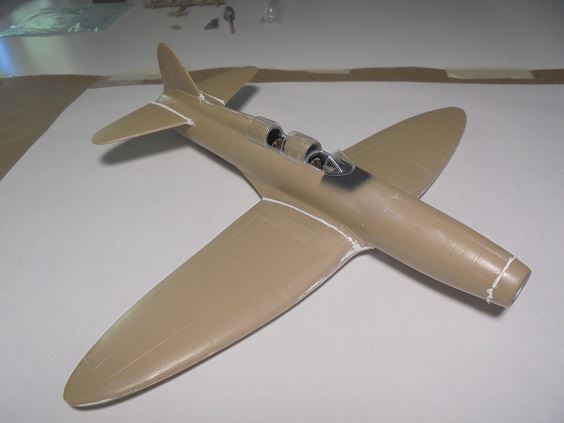
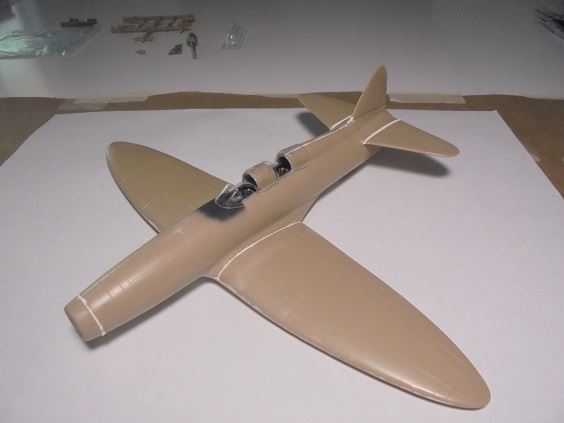
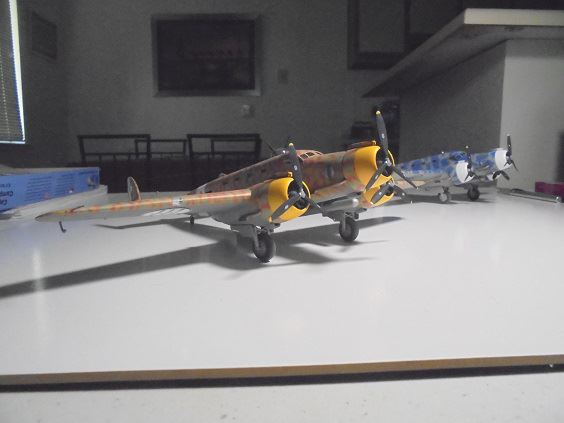
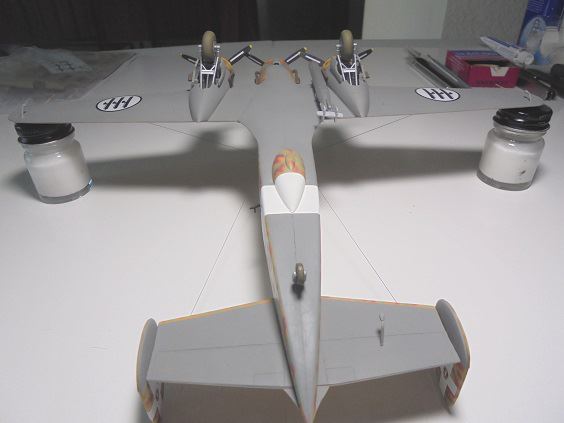
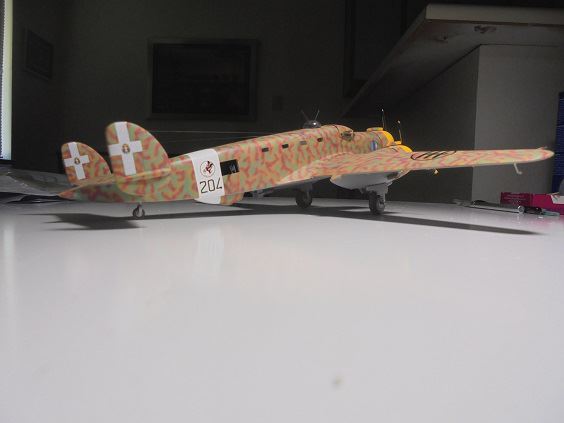
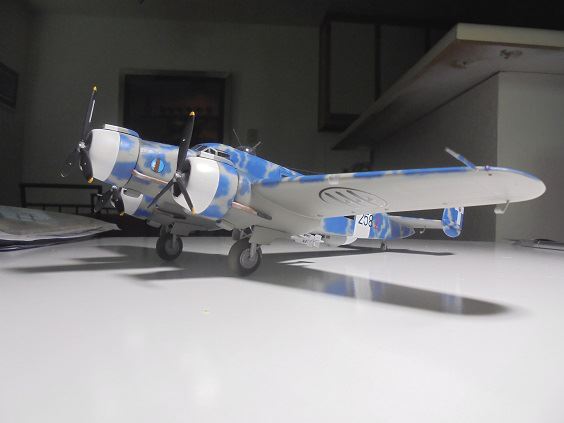
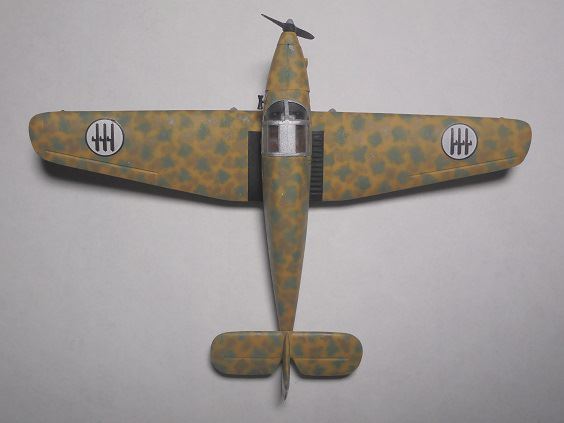
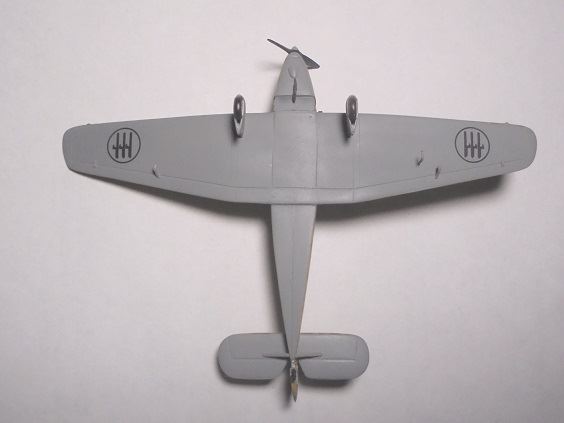
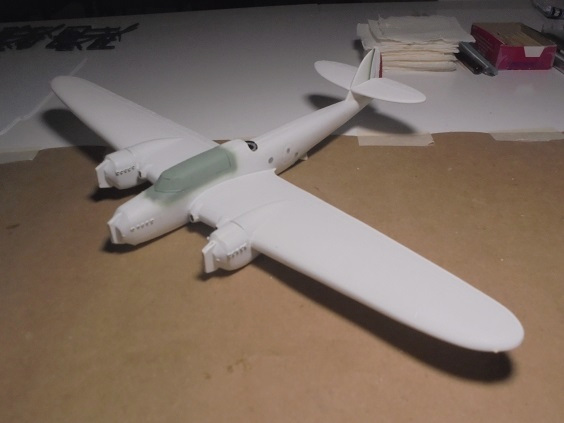
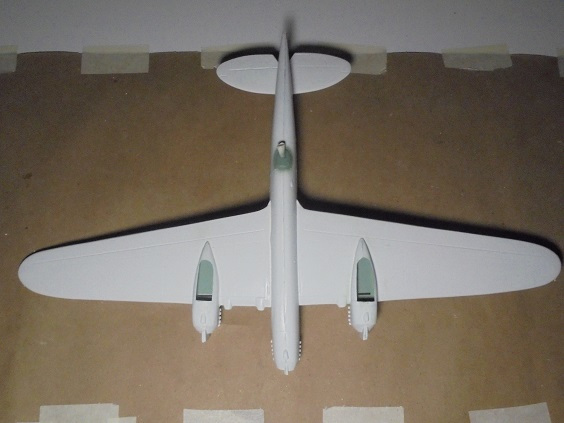
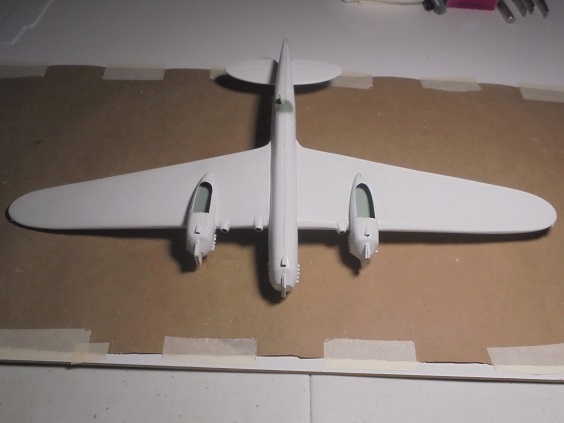
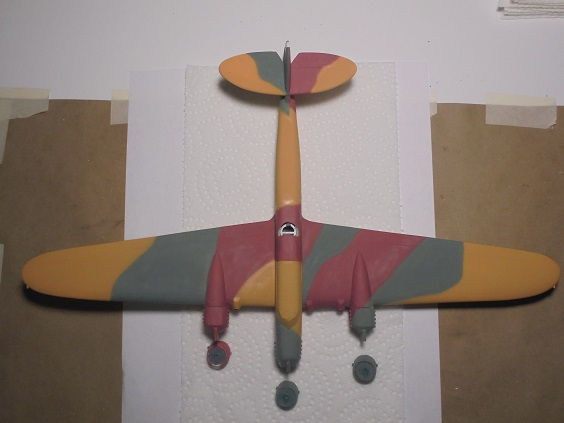
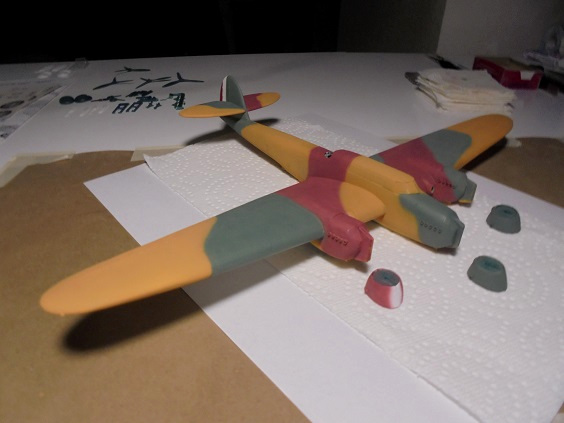
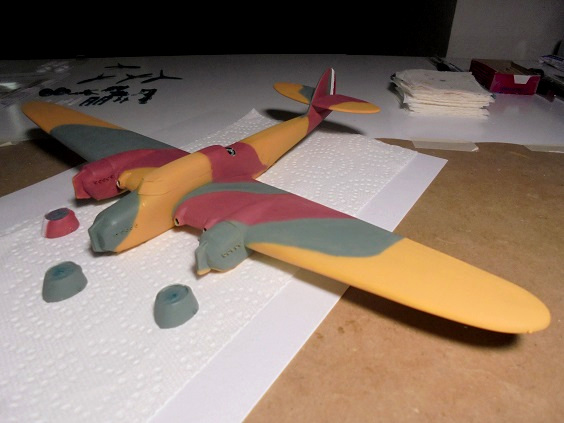
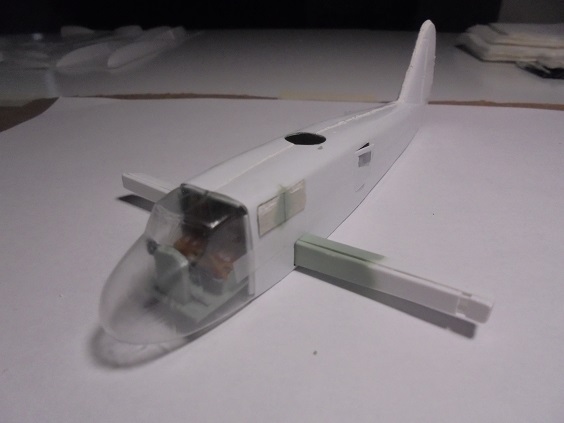
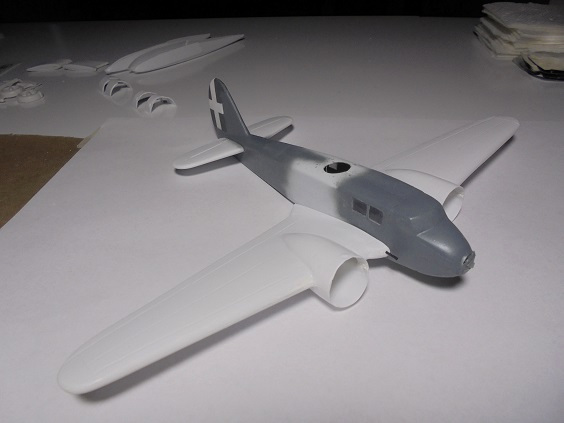
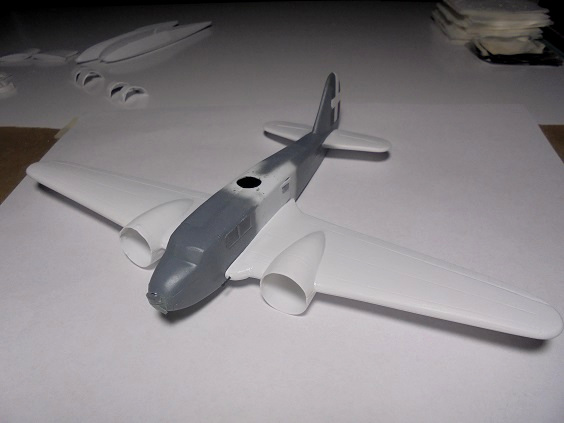
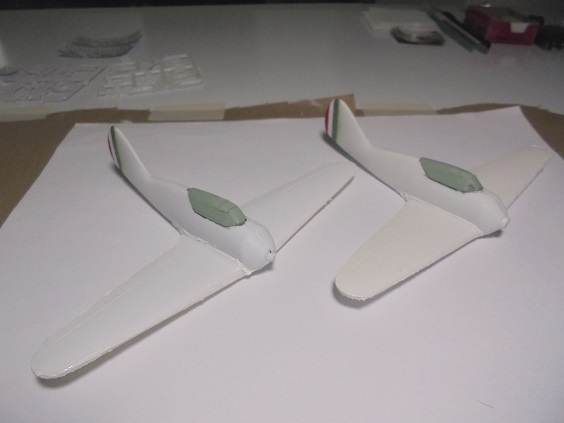
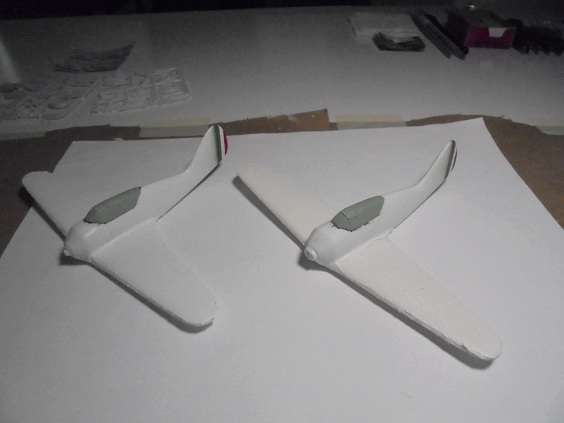
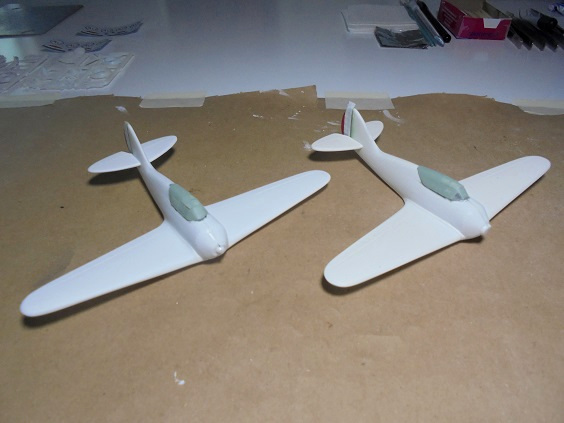
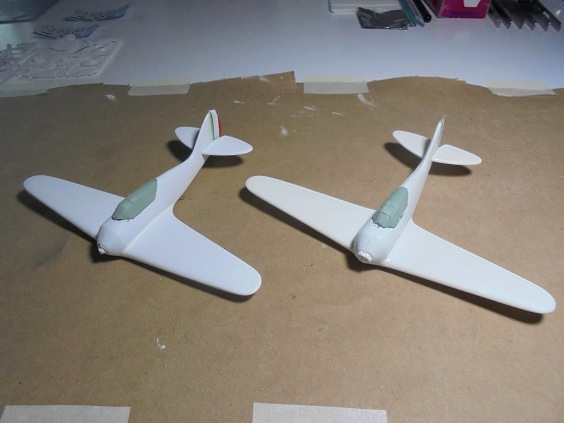
- > Largely assembled model now ready for spray painting:

 September 5, 2020
- > Space for fuselage tail landing gear mounting cut out, kit provided mount trimmed to fit inside hole, glued in place, some puttying & sand-shaping necessary, OK results.
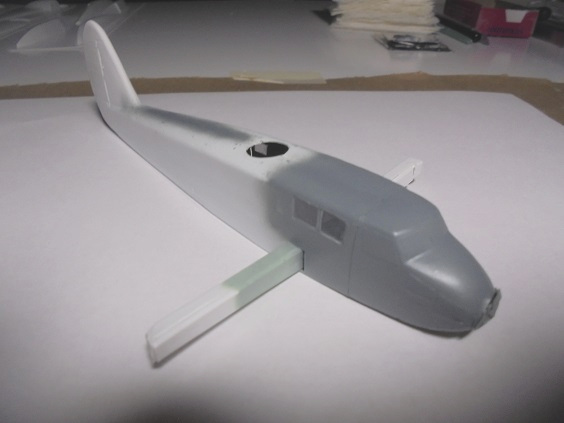
- > Largely assembled model uppersides, underneath mainwing & tailplane leading edges base spray painted Humbrol 63 Matt Sand + 10% Testors Flat Yellow + 36% Flat White shading replicating Giallo Mimetico 3.
September 6, 2020
- > Temperature record-setting

conditions made for
working today, all engine cowling assemblies finished nevertheless, OK results.
- > Some cowling joins broke loose while sand-finishing them
annoying having re-gluie, re-putty, re-sand seams
- > Kit injected-plastic engine radiator disc parts trimmed to fit inside cowling fronts, glued in place with cut sheet plastic stay wedges four to a disk.
- > Near all remining kit injected-plastic parts separted from sprues for later trimming & assembly work.
September 7, 2020
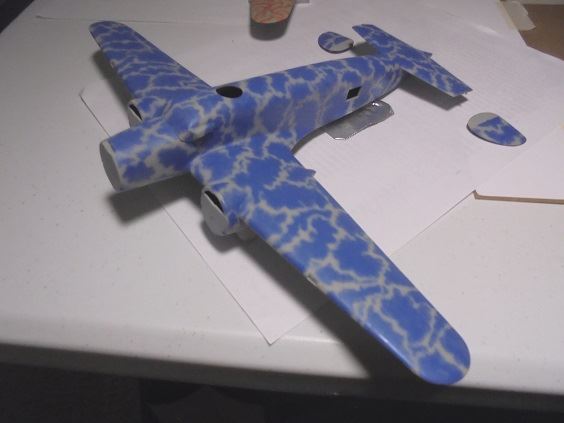
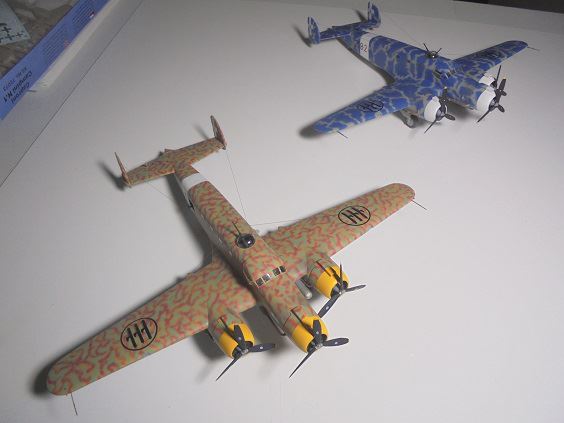
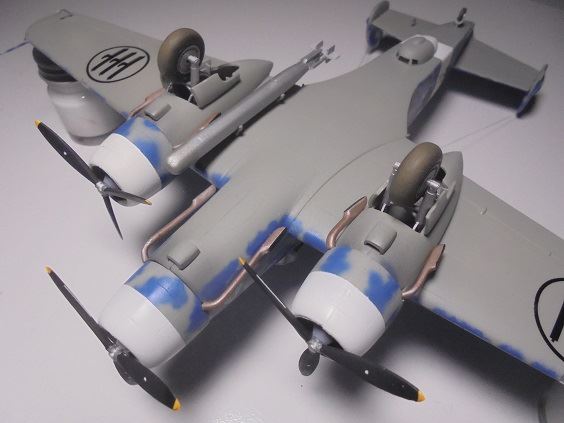
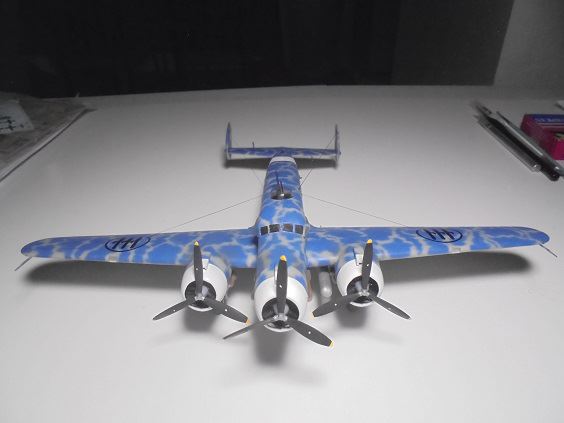
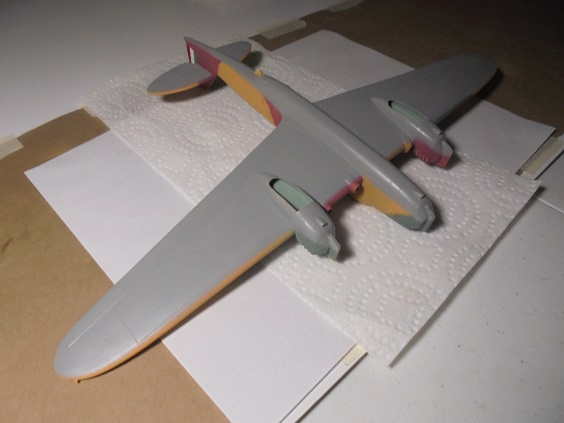
- > All model topsides & engine cowlings spray painted IPMS-Italy Humbrol 149 Matt Dark Green replicating Verde Mimetico 2, Testors Model Master 2009 British Crimson + Humbrol 118 Matt US Tan 80/20 mix replicating Marrone Mimetico 2 + 36% each by volume Testors Flat White shading enamels in CMPR/GAVS Schema A5 variant per kit painting instructions.
- > Soft-edged color separations per Internet research made for slow & tedious spraying work
satisfactory results nonetheless
 September 8, 2020
- > All model undersides spray painted IPMS-Italy Humbrol 140 Matt Gull Grey + 36% Testors Flat White shading enamels replicating Grigio Mimetico per kit painting instructions.
- > Soft-edged color separations per Internet research made for slow & tedious spraying work
OK results, some spot painting needed, doing that tomorrow:
 September 9, 2020
- > Spot spray & hand painting complete, longer & more tedious work than anticipated
OK results.
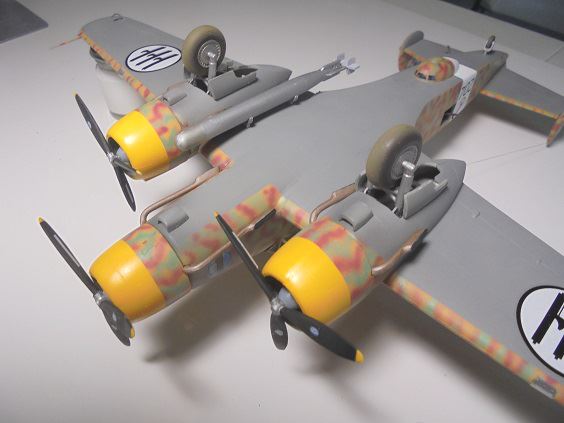
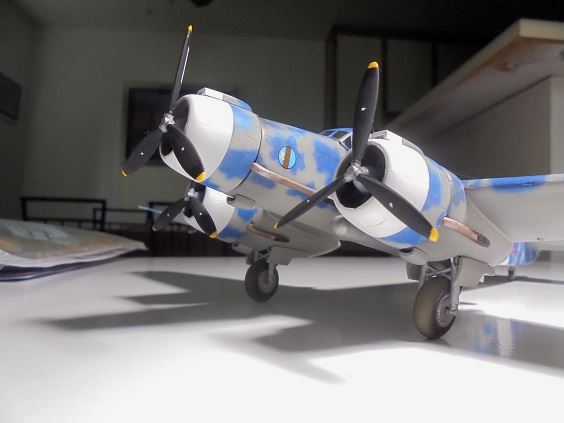
- > All engine cowlings spray & hand-painted appropriate mimetico colors, radiators spray & hand-painted Testors Brass & Flat Steel enamels, OK results.
- > All engine exhaust stack exteriors hand painted Testors Flat Rust & Steel spot mix, OK results, painting stack insides later.
- > All engines spray-weathered with Poly Scale Flat Black & White "special mix" acrylics replicating engine blow-by grime, OK results.
September 10, 2020
- > All engine cowling assemblies glued in place, cut styrene sheet plastic tabs used to hold them in place, OK results.
- > Circular engine exhaust interiors paintedTestors Flat Black & White "special mix" with dabbed circular toothpicks, OK results.
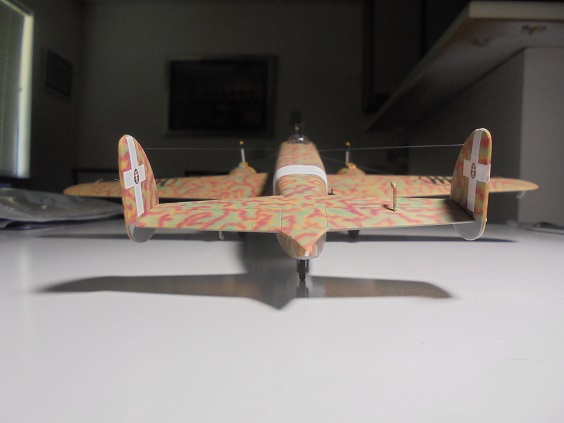
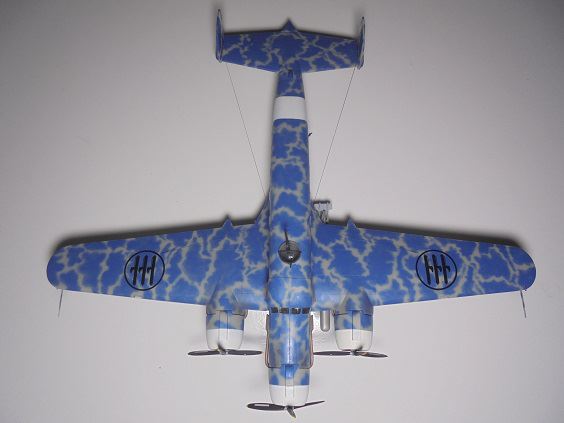
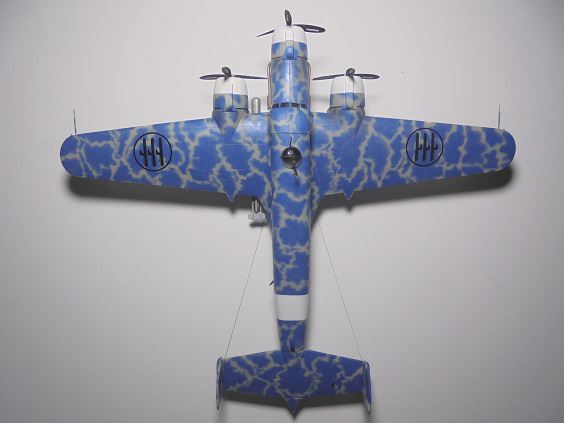
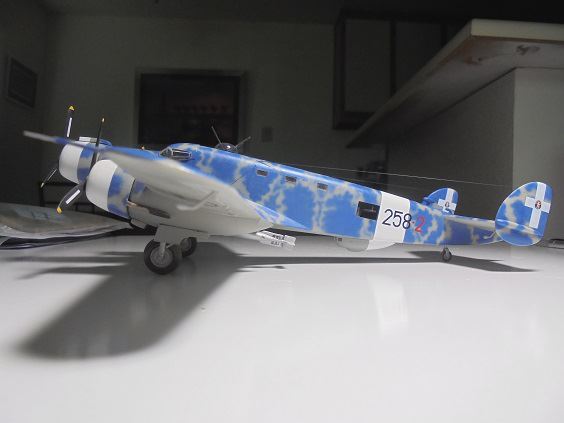
- > CANT Z.1007 Asso tailplanes per period photos apparently were stay-braced on rudder sail & fuselage only with cables in four locations unlike Z.1007bis' employing cables above & ridged trusses below tailplanes, not having thick EZ Line thread strung close-parallel cabling in four locations per period photos, OK results though
extremely tedious work
- > Fuselage tailwheel mount incorrectly placed on fuselage undersides
should had been
inside the fuselage
mounting it inside risked breaking it
and the tailwheel off whilst handling the model

mounting it externally negated that

- > Tailwheel mount masked-off, spray painted Testors Flat Black & White "special mix" creating the illusion of a fuselage tailwheel mounting hole

 9/11 2020
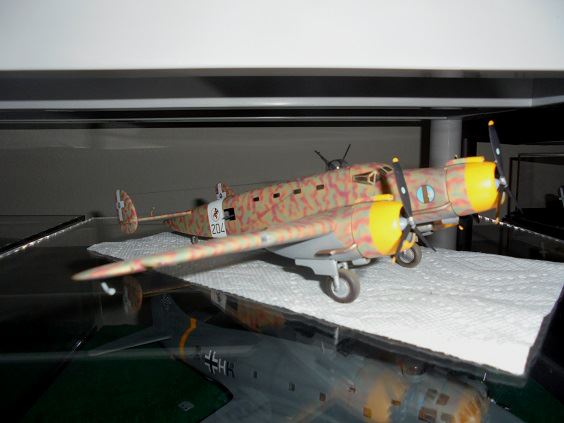
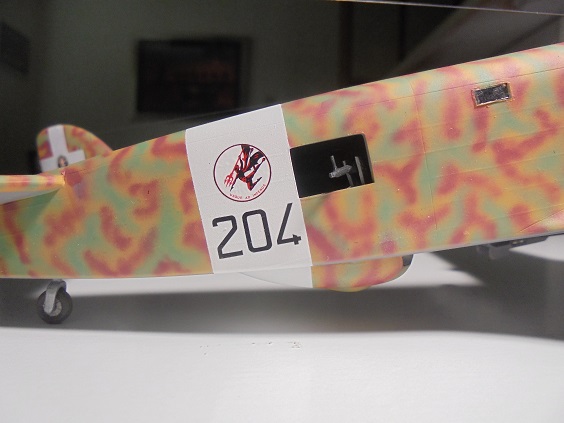
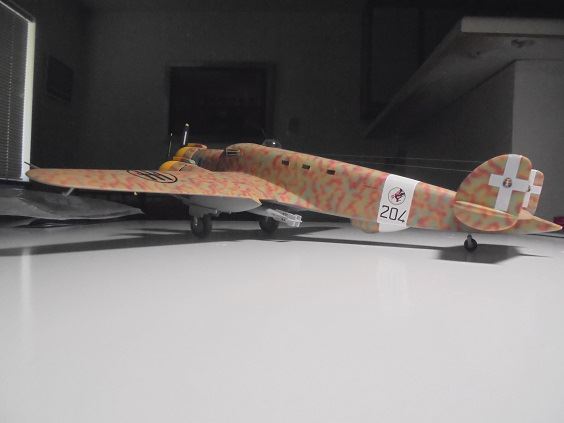
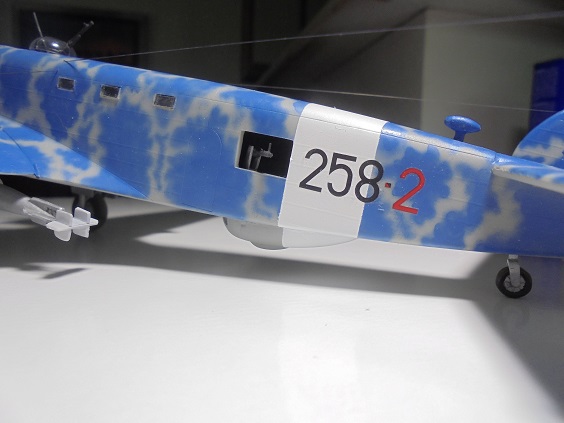
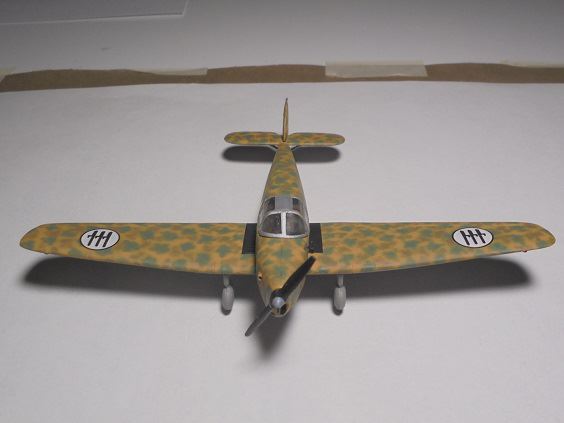
- > All decals afffixed on model, satisfying results
- > No kit decals sans the
CANT Z.1007 logos were usable, very poor print quality
most gingerly affixed one of two logo sets, high anxiety whole time whilst doing so

- > Spare SUPERMODEL CANT Z.1007bis flying unit decals employed to respresent a 210° Squadriglia aircraft affixed; carrier film age-yellowed

close knife-cutting around objects removed near all of it
- > Spare SUPERMODEL decortative fuselage fasci seen on Z.1007 & 1007bis aircraft affiixed forward of CANT Z.1007 logos.
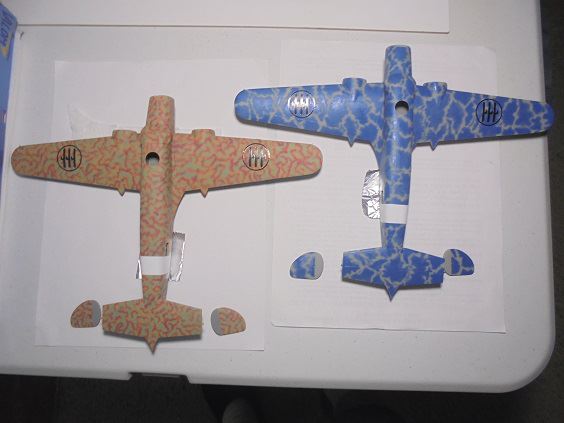
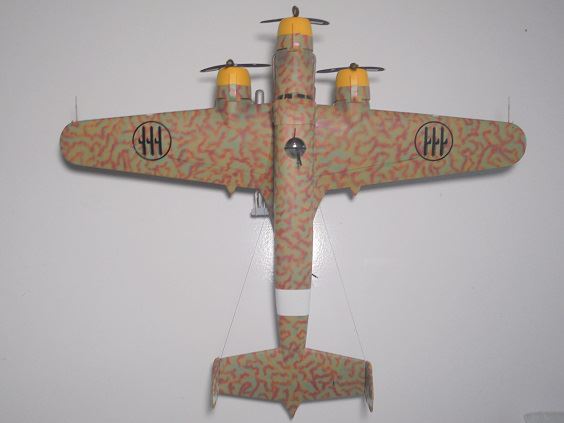
- > Large Tauro 72-554 mainwing tri-fasci decals roughly approximating those those seen on early CANT Z.1007s well as House of Savoy crests on rudder affixed.
- > Large 1/72 scale tri-fasci decals now hard to find, Tauro 72-554 sheet took them from was computer printed
not silkscreened presumably as a "cost savings" measure

- > All paint masking strips removed, clear areas machine oil-cleaned, cockpit canopy "greenhouse" touch-up painted, tedious work
good results nevertheless
- > Linted canopy greenhouse insides swabbed with trimmed Q-Tips via dorsal fuselage gun station, tricky work
good results.
- > All but one fuselage window insides swabbed with trimed toothpicks diped in machine oil via dorsal fuselage gun station, double tricky work
:crazy: OK results.
- > Fuselage dorsal gun station window insides also swabbed with toothpicks, least tricky work though tedious
- > Fuselage engine exhaust stack stains spray painted on with Poly Scale Flat Black & White "special mix" acrylics, OK results.
- > Mainwing fuel & oil filler cap area trailing stains hand painted on with Poly Scale "special mix" & Mud spot mix, OK results.
- > Kit lacked mainwing Pitot tube, fabricated one from spare plastic parts approximating type seen on early producton Z.1007 Asso aircraft.
- > Work on prepping & painting propellers, landing gear assemblies et. al. kits parts commences tomorrow.
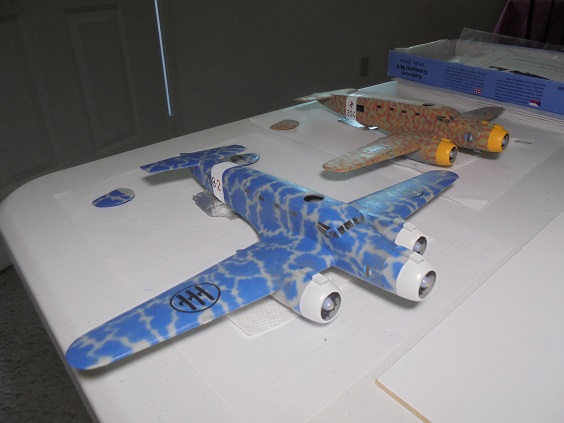
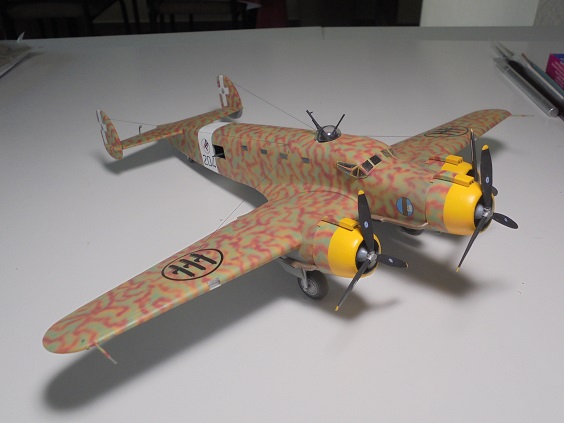
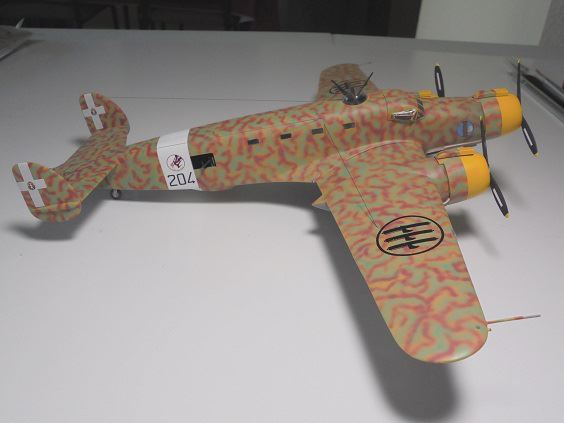
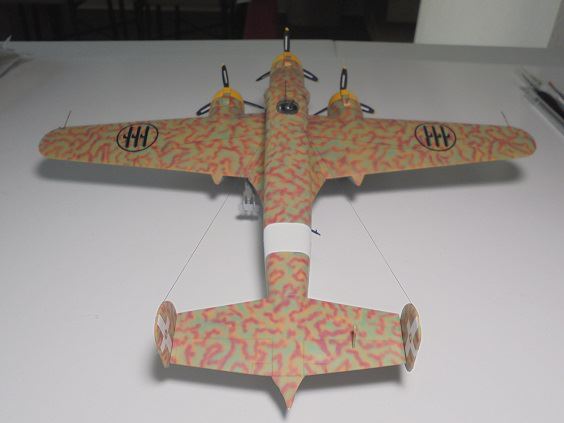
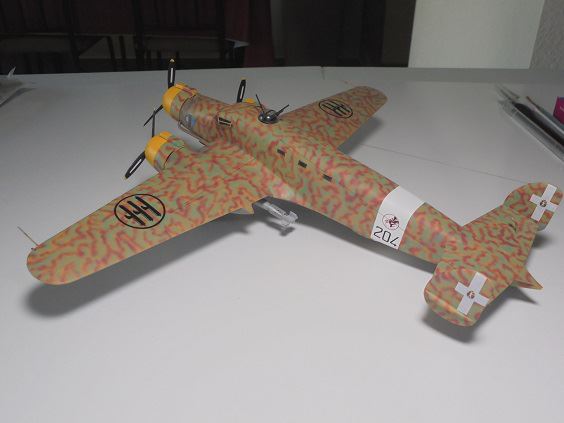
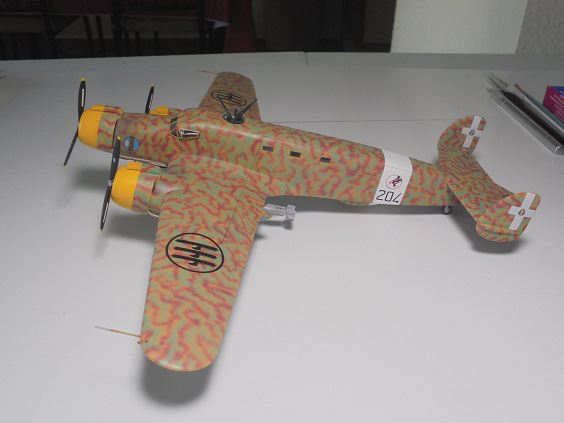
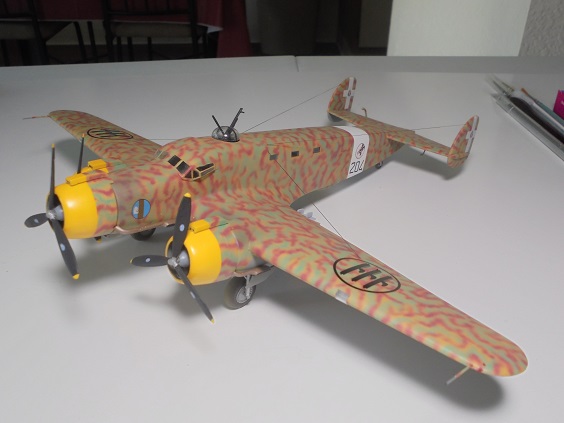
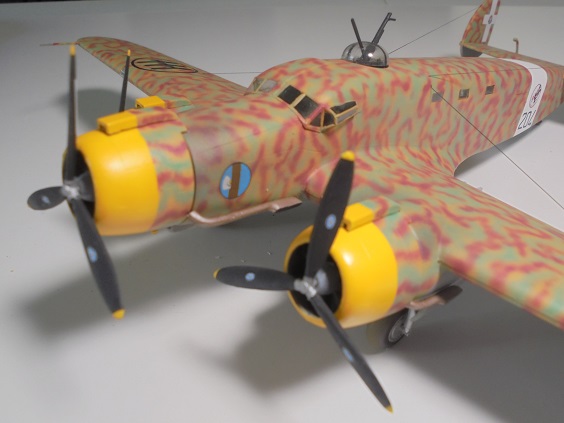
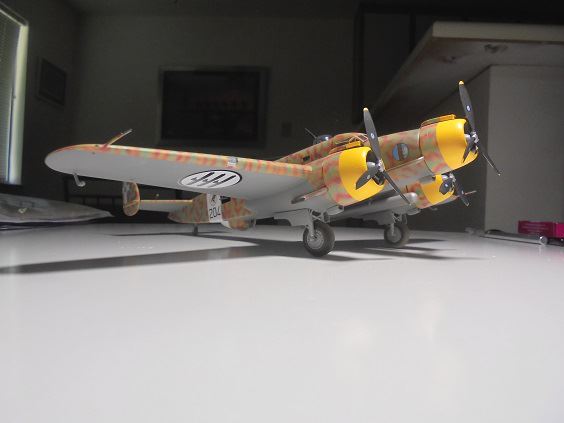
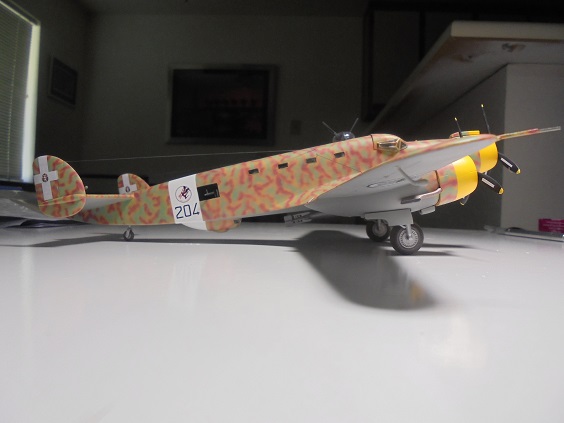
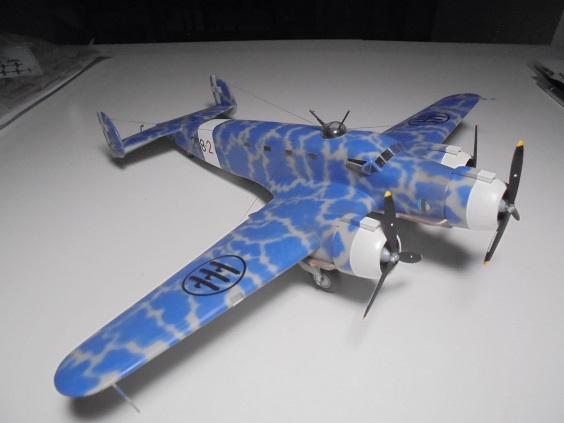
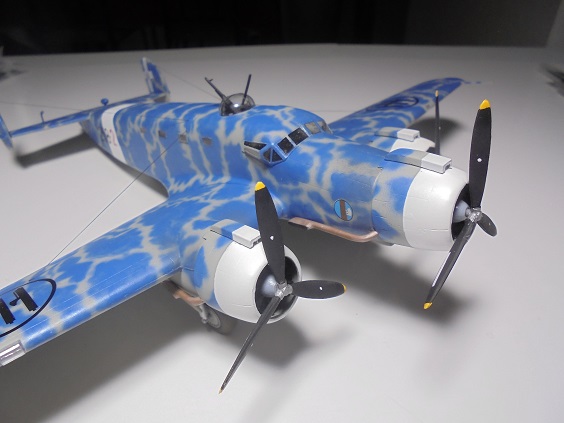
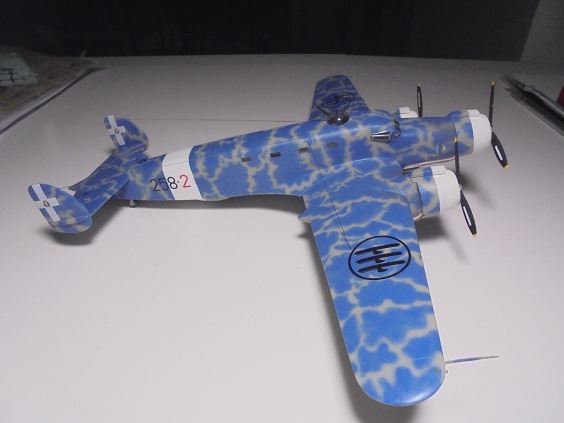
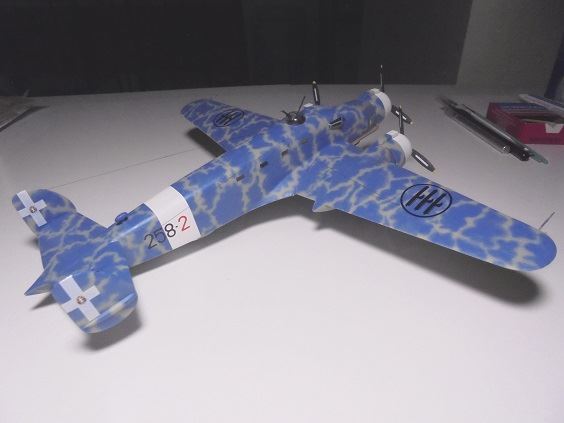
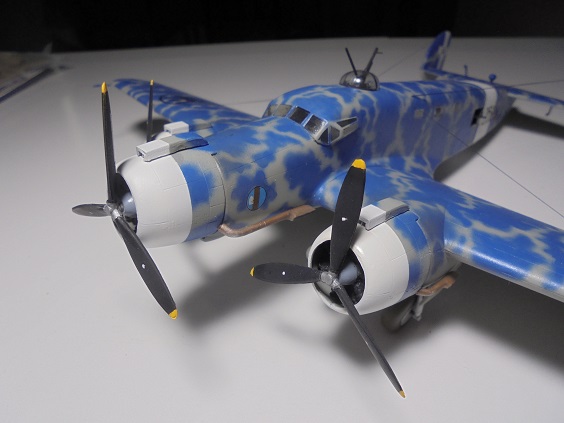
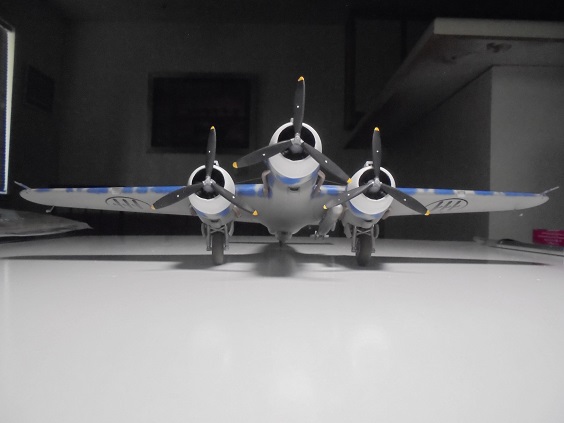
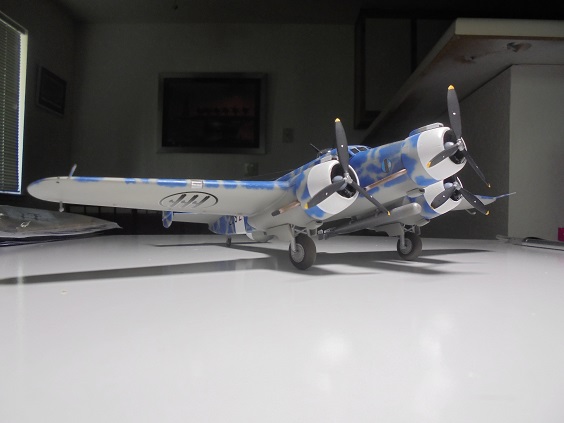
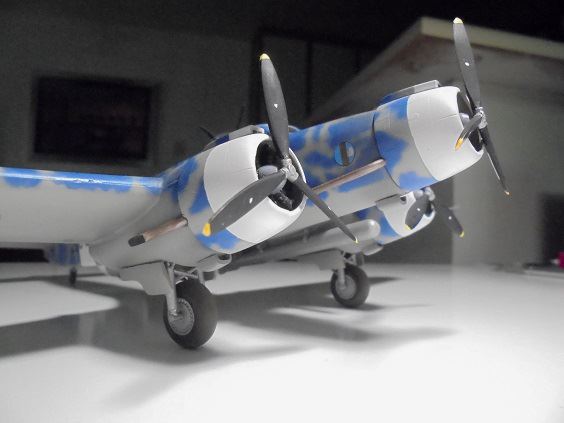
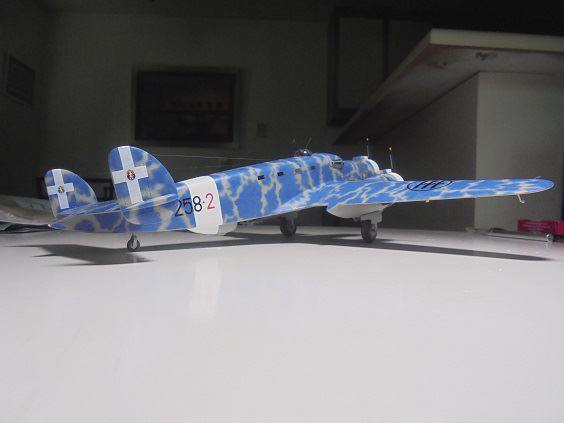
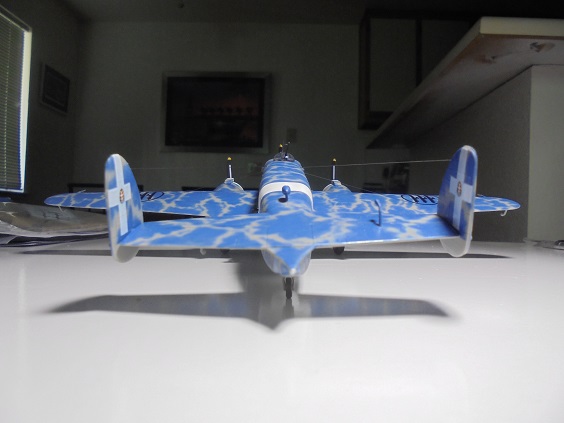
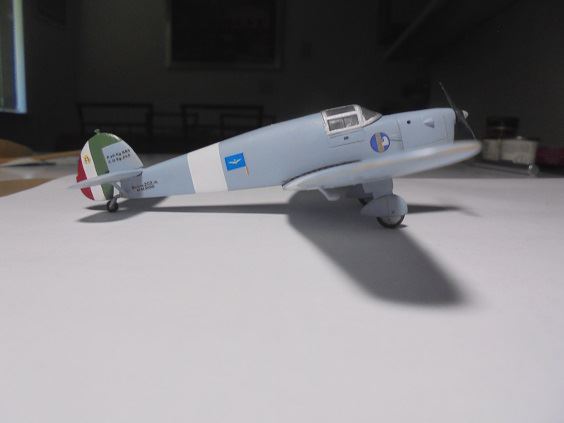
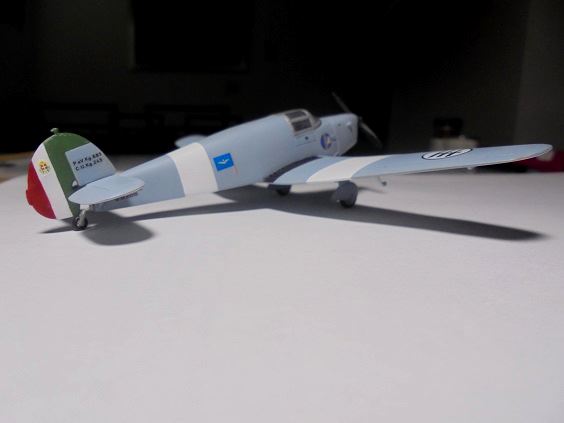
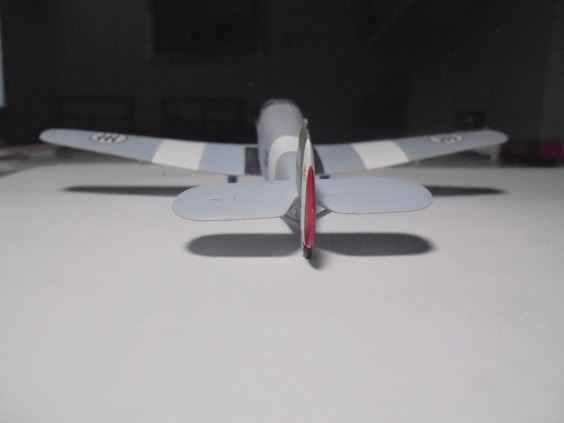
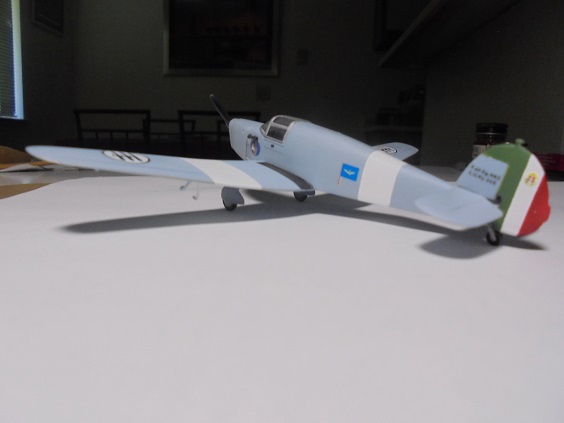
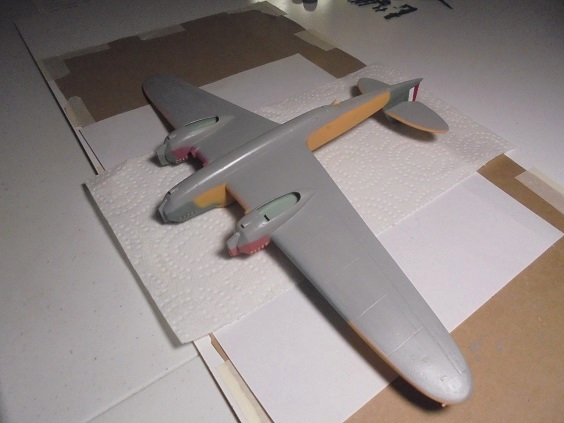
CANT Z.1007 Asso Complete, See Post Below
September 12, 2020
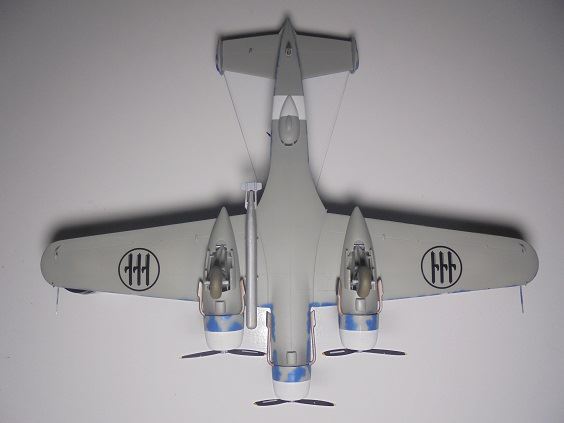
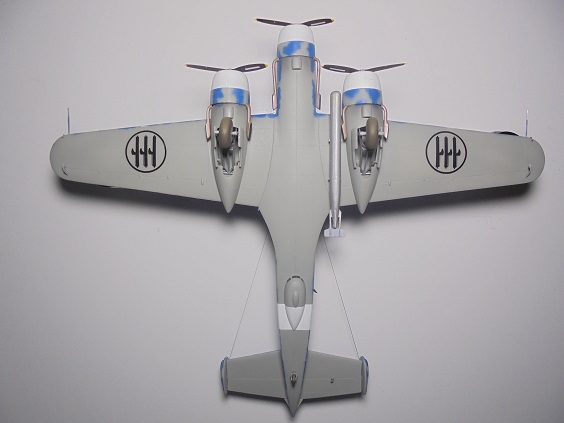
Caproni Ca.316 Build In Progress
The
Caproni Ca.316, a modification of the
Ca.310 Idro (seaplane), was a reconnaissance aircraft intended for catapult operations from Italian Navy capital ships. The basic aircraft design was modified with attachment of large pontoons underneath the engine nacelles and a revised nose with extensive glazing, 14 built none purportedly entering service.

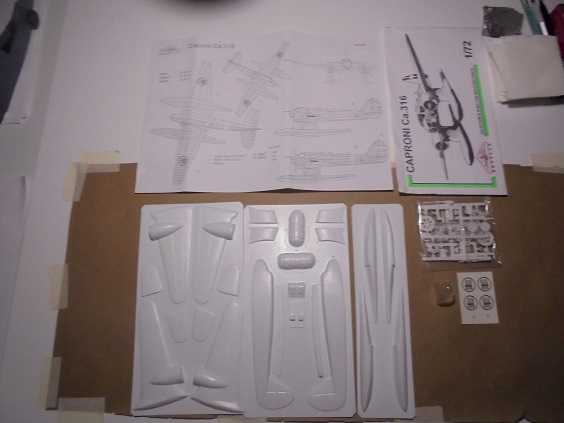 September 13, 2020
- > Fuselage halves, fore & aft fuselage-mainwing structural support parts cut-separated from molding sheets, surprisingly easy work

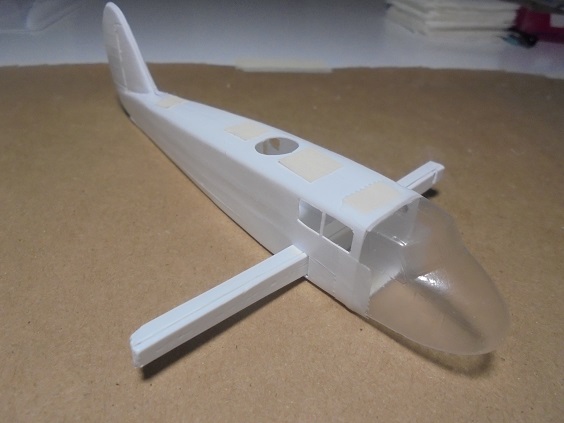
- > Fuselage halve edges trimmed, sand-shaped, repeatedly test fitted, satisfying results
- > Fuselage halve areas forward of fight crew cockpit cut off, halves taped together, three-axis sand-shapped & leveled, satisfying results
- > Clear vacuform plastic replacement fuselage nose part trimmed, three-axis sand-shapped & leveled, satisfying results
- > Clear nose part repeatedly test fitted over taped together fuselage halves, good three-axis fits
- > Fore & aft fuselage-mainwing structural support part edges trimmed & sand-shaped, positioning tabs cut from styrene plastic sheet, glued in place aft support part insides.
- > Portside fore fuselage-mainwing structural support part too short
cut part end off, glued it over aft structural support part port tip-end positioning tabs.
- > Main fore fuselage-mainwing structural support part glued over aft structural support positioning tabs starboard tip-end towards portside; noticable gab between it and portside end cap, structural support unit will be hidden by mainwings anyway

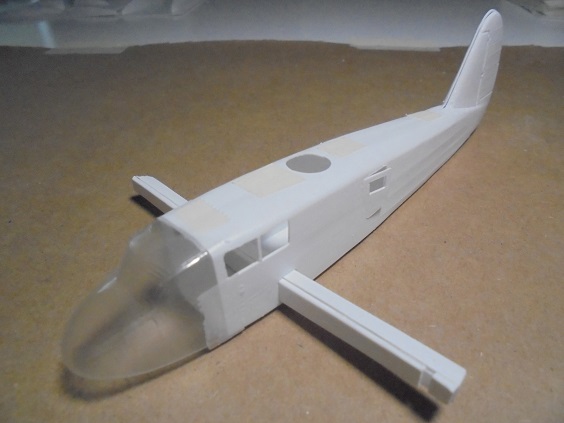
- > Lanciani gun turret holes cut out of fuselage dorsal areas, edges knife & shape-sanded, OK results.
- > Fuselage halve side window holes cut out, edges knife-shaped & filed, OK results.
- > Port fuselage crew cabin door partially cut out as non-kit specified option, edges knife-shaped, OK results.
- > Cabin door window hole cut out, edges knife-shaped, OK results.
- > Main fuselage part assemblies taped together for test fitting display:
 September 14, 2020
- > Cut styrene plastic positioning tabs glued inside & along all port fuselage halve edges, tabs also cut & glued along all port & starboard forward fuselage halve edges for positioning the clear vacuform plastic replacement fuselage nose part, good results.
- > Fuselage halve interiors, assembled fuselage-mainwing structural support unit, cockpit flight deck part spray painted Humbrol 78 Matt Cockpit Green + Testors Flat White 50/50 mix + 36% Flat White shading enamels replicating Verde Anticorrosione, good results.
- > Flight crew seats cut out of vacuform molding sheet, knife-trimmed & sand-shaped, spray painted Testors Flat Aluminum enamel, set aside to dry.
- > Styrene plastic-injected instrument panel/control bar & steeing yoke parts cut from sprues & knife-trimmed, yokes glued on instrument panel/control bar, backside spray apinted Verde Anticorrosione, more painting later.
September 15, 2020
- > Kit flight crew seats lack torso & seat cushions, fabricated sets from cut styrene sheet plastic spray painted Testors Flat Rust enamel approximating a common Italian aircraft seating color, all glued in place, good results.
- > Kit lacked torso & seat belts, fabricated sets from Scotch Magic Mending Tape spray painted Humbrol 29 Matt Dark Earth enamel cut in strips, buckle ends hand-painted Testors Flat Aluminum enamel, all glued in place, good results.
- > Assembled crew seats glued on cockpit flight deck pedistals, good results.
- > Kit lacked rudder control bars, fabricated set from cut styrene sheet plastic hand-painted Flat Aluminum, glued in place in front of crew sheets, good results.
- > Styrene plastic-injected instrument panel/control bar & steering yoke assembly frontsides spray painted Testors Flat Black & White "special mix" enamels, hand-painted yoke spokes Flat Aluminum, instrument panel detals Flat White, good results.
- > Instrument panel/control bar & steering yoke assembly glued in front of flight deck pedistals, good results.
- > Cut-out fuselage halve window holes had center posts intended to hold glued in place cut clear styrene sheet plastic panes, posts were too flimsy

cut them out, replaced post & panes with single-piece glued in place panes, OK results.
September 16, 2020
- > Fuselage halve windows kept popping off whilst masking for spray painting
several tries necessary gluing back in & masking, pray they'll hold
- > Humbrol 78 Matt Cockpit Green + Testors Flat White 50/50 mix + 36% Flat White shading enamels replicating Verde Anticorrosione sprayed over window pane separator post.
- > Cockpit flight deck assembly glued on cut styrene plastic pedistal mounted on port fuselage halve, OK three-axis alignment:


- > Fuselage halves glued together in stages; all seams puttied; rudder joins extensively puttied for later sand-shaping, OK results.
- > Clear vacuform plastic fuselage nose part taped on for test fitting:
 September 17, 2020
- > All puttied fuselage, rudder sail & rudder joins sand-smoothed, some additional puttying/sanding necessary, lots of work
OK results.
- > Additional puttying & knife-shaping around fuselage windows necessary, OK results.
- > Clear vacuform plastic fuselage nose part masked for painting, glued in stages on forward fuselage, corner gaps plugged with ethyl cyanoacetate glue, upper part areas spray painted Humbrol 78 Matt Cockpit Green + Testors Flat White 50/50 mix + 36% Flat White shading enamels replicating Verde Anticorrosione, OK results.
- > Fuselage nose part upper areas spray painted Humbrol 125 Dark Grey Satin + 36% Testors Flat White shading enamels replicating Maritime Grigio Azzurro Scuro 3, removed fuselage window masking, panes stayed in place
OK results:
 September 18, 2020
- > All remaining kit parts cut from mold sheets.
- > Mainwing, tailplane & float pylon parts assembled, no retaining & positioning tabs needed not even for mainwings

all assemblies set aside to cure.
- > Float & engine cowling parts will need glue join retaining & positioning tabs, working on them later.
September 19, 2020
- > Rudder base painted Testors Flat White enamel, Distintivo di Guerra cross area masked, rudder oversprayed with Humbrol 91 Matt Black Green + 36% Flat White shading repilcating Verde Oliva Scuro 3 typical for Regia Aeronautica Italiana maritime aircraft, OK results, entire rudder masked off for later color spray painting.
- > Tailplanes extensively shape-sanded, butt ends joining on fuselage knife-trimmed, sanded & test fitted, OK results, fuselage contact areas masked for gluing on tailplanes later.
- > Upper aft fuselage, rudder & sail spray painted Humbrol 125 Dark Grey Satin + 36% Testors Flat White shading enamels replicating Maritime Grigio Azzurro Scuro 3, OK results.
- > Distintivo di Guerra cross area rudder masking removed, overspray aireas touched up wit Flat White, OK results.
- > Tailplanes glued on fuselage, OK results.
September 20, 2020
- > All puttied mainwing joins sand-smoothed, some additional puttying/sanding necessary, lots of work
OK results.
- > Mainwing underside trailing butt-ends too short, cut styrene plastic extenders glued in place, knife-shaped, puttied & sand-shaped, OK results.
- > Period photos of Ca.316 prototyped showed it equipped with a port wing root-mounted machine gun, assuming a gun was also mounted starnboard drilled holes in wing root leading edges, test fitted gun barrels taken from part spares, OK fits.
 September 21, 2020
- > Float pylon assemblies extensively knife & sand-shaped, many test fits underneath aft engine nacelles followed up with many knife & sand-shapings
pylons eventually
and successfully glued on both nacelles
- > All engine cowling parts glue-assembled with cut styrene sheet plastic retaining tabs, extensive knife-shaping & sanding necessary, good injected styrene plastic engine cowling ring parts fits, OK upper mainwing engine nacelle fits.
- > Engine cowling moldings lacked "skirts" extending to mainwing engine nacelles
initially not sure what to do about that
solution found shape-bending semi-circular cut styrene sheet plastic strips, gluing them inside semi-circular engine nacelle lower halves, "skirts" extending inline with upper cowling edges, successfull test fits resulting just after a few strip adjustments followed by successfully gluing them in place
- > Engine cowling assemblies test fited over "skirted" mainwing engine nacelles, port cowling ~.3 mm too narrow, starboard ~2 mm too wide
parts of latter repeatedly trimmed till same diameter as port "for balance", re-glued together, glue seams of both cowlings glue puttied (see below).
- > Cut styrene plastic tabs glued around aft engine cowling insides, cowlings test "plugged" in mainwing engine nacelles then glued on, good results
- > Noticeable gaps above engine nacelle "skirts" & aft engine cowlings internally covered over with glued-on styrene sheet plastic strips, good results
- > Some engine nacelle/cowling glue joins puttied & smooth-sanded, all engine cowling parts joins had to be re-puttied & sanded as well
OK results.
September 22, 2020
- > All remaining fuselage uppersides sans areas where mainwing assemblies will be glued on, tailplane uppersides & underneath leading edges spray painted Humbrol 125 Dark Grey Satin + 36% Testors Flat White shading enamels replicating Maritime Grigio Azzurro Scuro 3 (GAS3).
- > All mainwing uppersides sans butt-ends attached to fuselage, forward upper engine nacelles, underneath leading edges also spray painted GAS3.
September 23, 2020
- > All mainwing assemblies masked-off, undersides sans butt-ends spray painted Testors Model Master 1726 Light Sea Grey + 36% Testors Flat White shading enamels replicating Grigio Azzurro Chiaro 1 (GAC1), OK results.
- > Lower fuselage assembly likewise masked-off, undersides sans mainwing join areas spray painted GAC1, OK results.
- > Fuselage identification band masked-off & spray painted Testors Flat White enamel, OK results.
September 24, 2020
- > Mainwing assemblies glued on fuselage in stages, acceptable results.
- > Extensive seam-fill puttying necessary over all fuselage underside joins & some upperside ones, extensive knife-shaping & sand-finishing nessary.
- > All fuselage-wiing root joins & adjacent areas extensively masked-off & spray painted Humbrol 125 Dark Grey Satin + 36% Testors Flat White shading enamels replicating Maritime Grigio Azzurro Scuro 3 (GAS3) & Testors Model Master 1726 Light Sea Grey + 36% Testors Flat White shading enamels replicating Grigio Azzurro Chiaro 1 (GAC1), OK results.
- > Styrene injected-plastic engine ring interiors spray painted Humbrol 78 Matt Cockpit Green + Testors Flat White 50/50 mix + 36% Flat White shading enamels replicating Verde Anticorrosione, engine cylinders & crankcases hand painted Testors Flat Black & White "special mix", rings glued on engine nacelles, ring exteriors & adjacent engine cowling areas masked-off & spray painted GAS3 & GAC1, acceptable results.
- > Engine air cooling baffle rings spray painted Testors Flat Steel enamel, glued over engine faces, OK results.
- > Poorly scaled & casted kit mainwing engine nacelles & cowlings areas too long, too short well as outwards splayed
fate not smiling here

- > Photos of build progress to date:

 September 25, 2020
- > Period photos of Caproni Ca.316 prototype show fuselage interior structural supports angled inside double windows aft of cockpit port & starboard, didn't catch that tiill yesterday
nevertheless wanting to replicate them masked-off windows, sprayed on Humbrol 78 Matt Cockpit Green + Testors Flat White 50/50 mix + 36% Flat White shading enamels replicating Verde Anticorrosione then Humbrol 125 Dark Grey Satin + 36% Testors Flat White shading enamels replicating Maritime Grigio Azzurro Scuro 3 (GAS3) latter color blending with GAS3 vertical window bars for better visual aesthetics, OK results.
- > Engine nacelle uppersides spray-weathered with Poly Scale Flat Black & White "special mix" acrylics replicating engine blow-by grime, OK results.
- > Kit styrene injected plastic engine exhaust pipes knife-shaped, holes drilled, outsides spray painted Testors Flat Steel, inside Testors Flat Black & White "special mix" enamels, pipes glued in place in engine cowling holes, OK results.
- > Kit lacked rudder mass-balance bar, part visually approximating mass-balance bar seen on Ca.316 prototype period photos found in spares bag, knife & bent-shaped, glued in place on rudder, over-sprayed Humbrol 91 Matt Black Green + 36% Flat White shading repilcating Verde Oliva Scuro 3 typical for Regia Aeronautica Italiana maritime aircraft rudders, OK results.
- > Fabricated & glued on mainwing navigation light part fronts hand painted Testors Flat Green & Model Master Insignia Red enamels, OK results.
- > Fuselage tail navigation light immediately below rudder replicated with bush-dabbed on Testors Flat White enamel, OK results.
- > Kit clear vacufrom styrene plastic Lanciani turret part accidentially tossed days ago
replaced it with injected-plastic one "stolen" from Italeri CANT Z.506C donor kit for upcoming BroPlan Z.506B conversion build, extensively knife-cut & sand-shaped, frames masked-off & spray-painted "special mix", OK results.
- > Kit injected plastic Lanciani turret gun & mass balance parts nothing more than rods

replaced them with machine gun from spares bag, mass balance "stolen" from Z.506B, kit parts modified & "married" to fit inside clear turret, spray painted "special mix", "married" unit glued inside clear turret part some touch-up brush painting necessary afterwards, OK results.
- > Kit lacked fuselage dorsal D/F loop, one very similar to that seen on the Ca.316 prototype taken from spares bag, spray painted "special mix", OK results.
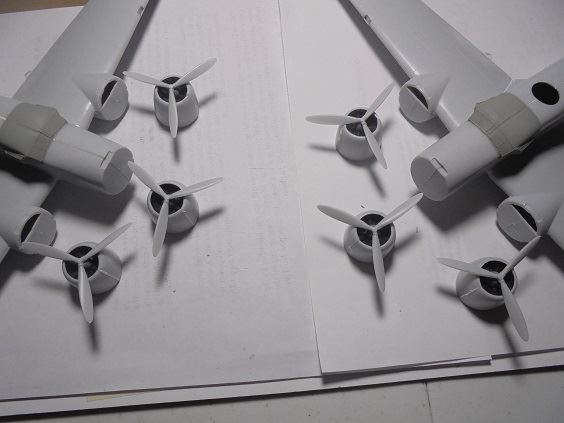
- > Kit styrene injected plastice two-blade propellers knife-trimmed & prepped for painting; port propeller blades wrong pitch direction
cut them off, glued them back on in correct direction, OK results.
- > Propellers spray painted Testors Flat White, Yellow, "special mix" & Flat Aluminum per period photos of Ca.316 prototype, KORA 72-202 Piaggio propeller logotype decails affixed to blades, OK results.
- > Kit mainwing & rudder tri-fasci & House of Savoy water decals unusable, Tauro Model 72-546 Ro.37 - Re.2001/2002/2005 Ju-87 Ca.311/13/14 decals used instead, satisfying results
September 26, 2020
- > Positioning & alignment tabs cut from styrene sheet plastic glued inside kit float halves, assembled them, glue-joins extensively puttied, assembled floats set aside to dry till tomorrow, OK results.
- > Entire mostly assembled model over-sprayed with Testors Clear Semi-Gloss Lacquer, OK results.
- > Forward fuselage windows & hemispheric nose cap paint maskings removed, over-spray rubbed off, some touching-up painting necessary, OK results.
- > Noticeable debris glob stuck inside lower starboard ventral forward fuselage window pane
removing it extremely problematic if unlikely
removing it with brass rod snaked in from fuselage port cabin door didn't work
hight risk of breaking cockpit assembly parts as well
thick paper cut-shaped with hook on end dabbed with machine oil did
- > Painted D/F loop part glued in drilled hole adjacent to fuselage dorsal identification band, OK results.
- > EZ Line stretch thread replicating a radio wire glued over aft fuselage dorsal area, OK results.
September 27, 2020
- > Puttied-over glue joins of assembled floats extensively sand-shaped & sand-finished, several join spots had to be re-puttied & re-sanded
slow tedious work
OK results.
- > Kit lacked "T" mooring posts, cut-fabricated sets, glued them in place on float topsides near fore & aft ends, OK results.
- > Floats spray painted Humbrol 125 Dark Grey Satin + 36% Testors Flat White shading replicating Maritime Grigio Azzurro Scuro 3 above water line, Testors Flat Black & White "special mix" enamels below, OK results.
- > Attaching floats on engine nacelle-mounted pylons most dreaded task of entire kit build
direct glue-attaching severely limits x-y-z axis adjusting before & after gluing, cutting holes in float dorsal areas to slide-in pylons allows very fine x-y-z axis dry test fit adjustiments before well as after gluing though is time consuming
chose latter approach despite extra work involved.
- > Starboard pylon-float glue attachment OK, tedious work
decent x-y-z axis alignments relative to mainwing despite float skewed slightly right due to poor mainwing castings
float-pylon joins masked-off & puttied, set aside to dry.
- > Port pylon-float glue attachment effort fraught with danger
cut hole in float too far forward
no choice but cut hole farther aft till port float laterally aligned with starboard one during dry test fits, glue attachment OK, tedious heart-stopping work
decent x-y-z axis alignments relative to mainwing despite float skewed slightly right ala starboard one due to poor mainwing castings
- > Cut hole in float fore of port pylon still had to be filled
styrene sheet plastic plug cut-shaped "by-eye", glued in place in just one try
perfict fit as well
float-pylon joins & patched hole fore of pylon masked-off & puttied, set aside to dry.
Caproni Ca.316 Complete, See Post Below
September 28, 2020
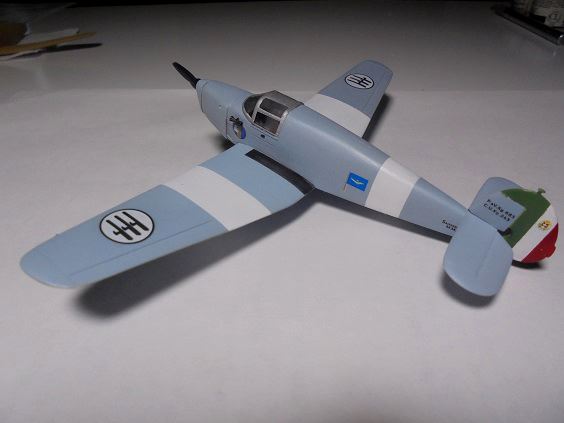
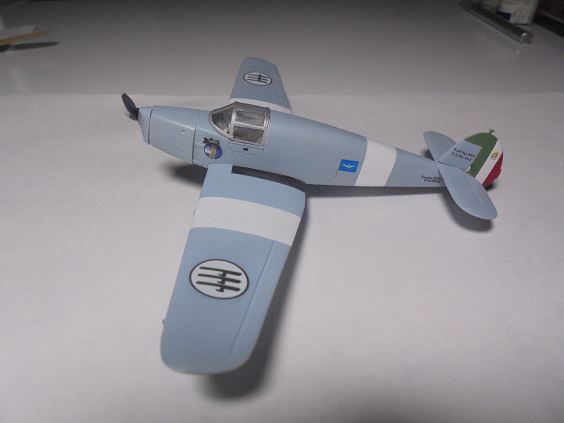
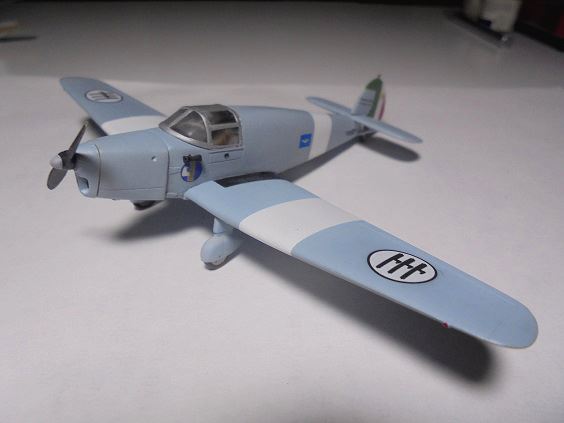
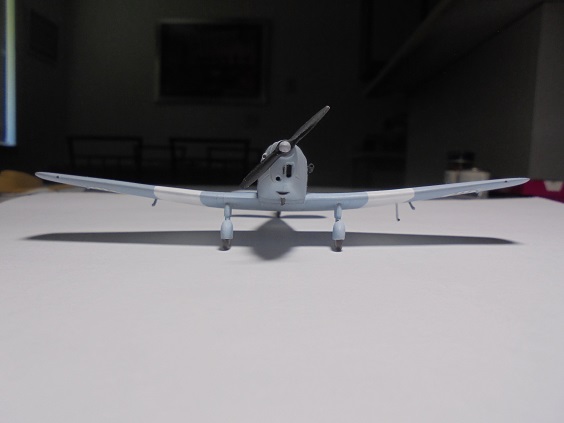
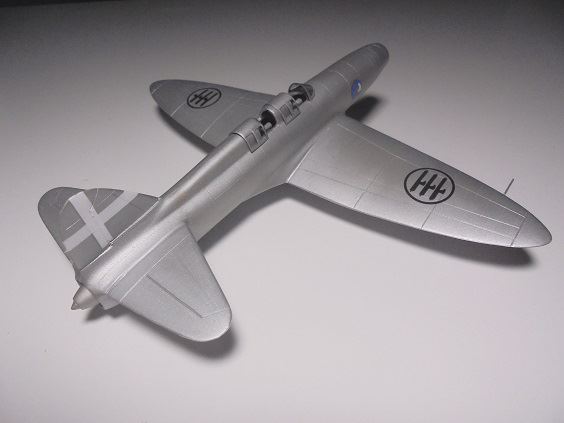
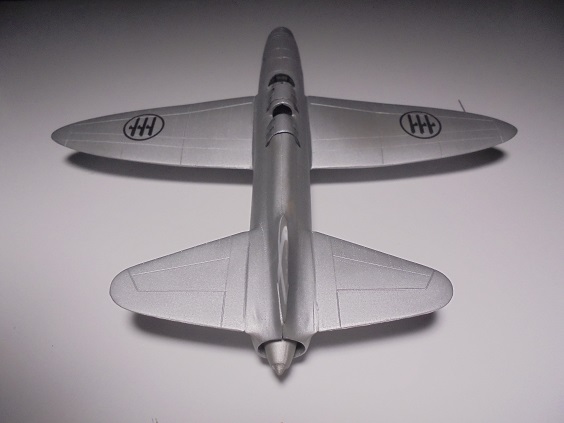
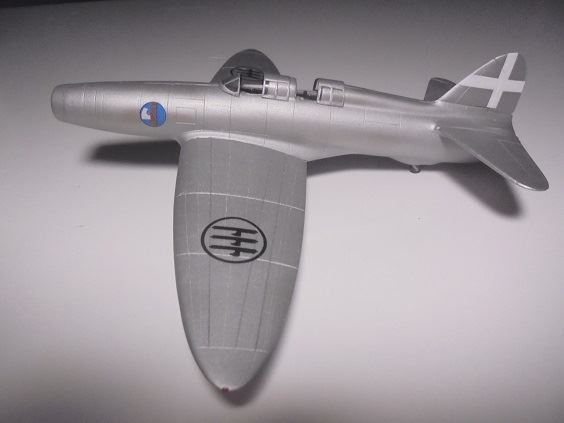
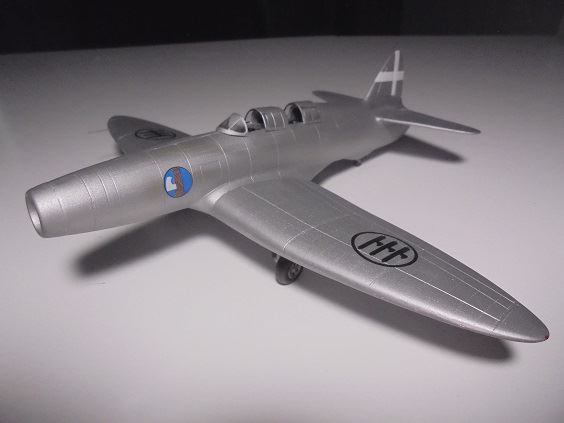
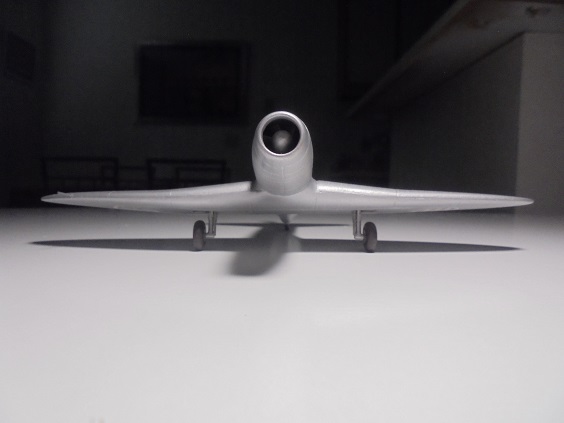
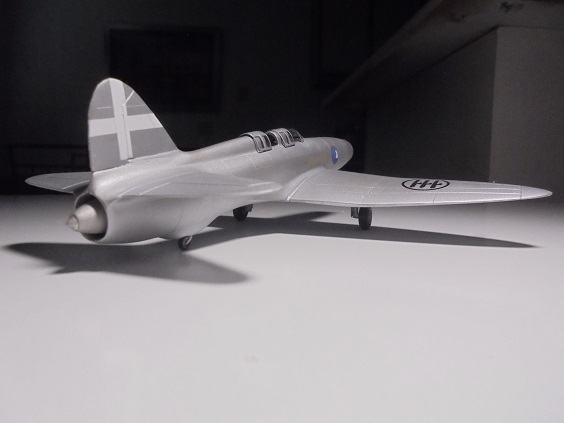
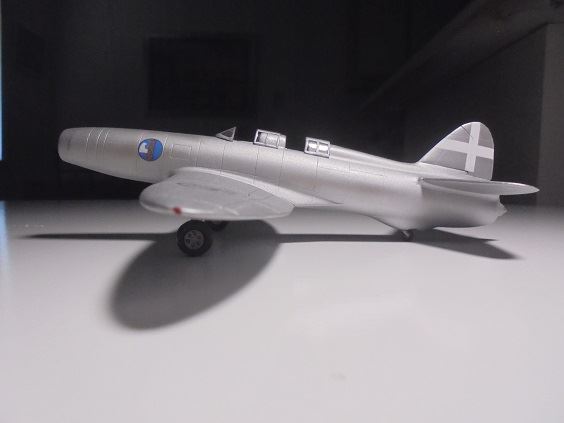
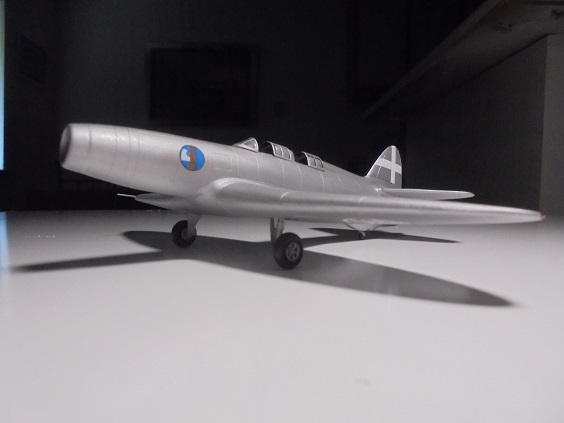
Aeronautica Umbra Trojani 18
The
Aeronautica Umbra Trojani 18 (Aeronautica Umbra T.18 or
AUT.18) designed by
Felice Trojani (1897-1971) in 1934 was a very modern all-metal stressed-skin fighter aircraft design predating its direct competator the
Aeronautica Macchi C.200 by near a year the sole prototype
M.M.363 first flying on April 22, 1939 near year and half after the C.200 subsequent flight trials proving disappointing. Returned to the Aeronautica Umbra factory at Foligno, Perugia Italy on Ferbuary 20, 1940 for modifications a second flight test series commenced on November 5th no improvements demonstrated over newer fighters already in prduction ala C.200 all further development subsequently abandoned.
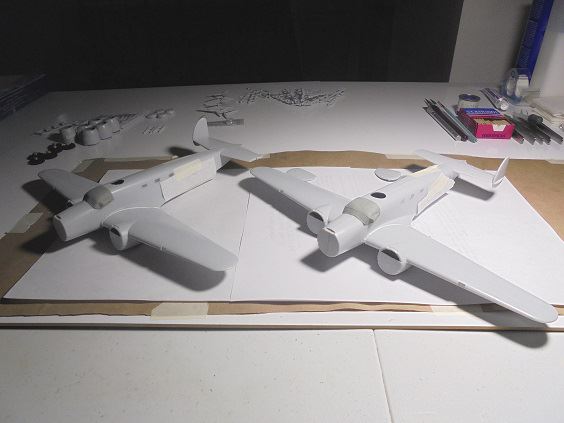
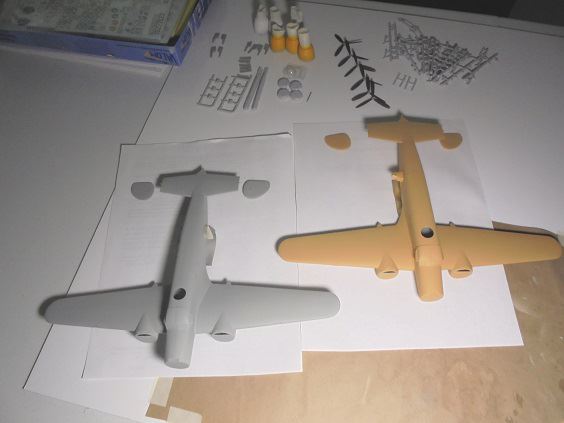
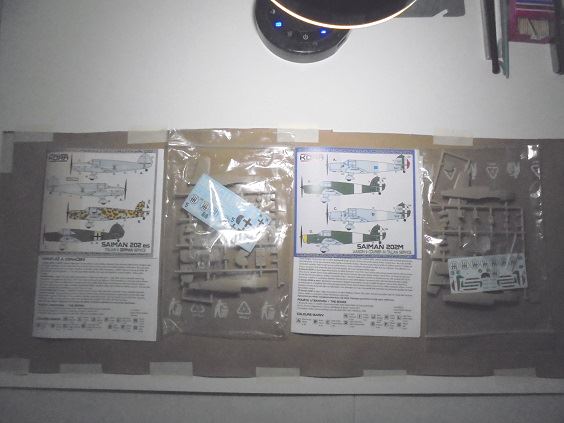
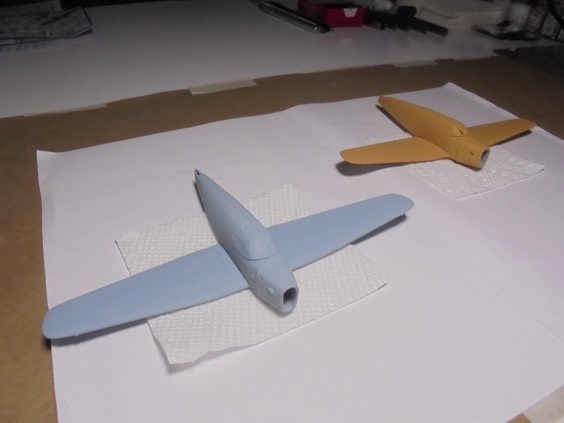
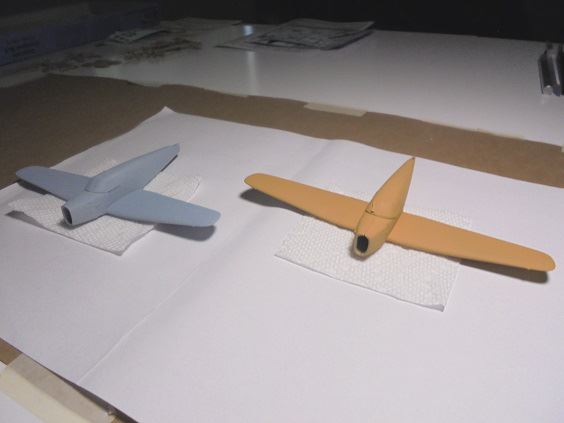
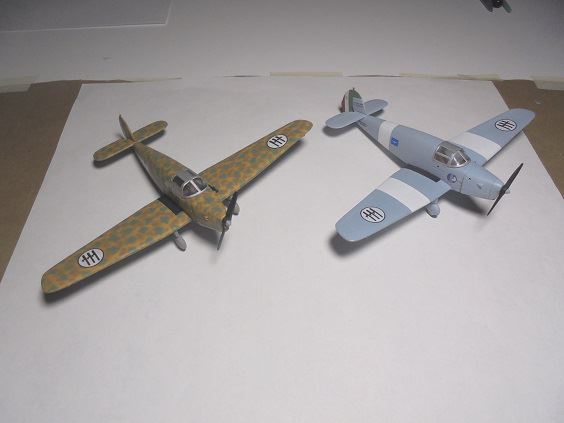
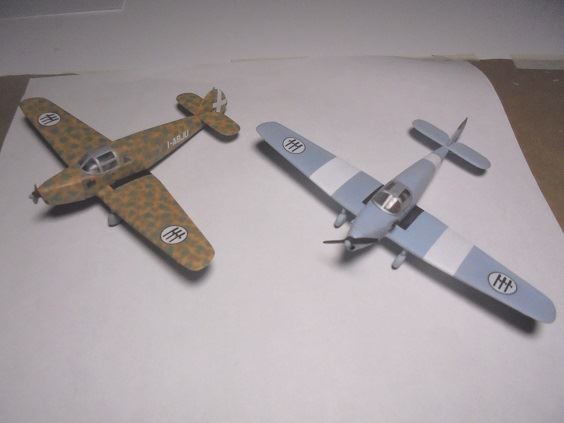
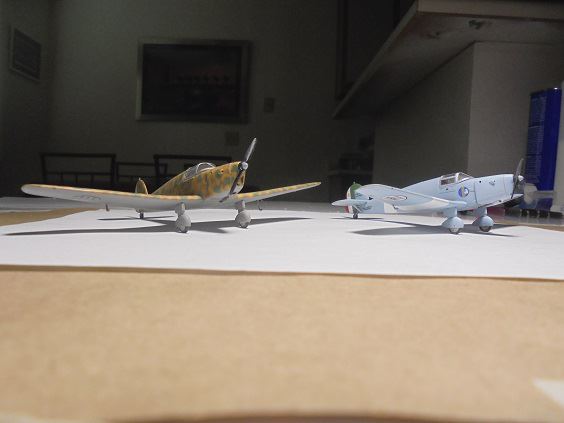
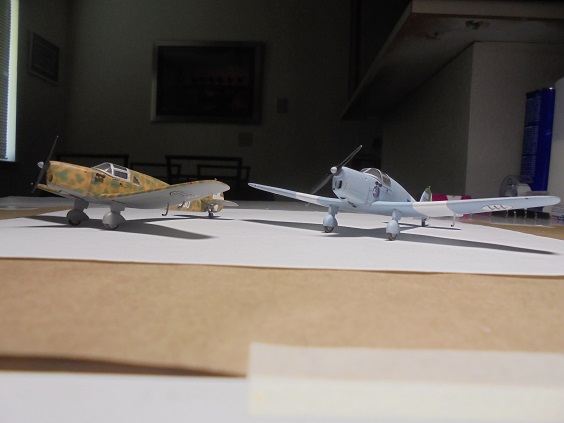
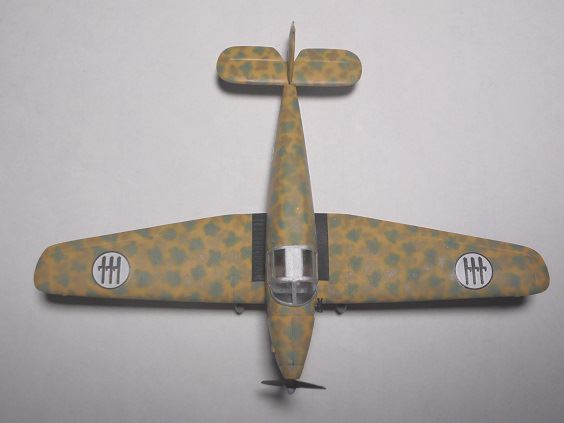
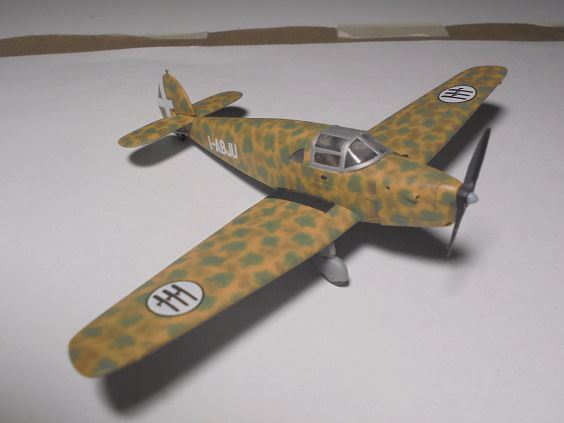
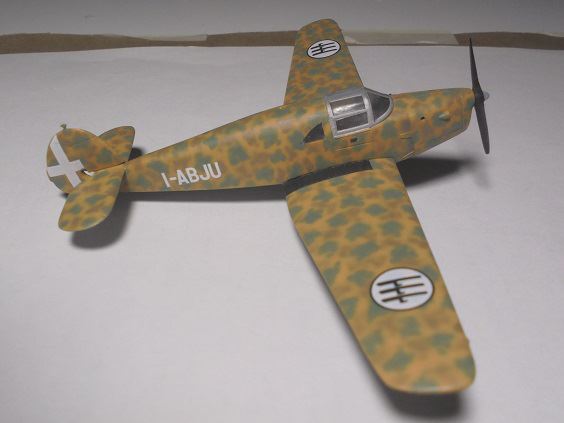
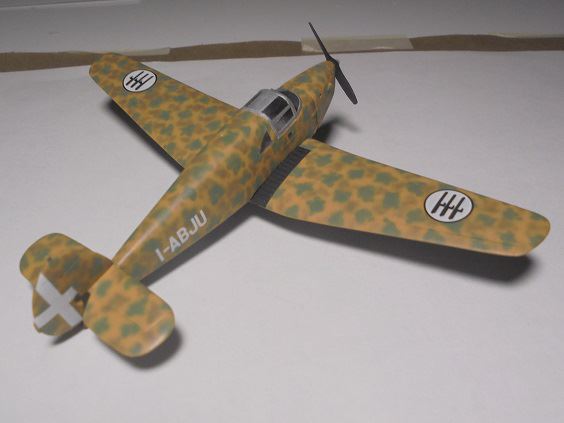
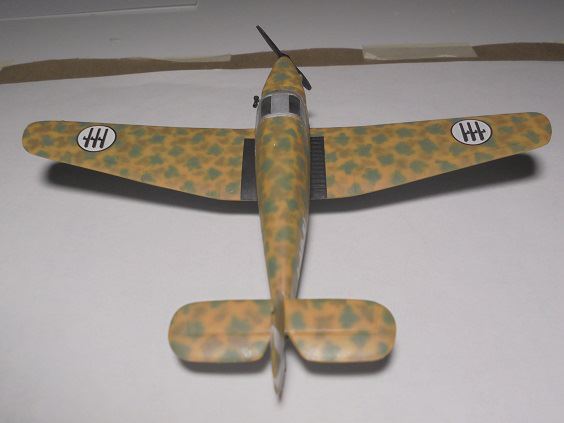
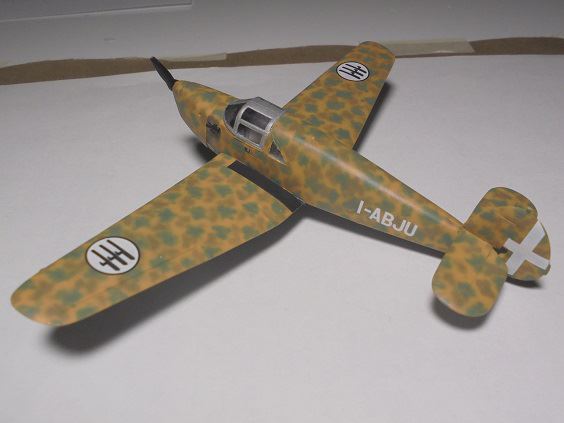
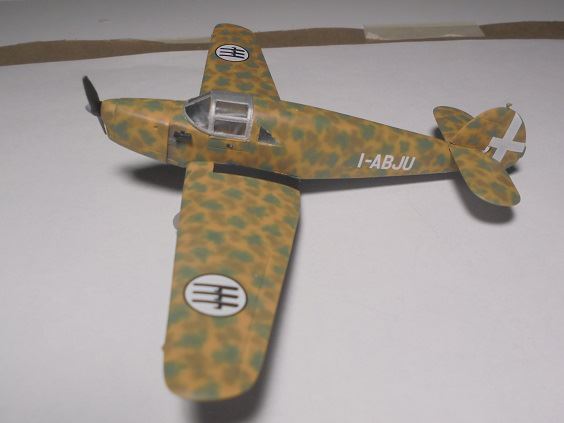
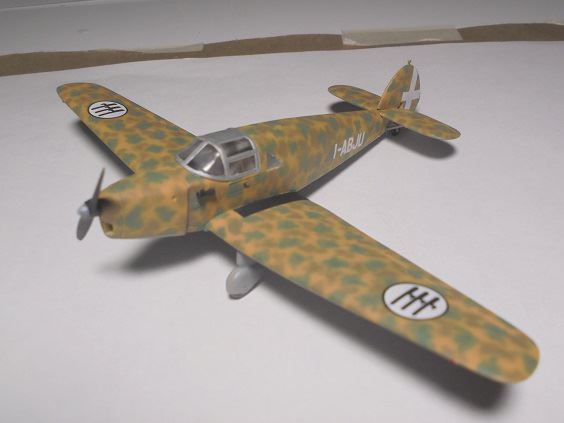
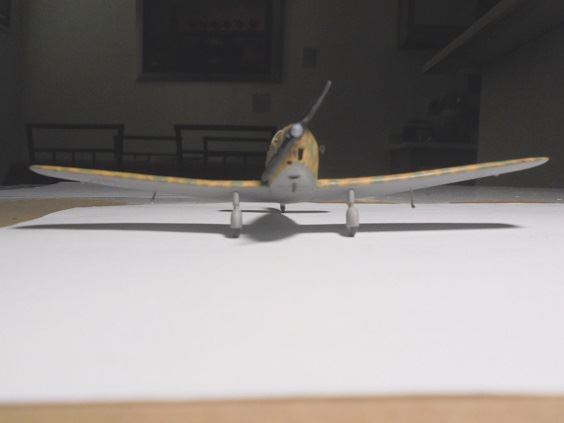
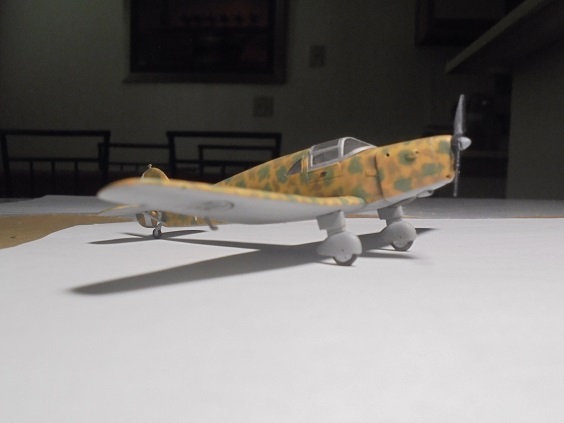
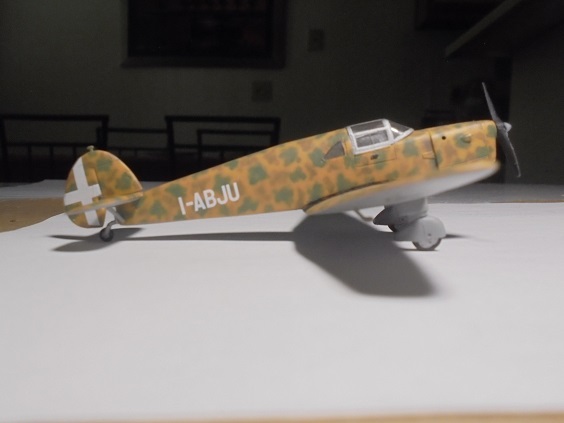
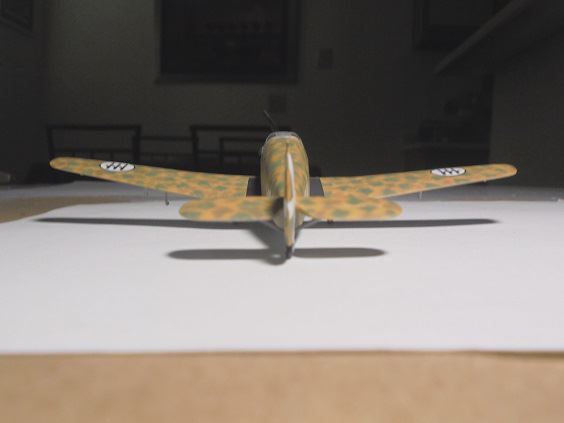
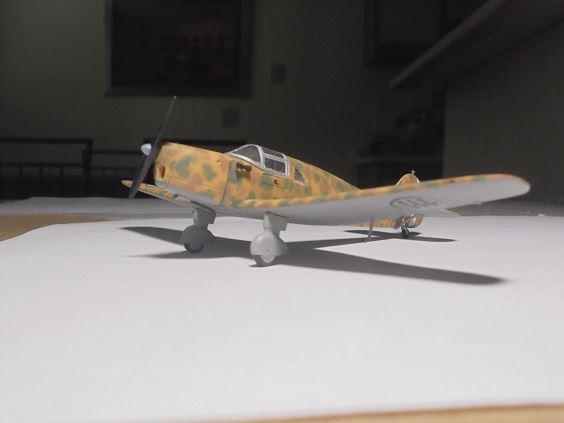
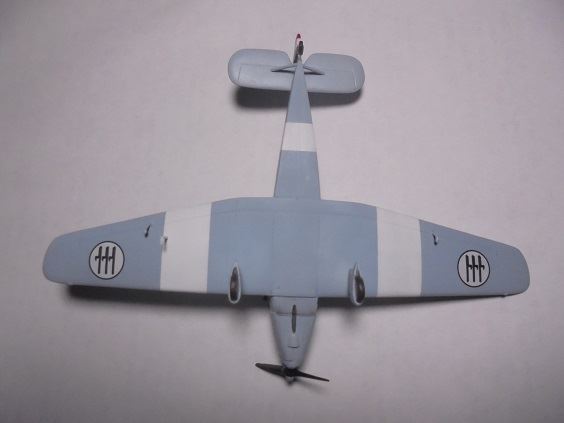
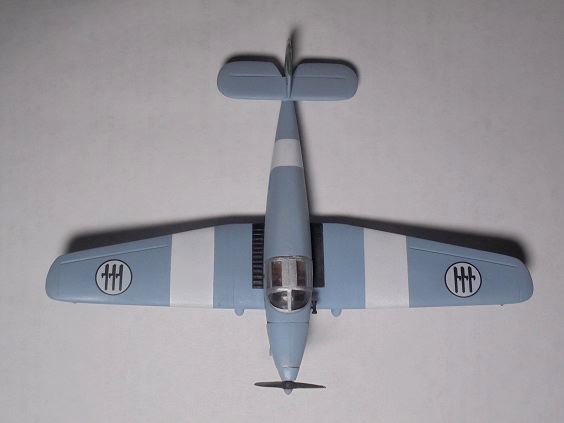
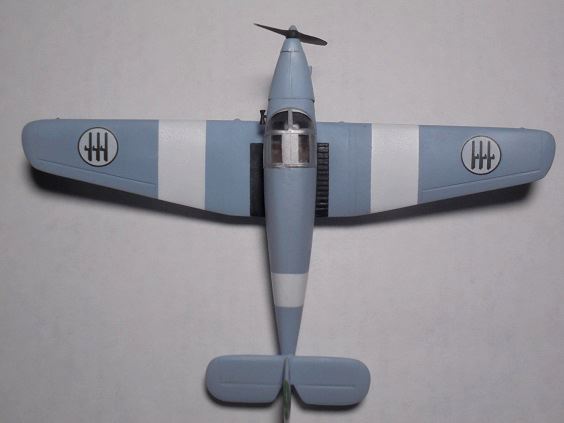
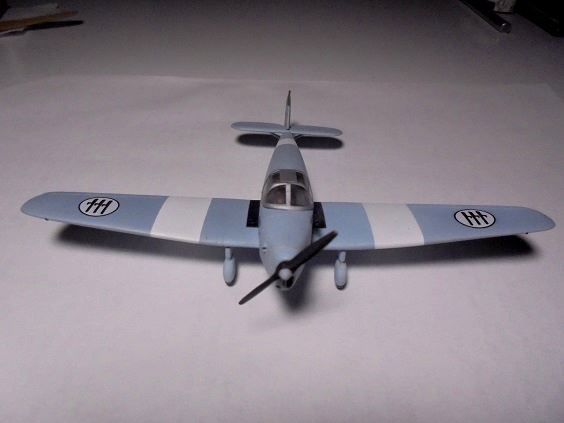
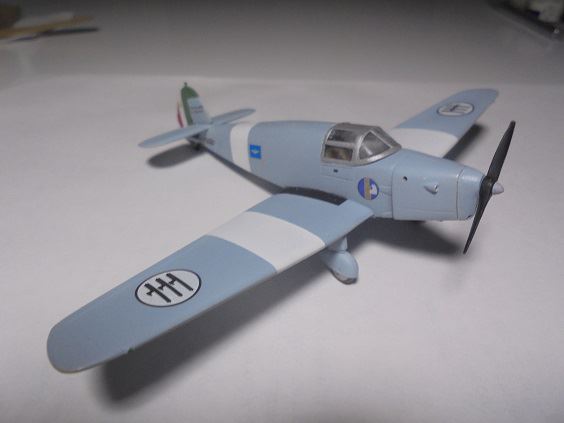
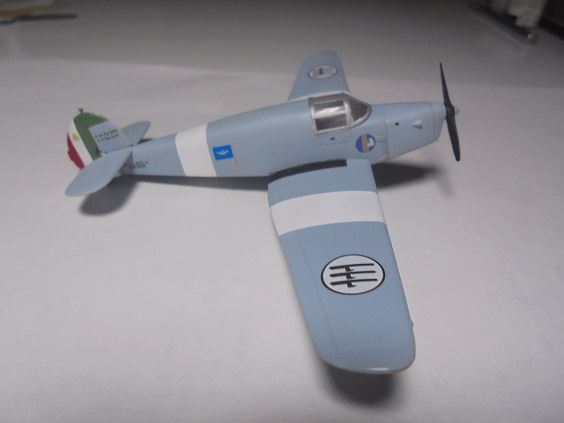
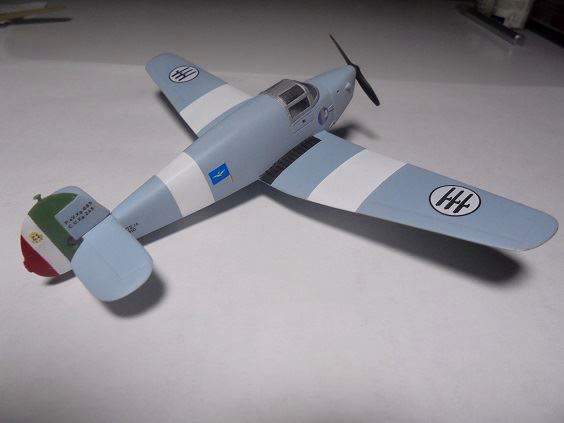
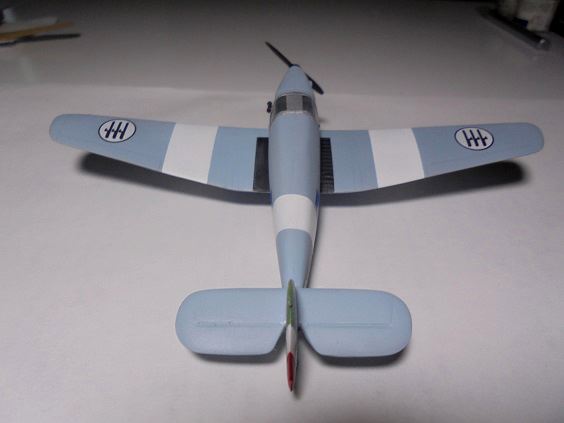
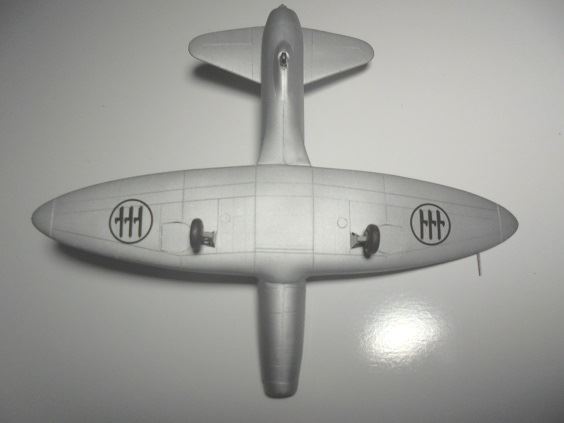
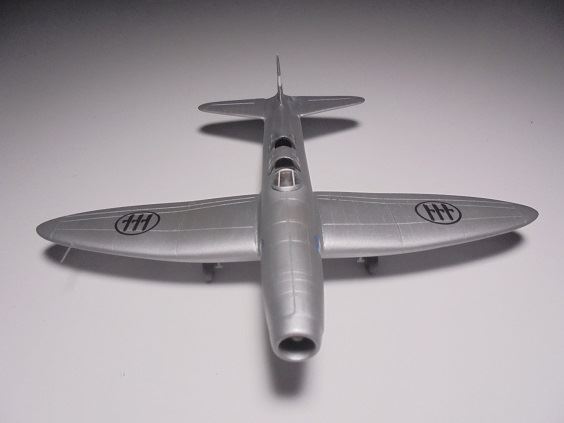
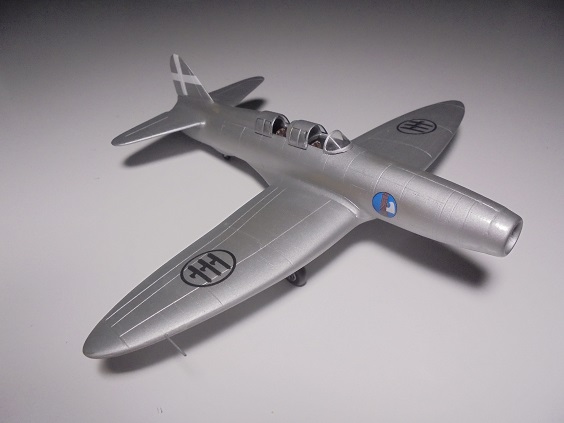
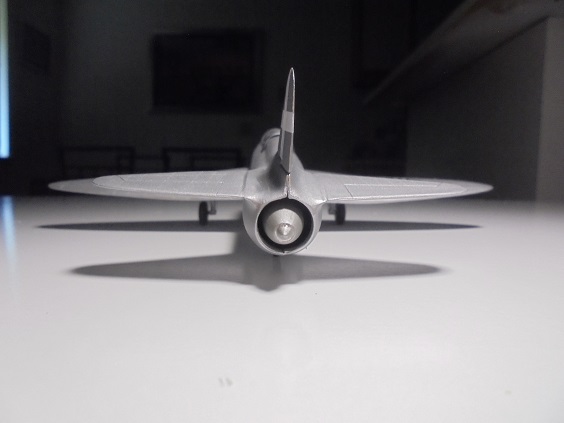
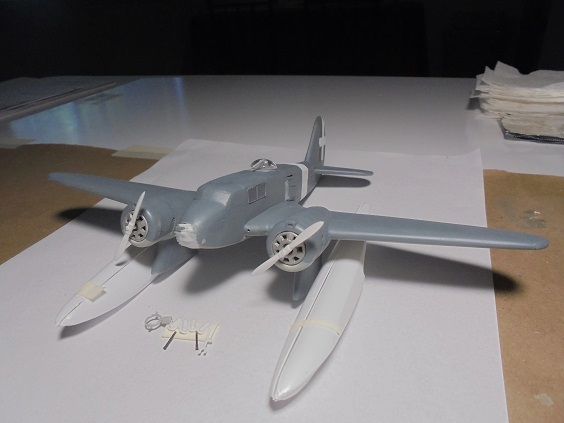
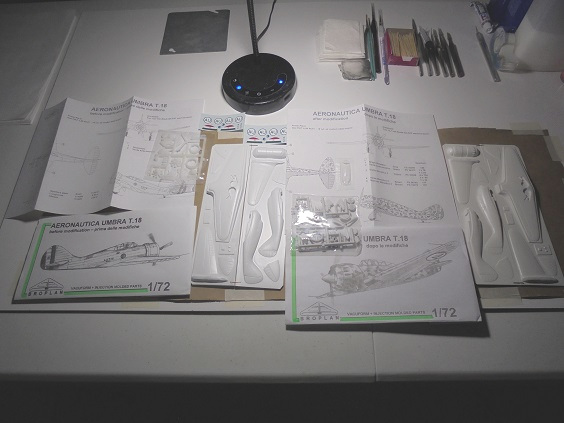
The 1/72 scale 2004-vintage
BroPlan of Poland MS-86 & MS-88 vacuform kits with injected styrene plastic parts featuring different engines & cowlings are the only ones of the AUT.18 they being concurrently built:
 September 29, 2020
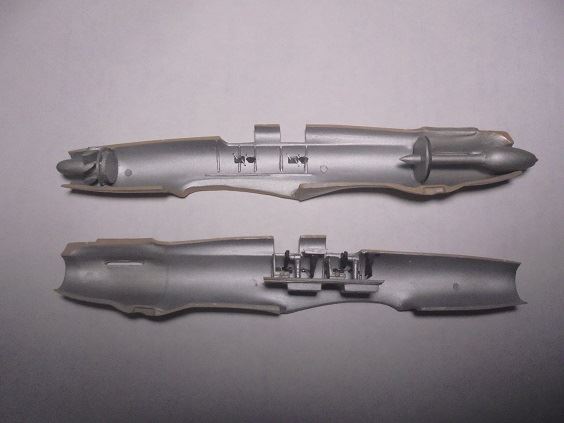
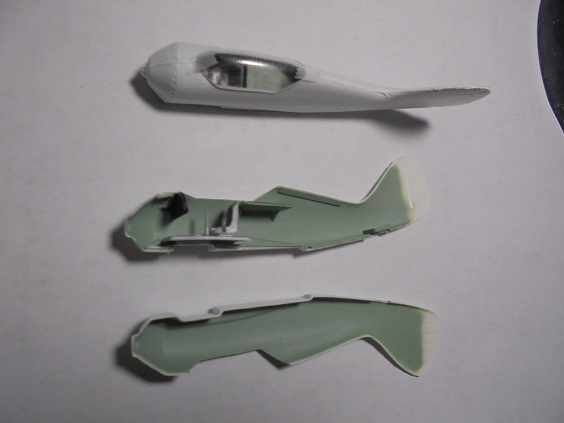
- > All vacuform kit parts cut-separated from sheets.
- > All tailplane halves glued together, seams puttied & sand-shaped, fuselage attachment butt ends sanded, good results.
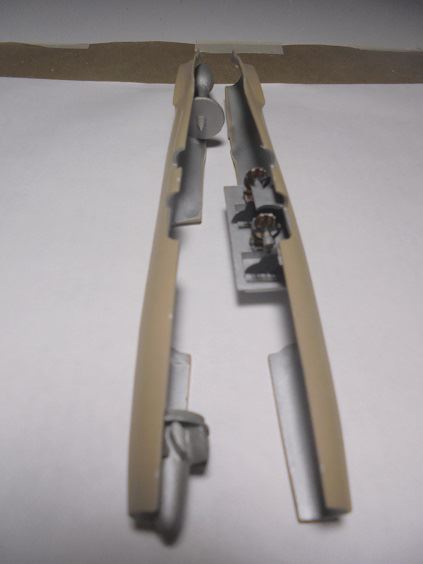
- > Vacuform cockpit flight deck & tail wheel mounts, injected plastic pilot seat & joy stick parts cut from sprues & knife-trimmed, seats & sticks glued in place on flight decks, good results.
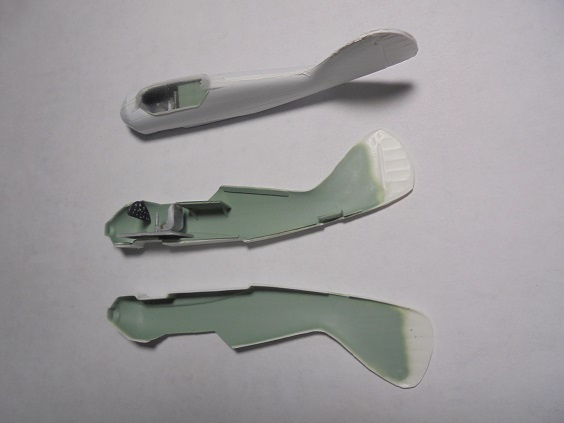
- > Kits come with clear vacuform canopies, molded-in cockpit canopies cut off fuselage halve parts.
September 30, 2020
- > Cockpit flight deck assemblies spray painted Testors Flat Aluminum enamel, OK results.
- > Kit lacked seat belts, fabricated sets from cut strips of Scotch Magic Mending tape spray painted Humbrol 29 Matt Dark Earth, belt buckles hand painted Flat Aluminum, glued them in place, OK results.
- > One kit provided styrene injected plastic cockpit instrument panel cut from sprues, support brace cut from styrene sheet plastic, glued on instrument panel back, assembly spray painted Testors Flack Black & White "special mix", enamels instruments hand-painted on with Flat White, good results.
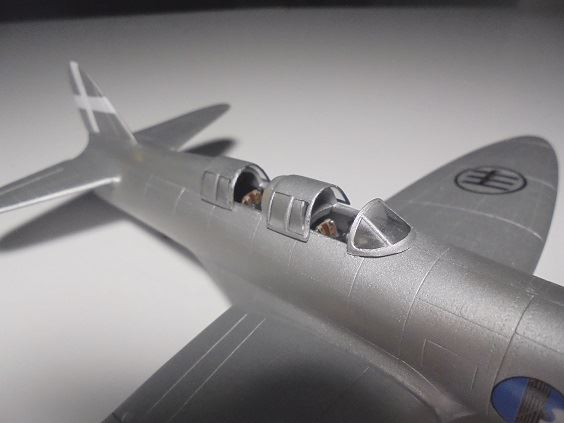
- > One kit provided clear vacuform styrene plastic cockpit canopy cut from molding sheet sand-shaped for test fitting.
- > One set of fuselage halve molded-in cockpit canopies & fuselage tail wheel well covers cut off (injected-molded covers provided), fuselage halve edges knife-shaped, filed & sand-shaped.
- > Cut styrene plastic positioning & alignment tabs glued along starboard fuselage halve interior, both halves & cockpit canopy test fitted number of times, OK fits.
- > Fuselage halve interiors spray painted Humbrol 78 Matt Cockpit Green + Testors Flat White 50/50 mix + 36% Flat White shading enamels replicating Verde Anticorrosione, OK results.
- > Instrument panel assembly glued in place in starboard halve forward cockpit; several frustrating tries aligning panel support brace on fuselage halve (kept sliding off)
last try took
- > Cockpit flight deck assembly glued in place over a starboard halve cockpit area positioning & alignment tab acting as mounting; flight deck knife-trimmed to snugly fit within fuselage halves, tricky work
OK results.
- > Kit provided panel behind pilot seat & fuselage tail wheel mounting knife-cut to fit within fuselage halves, hole drilled in for mounting tail wheel later, glued in place on starboard fuselage halve, OK results.
- > Panel behind pilot seat tad narrow
support braces cut from styrene sheet plastic, glued underneath panel, fuselage attachment end iteratively knife-trimmed for x-y-z axis fuselage lateral & longitudinal alignments, frustratingly tedious & tricky work
good alignments
- > Glued in place panel behind pilot seat & tailwheel mounting, all positioning & alignment tab topsides spray painted Verde Anticorrosione, OK results.
- > Fuselage halves glued together in stages, all seams puttied, rudder & sail edges extensively puttied, OK results, set aside to dry.
October 1, 2020
- > Second kit molded-in fuselage halve cockpit canopy & fuselage tail wheel well covers cut off (clear vacuform canopy & injected-molded covers provided), fuselage halve edges knife-shaped, filed & sand-shaped, OK results.
- > Cut styrene plastic positioning & alignment tabs glued along starboard fuselage halve interior, halves test fitted, OK results.
- > Second kit provided tail wheel mounting knife-cut to fit within fuselage halves, hole drilled in for mounting tail wheel later, glued in place on second kit starboard fuselage halve, OK results.
- > Second kit provided panel behind pilot seat unusable, new longer & wider replacement & support braces cut from styrene sheet plastic, glued underneath panel, fuselage attachment end iteratively knife-trimmed for x-y-z axis fuselage lateral & longitudinal alignments, tedious work
good alignments
- > Fuselage halve interiors spray painted Humbrol 78 Matt Cockpit Green + Testors Flat White 50/50 mix + 36% Flat White shading enamels replicating Verde Anticorrosione, OK results.
- > Second kit provided styrene injected plastic cockpit instrument panel cut from sprues, support brace cut from styrene sheet plastic, glued on instrument panel back, assembly spray painted Testors Flack Black & White "special mix", enamels instruments hand-painted on with Flat White, good results.
- > Instrument panel assembly glued in place in starboard halve forward cockpit after two tries, OK results.
- > Cockpit flight deck assembly glued in place over a starboard halve cockpit area positioning & alignment tab acting as mounting; flight deck knife-trimmed to snugly fit within fuselage halves, OK results:
- > Fuselage halves glued together in stages, all seams puttied, rudder & sail edges extensively puttied, OK results, set aside to dry.
October 2, 2020
- > Puttied-over fuselage glue seams of both builds extensively shaped & smooth-sanded, straightforward though repetitive work, good results
- > Forward cockpit edge of one assembly squared-off with cut styrene plastic extender, puttied & smooth-sanded, second kit clear vacuform canopy test fitted over cockpit, good results.
- > Clear cockpit canopies molded too large to seat-on fuselage cockpit edges, must be saddled-on aft of windscreens up to a millimeter noticable overlaps resulting, masked-off & "blacked-out" with sprayed-on Testors Flat Black & White "special mix" enamel paint, canopies glued on in stages, OK results.
October 3, 2020
- > Fuselage clear cockpit canopies masked-off,
extremely tedious work
frames base spray painted Humbrol 78 Matt Cockpit Green + Testors Flat White 50/50 mix + 36% Flat White shading enamels replicating Verde Anticorrosione, OK results.
- > Fuselage rudders base spray painted Testors Flat White enamel, spraying on other tri-colors tomorrow.
October 4, 2020
- > Fuselage assemblty rudder's white centers masked-off, sides alternatively spray painted Testors Flat Green & Testors Model Master Insignia Red Italian tri-color enamels, some spray-over touch-ups nessary with Testors Flat White enamel paint, OK results.
- > Kit single-piece mainwing underside parts sand-shaped, test-fitted underneath fuselage assemblies, glued in place, good results.
- > Kit mainwing upperside port/starboard mainwing part wingroot moldings knife rough-trimmed, test-fits & adjustments of them tomorrow.
October 5, 2020
- > All kit mainwing upperside port.starboard part edges knife fine-trimmed, extensively filed & edge sanded.
- > All upperside parts glued in place over fuselage-mounted single-piece mainwind underside units.
- > All fuselage-mainwing join seams including those laterally wrapping underneath fuselages fore & aft of mainwings puttied, noticable gaps along top portside joins of both models requiring extra amounts particularly around aft wingroots.
- > All mainwing leading & trailing edge glue join seams puttied.
- > Mainwing assembly & seam puttying work came off OK though more puttying may be necessary, checking on that tomorow.
 October 6, 2020
- > All puttied glue joins of fuselage-mainwing assembled units extensively shape & finish-sanded; much spot puttying & sanding necessary; tedious & laborious work
satisfactory results
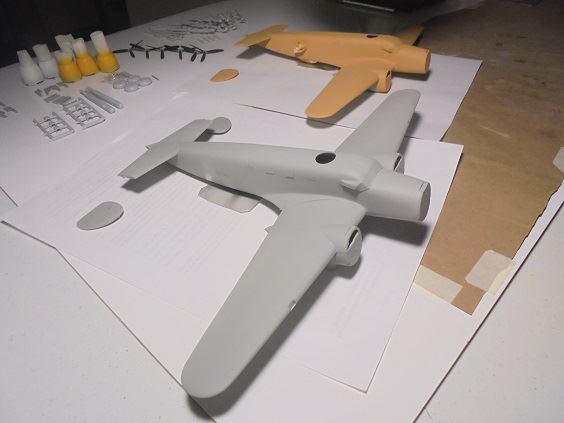
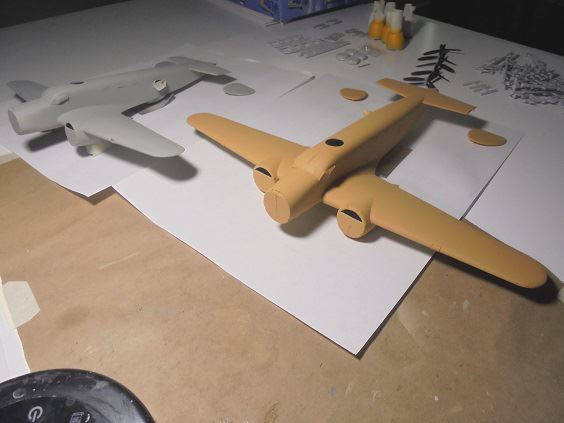
- > Tailplanes glued in place on fuselages, OK results; build progress to date:
 October 7, 2020
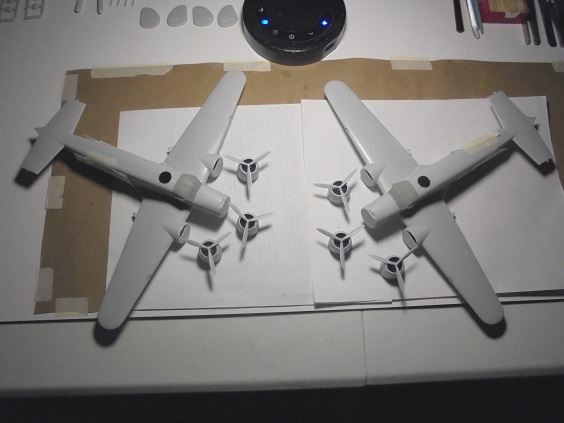
- > Engine cowling parts for both model builds assembled, interiors spray painted Humbrol 78 Matt Cockpit Green + Testors Flat White 50/50 mix + 36% Flat White shading enamels replicating Verde Anticorrosione, OK results.
- > Styrene injected-plastic cowling rings, engine carburator ram air scoops cut-separated from sprues & vacuform cowling parts all required extensive knife & sand-shaping work, some glue seam fill puttying & sanding necessary for all well.
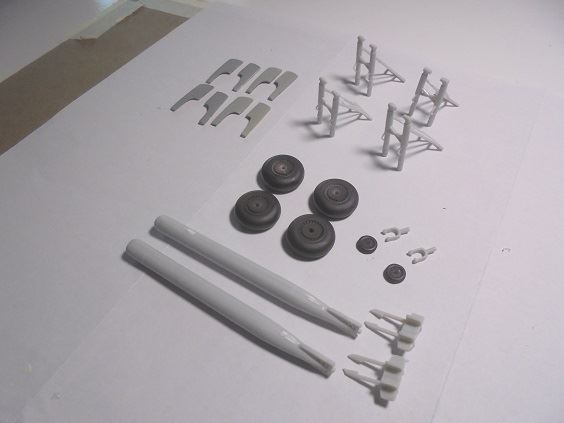
- > All injected-plastic landing gear well cover parts cut-separated from sprues, extensively knife & sand shaped, interior sides sprayed Verde Anticorrosione, OK results.
- > All injected-plastic FIAT A.80 radial engine parts cut-separately from sprues, extensively knife-shaped, crankcases spray painted Testors Model Master 2105 Dark Blue Gray, engine cylinders Testors Flat Black & White "special mix", OK results.
See Group V - BroPlan Vacuform Builds - Part II Post Below To Continue