Gull Models 1:48 Macchi C.202

Post in-progress or completed model pics here
dylan the rabbit
Pilota
Posts: 9
Joined: Fri May 15, 2009 9:18 am
Location: Dubai

Gull Models 1:48 Macchi C.202

Post by dylan the rabbit » Fri May 15, 2009 9:26 am

I started this kit over on a vac-form group build on Britmodeller.com

Gregory Jouette asked if I could post the build progress up here, as he thought you guys might like to see it.

I don't know much about this manufacturer at all. Nothing in fact.

I trawled the net and found one chap on a forum (who's contact I think I lost) who said that this kit was the bollocks before the Hasegawa came out, which killed it stone dead.

Anyway, I bought this of evilbay a couple of years ago during my reckless stash aquisition, and is the only vac form in my collection.

Image

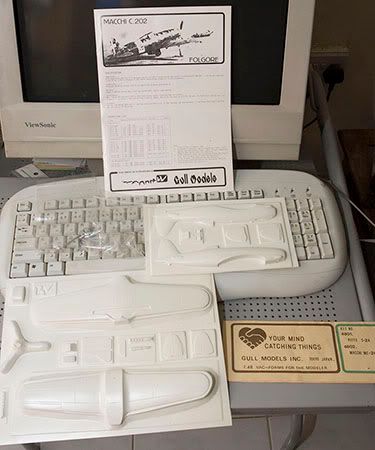
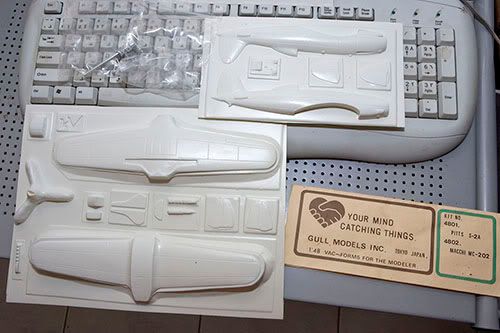
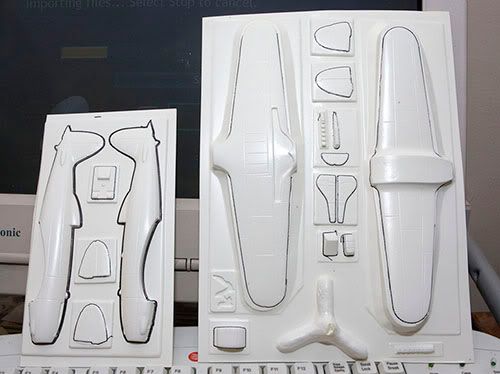
Standard fare from a vac form? White metal prop and undercarraige, sparse cockpit (a floor, seat and IP), and a canopy, and thats it.

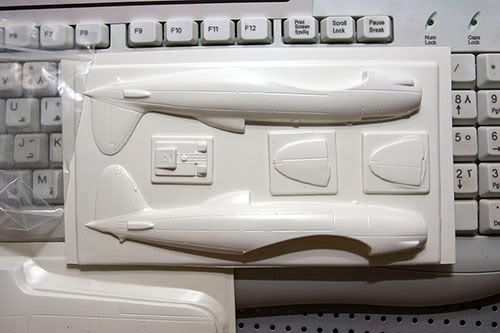
The panel lines look like something Tommy Atkins would have dug into the Flanders earth, and the surface quality isn't fantastic. Lovely!

There are no decals, and if it ever gets to the stage where I will continue with it, I'll see about getting some from Pacific Coast Models, or begging for some spares!

Image

Image

Image

To it's credit, it does come with a really nice instruction book, with scale drawing references which should help massively if I rescribe it.

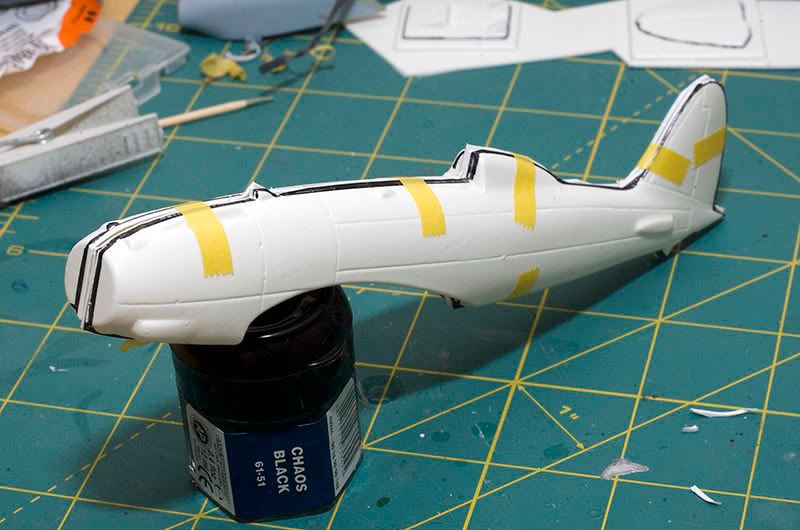
I've gone round the outlines of the major parts with a black pen (a bit thick around the airframe I know), and will make a start on cutting it out over the weekend.

Image

Watch this space!

Cheers,

Nick

User avatar
Capitano
Generale di Brigata Aerea
Posts: 278
Joined: Sat Dec 06, 2008 10:38 pm
Location: Just far enough away from Chicago.

Post by Capitano » Fri May 15, 2009 10:33 am

Dylan, welcome to the forum and thanks for posting this for us. No matter the kit, a vacu-kit build will be helpful.

So tell me, is that triangle blobby piece the propeller? You have got to be kidding me! You said a white metal prop but what is that? How many pieces are not vacu-pieces? Is there any interior detail? It seems to me that a trip to the resin and p-e aftermaket is going to be necessary to make this model more than something you find at a 5 and dime store.

Good luck.

User avatar
GAJouette
Generale di Divisone Aerea
Posts: 333
Joined: Wed Sep 12, 2007 2:11 pm
Location: Southern U.S

Post by GAJouette » Fri May 15, 2009 10:54 am

Nick,
Welcome to Stormo my friend and thanks for posting.As a builder of vacuform kits I'll be following this thread with great interest.
Regards,
Gregory Jouette

User avatar
GAJouette
Generale di Divisone Aerea
Posts: 333
Joined: Wed Sep 12, 2007 2:11 pm
Location: Southern U.S

Post by GAJouette » Fri May 15, 2009 11:13 am

Capitano wrote:Dylan, welcome to the forum and thanks for posting this for us. No matter the kit, a vacu-kit build will be helpful.

So tell me, is that triangle blobby piece the propeller? You have got to be kidding me! You said a white metal prop but what is that? How many pieces are not vacu-pieces? Is there any interior detail? It seems to me that a trip to the resin and p-e aftermaket is going to be necessary to make this model more than something you find at a 5 and dime store.

Good luck.
Paul,
As a vac builder too I can tell you what you see posted above is pretty much standard fare in vacuform kit.Generally speaking you'll need to raid the Spares Box for your details and or scratch build what's needed.Having said that some do include items like white metal props,misc.w/m parts as well some basic interior part vacuformed on the sheet.These vac kits do require a lot more work than the plastic kit,true .But if done right can be very rewarding.If you'ld like I can post my Macchi 202 vac kit which is WIP.That would give you a better idea of how it's done,take my friend,later.
Regards,
Gregory Jouette

User avatar
Capitano
Generale di Brigata Aerea
Posts: 278
Joined: Sat Dec 06, 2008 10:38 pm
Location: Just far enough away from Chicago.

Post by Capitano » Fri May 15, 2009 12:37 pm

I don't have any vac kits. I have looked at some but took a pass. The closest to a vac kit I have is the limited run Fonderie PV-1 Ventura kit that has all of the resin, white metal, p-e stuff. The casting is some what crude that there are no locator pins, the finish is rough, etc. There was a recent post at another model site where some one actually finished the Ventura kit and it was pretty much a beeyotch to build.

Vac kits do require a higher level of model building from the shake and bake boxes like Tamiya and Hasegawa offer. Any one who masters these kits and produces a quality model has my applause. There is a measure of self accomplishment when one finishes a limited run or a vacuform kit. Conquering the model gods is always a satisfying thing.

Paul

dylan the rabbit
Pilota
Posts: 9
Joined: Fri May 15, 2009 9:18 am
Location: Dubai

Post by dylan the rabbit » Fri May 15, 2009 12:40 pm

Thanks for the replies guys.

The white blobby prop looking thing contains the metal prop and spinner on the other side of the sheet! I just didn't shoot it.. Will do when I get round to it.

There are also some metal parts for the undercarriage (very basic) and the wheels are also metal.

I'm not going to buy any aftermarket for this. Whatever goes in the cockpit, I'll make up from bits of plastic card and whatever I can find. The only thing I can see myself buying for this are the decals, and maybe some of Mike Grant's smoke rings (if I decide to put them on it).. Early days yet.

I've got some great reference pics, so I know already I need to make up sidewalls with gubbins and a headrest.

It's my first vacform however, so it may even end up in the bin!

Cheers,

Nick

Editor
Site Admin
Site Admin
Posts: 2345
Joined: Thu Jul 24, 2003 3:53 pm
Location: Canada
Contact:

Post by Editor » Fri May 15, 2009 8:26 pm

Welcome to Stormo Nick and thank you for your very interesting post! I'm looking forward to watching your progress. I've always wanted to give a vacform a whirl and I'm sure I'll learn a thing or two. I was in Abu Dhabi last June, it was lovely weather :)
Image

dylan the rabbit
Pilota
Posts: 9
Joined: Fri May 15, 2009 9:18 am
Location: Dubai

Post by dylan the rabbit » Sat May 16, 2009 7:43 am

Thanks Paul.

What were you doing in Abu Dhabi last year?

Cutting of the kit has commenced! The fuselage is off the sheet courtesy of a Stanley knife, and it doesn't look too bad. Needs a lot of sanding, but that's kits these days eh? (Or is that just me?)

Pics tomorrow.

Cheers,

Nick

Editor
Site Admin
Site Admin
Posts: 2345
Joined: Thu Jul 24, 2003 3:53 pm
Location: Canada
Contact:

Post by Editor » Sat May 16, 2009 9:28 pm

Hi Nick,
I was in Abu Dhabi last year on a work related assignment - engineering software on the upstream. As I recall we hit 54C and stayed above 50C the entire time I was there (2 weeks). Fortunately it cooled down to 30C in the evenings :) The pool in the hotel needed to be chilled :) How long have you been in Dhubai ?
Image

dylan the rabbit
Pilota
Posts: 9
Joined: Fri May 15, 2009 9:18 am
Location: Dubai

Post by dylan the rabbit » Sun May 17, 2009 5:34 am

Hi Vince,

Called you Paul in my last post.. Sorry bout that. V.tired when I posted!

I've been out here 16 years this August.. Seen quite a few changes!

Here's the latest pic on the Macchi..

Image

I'm going to fill in the trenches on the body with a sprue and glue mix, and then sand that back. I've got scale drawings of the Macchi, which I'll print on decal paper and overlay on the kit parts prior to scribing over them. That's the theory anyway!

More to follow.

Cheers,

Nick

User avatar
Capitano
Generale di Brigata Aerea
Posts: 278
Joined: Sat Dec 06, 2008 10:38 pm
Location: Just far enough away from Chicago.

Post by Capitano » Sun May 17, 2009 9:13 pm

What 'plastic' is a vac kit made out of? Will solvents melt it and turn it into a blobby mess?

User avatar
GAJouette
Generale di Divisone Aerea
Posts: 333
Joined: Wed Sep 12, 2007 2:11 pm
Location: Southern U.S

Post by GAJouette » Sun May 17, 2009 9:47 pm

Paul,
The plastic is Styrene,just like Evergreen Plastic Stock is.I use Ambroid or Tenax 7R Plastic welder for the general construction,such as the fuselage,wing ,and so on.Since everything is well handled during construction I use Zap to reinforce the seams of the fuselage by flowing the zap down the seam ,the spreading it with an old brush.I've found that if I didn't take this step it was all to easy to pop the seams while handling the model or applying decals.If ever get a wild hare to try a vac kit please let me know as I have several in the stash,and would gladly give you one as a sort of trainer kit.Just a thought,if you're interested feel free to contact me anytime.
Regards,
Gregory Jouette

dylan the rabbit
Pilota
Posts: 9
Joined: Fri May 15, 2009 9:18 am
Location: Dubai

Post by dylan the rabbit » Sun May 17, 2009 10:02 pm

So, you prefer to use that stuff instead of superglue Gregory?

I'm looking around for an alternative to CA for the build, as I want something with a slightly slower setting time!

I've just checked the fuselage halves against the supplied scale drawings with the kit, and I'm amazed how a manufacturer could get the two so different!

One of the major boobs is the fuselage shape behind the pilot. Instead of a sweeping arc, it looks more like a hunchback, so I'm going to have to take a copy of it, and scratchbuild a new hump out of thin plastic.

Add to that, all the other bits and bobs on the fuselage are in the wrong place, I'm thinking, what the hell were they thinking building it, and what the hell am I thinking building it too!

Much easier to get a Hasegawa!

Oh well. Why make life easy? I'll go build myself a nice Tamiya as therapy after I finish this!

Cheers,

Nick

User avatar
GAJouette
Generale di Divisone Aerea
Posts: 333
Joined: Wed Sep 12, 2007 2:11 pm
Location: Southern U.S

Post by GAJouette » Mon May 18, 2009 8:39 am

dylan the rabbit wrote:So, you prefer to use that stuff instead of superglue Gregory?

I'm looking around for an alternative to CA for the build, as I want something with a slightly slower setting time!

I've just checked the fuselage halves against the supplied scale drawings with the kit, and I'm amazed how a manufacturer could get the two so different!

One of the major boobs is the fuselage shape behind the pilot. Instead of a sweeping arc, it looks more like a hunchback, so I'm going to have to take a copy of it, and scratchbuild a new hump out of thin plastic.

Add to that, all the other bits and bobs on the fuselage are in the wrong place, I'm thinking, what the hell were they thinking building it, and what the hell am I thinking building it too!

Much easier to get a Hasegawa!

Oh well. Why make life easy? I'll go build myself a nice Tamiya as therapy after I finish this!

Cheers,

Nick
Nick,
The Tenax 7R or Ambroid is my personal choice of glues for all my modeling both vacuform and styrene kits. I've found it works the best on joining the parts for vac has it actually melts (welds) to two halves together for an excellent bond.You could use the watery thin type of Zap for this but it sets very fast you had best have everything lined up correctly.Otherwise it's very difficult to separate the parts for a redo.That redo is a much easier to get done if you've used Tenax or Ambroid.A steady hand as always is a plus when you run a hobby knife down the seam to separate the halves.Another useful tip for gluing the halves together is never glue more than an inch at a time,it's much easier to separate in short lenghts.

As for use of kit supplied drawings , a word of causion.They're not always correct.Your best bet is to get a hold of some good references for the Macchi 202.I use ALi D'Italia #22 Aermacchi C.202,AeroDetail#15 Macchi C.200,202 and 205,and Aviolibri Special#1/#3 Macchi MC 202 (Parts 1&2).
It is also possible that your drawing depicts a different series than the masters used in vacuforming the kit itself.That could account for the some of the bits and bobs missing or in different locations on the fuselage.The odd shape of the hump behind the pilot may correctable using milliput (SP) or Tamiya Putty to avoid building an entire replacement.Not having the same kit as your Gull Models example I can't be 100% sure the kit supplied drawings are incorrect but over the years I've learded not to trust them too much.I hope this is helpful to you,as always feel free to contact me directly via PM or e-mail if I can be of assistance to you on this project.
Regards,
Gregory Jouette

User avatar
Capitano
Generale di Brigata Aerea
Posts: 278
Joined: Sat Dec 06, 2008 10:38 pm
Location: Just far enough away from Chicago.

Post by Capitano » Mon May 18, 2009 7:40 pm

GAJouette wrote:Paul,
The plastic is Styrene,just like Evergreen Plastic Stock is.I use Ambroid or Tenax 7R Plastic welder for the general construction,such as the fuselage,wing ,and so on.Since everything is well handled during construction I use Zap to reinforce the seams of the fuselage by flowing the zap down the seam ,the spreading it with an old brush.I've found that if I didn't take this step it was all to easy to pop the seams while handling the model or applying decals.If ever get a wild hare to try a vac kit please let me know as I have several in the stash,and would gladly give you one as a sort of trainer kit.Just a thought,if you're interested feel free to contact me anytime.
Regards,
Gregory Jouette
No thanks, I'll take a pass. I'm losing my hair fast enough without the extra problems of a vac kit. A Hasegawa Folgore or Veltro is good enough for me.

As for the glue, I never liked Tenax. I like CA and Tamiya glues. Actually I like a lot of the Tamiya paints and glues.

But wait, this thread is not about about what I like, its about a fellow modeler standing on the edge of a cliff hoping to soar like an eagle if he can put this mass of...um...er...plastic together.

Paul


.

Post Reply