I've made exceptions buying & building models of pre-1935 Italian aircraft, Caproni Ca.100 in particular, bought & built the entire Choroszy Modelbud Ca.100 line, glad I had, were good builds well as interesting to look at - - just found a Czech-made FLY 72013 1/72 Scale Caproni Ca.101 Piaggio Stella P.VII Engines resin kit for sale also on eBay "at a good price", bought it forthwith
Retired In Kalifornia's Italian Aircraft Model Builds In Progress Photos
-
RetiredInKalifornia

- Generale di Divisone Aerea

- Posts: 566
- Joined: Fri Jun 14, 2019 6:34 pm
BroPlan Caproni Ca.133 Up For Sale On eBay...
...An Australian eBay has it up for bid till Sunday January 12th, placed U.S. $90 then $100 bid, somebody or others have higher limits, gave up knowing could be years till another comes on the market; canopy was yellow-aged anyway. There also is a BroPlan Caproni Ca.111 up for sale, though about bidding on it but isn't as desirable.
I've made exceptions buying & building models of pre-1935 Italian aircraft, Caproni Ca.100 in particular, bought & built the entire Choroszy Modelbud Ca.100 line, glad I had, were good builds well as interesting to look at - - just found a Czech-made FLY 72013 1/72 Scale Caproni Ca.101 Piaggio Stella P.VII Engines resin kit for sale also on eBay "at a good price", bought it forthwith DO hope I'd not made a mistake here! Based on the 1927-vintage Ca.97 single-engine transport the Ca.101 trimotor was basis of the Ca.111 & 133 later also employed as a bomber, you'd think there be resins of the 111 & 133, haven't found them yet, if none forthcoming by end of 2022 the 101 will have to suffice in way of representing the 101-133 development line amongst my model builds.
I've made exceptions buying & building models of pre-1935 Italian aircraft, Caproni Ca.100 in particular, bought & built the entire Choroszy Modelbud Ca.100 line, glad I had, were good builds well as interesting to look at - - just found a Czech-made FLY 72013 1/72 Scale Caproni Ca.101 Piaggio Stella P.VII Engines resin kit for sale also on eBay "at a good price", bought it forthwith
-
RetiredInKalifornia
- Generale di Divisone Aerea
- Posts: 566
- Joined: Fri Jun 14, 2019 6:34 pm


-
RetiredInKalifornia
- Generale di Divisone Aerea
- Posts: 566
- Joined: Fri Jun 14, 2019 6:34 pm
Post Deleted.
Last edited by RetiredInKalifornia on Sun Jun 07, 2020 7:39 pm, edited 23 times in total.
-
RetiredInKalifornia
- Generale di Divisone Aerea
- Posts: 566
- Joined: Fri Jun 14, 2019 6:34 pm
Group II Resins: SEM Model Macchi C.205N-1 & N-2, Cunarmodel Macchi C.207, RS Models Reggine Re.2007 Resins
GROUP II RESIN MODEL BUILDS ARE COMPLETE, SEE BELOW FOR GROUP II PLASTIC BUILDS
Build Progress Reports Will Be Continuously Posted Here, Photos Of Built Models Will Be On Separate Postings
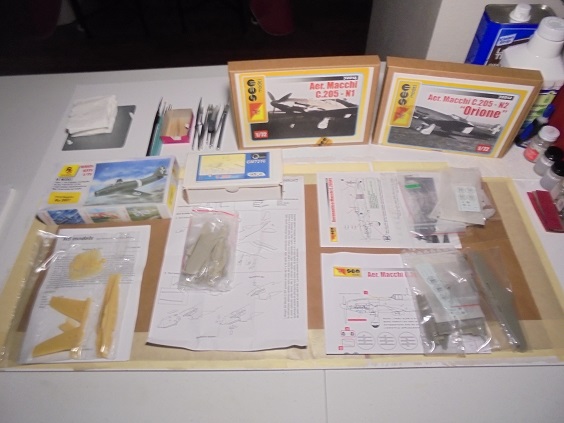
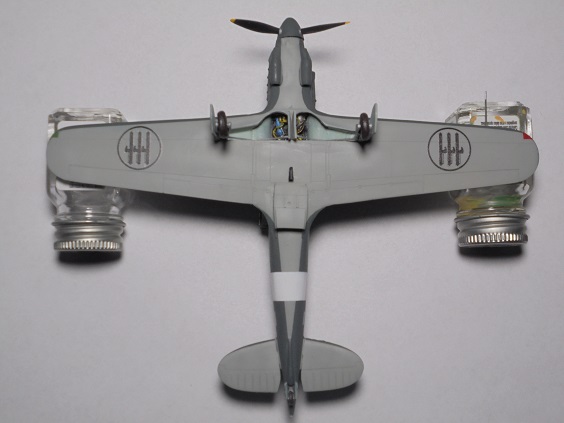
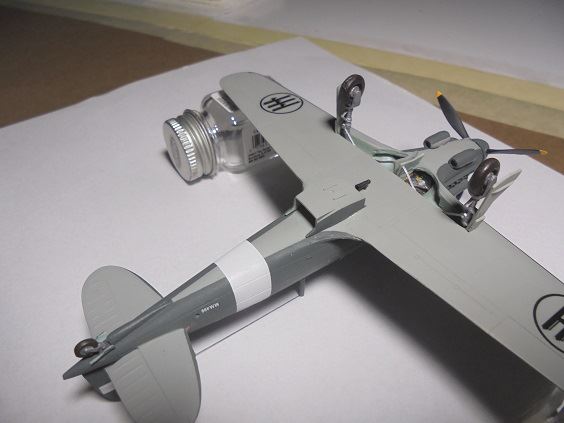
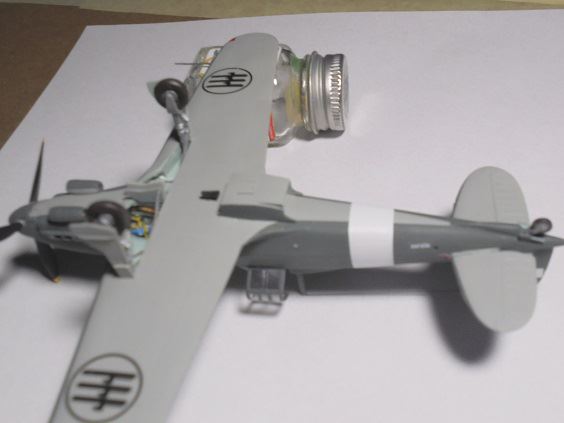
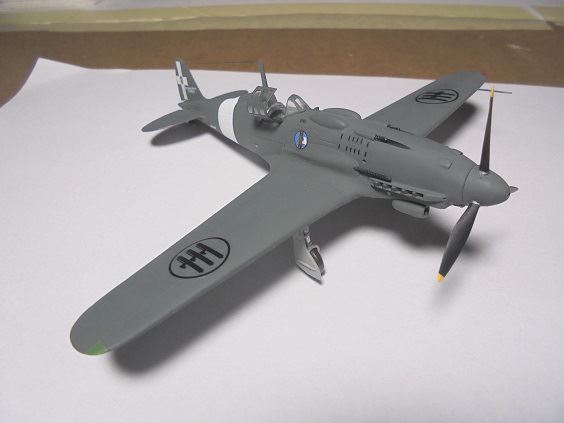
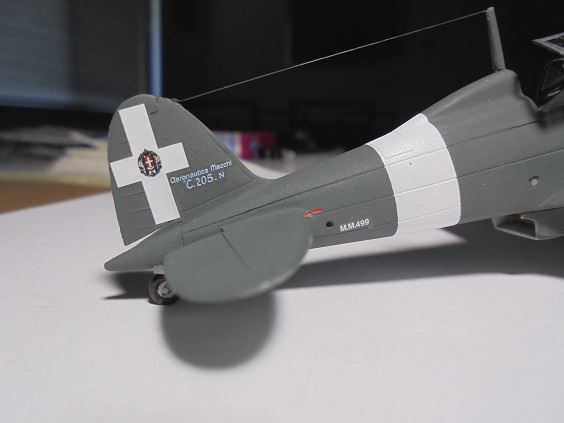
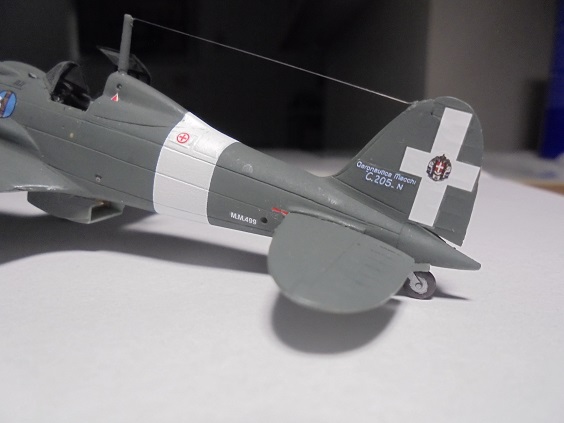
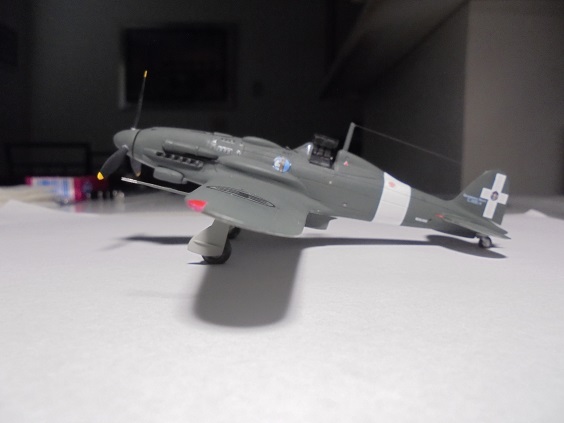
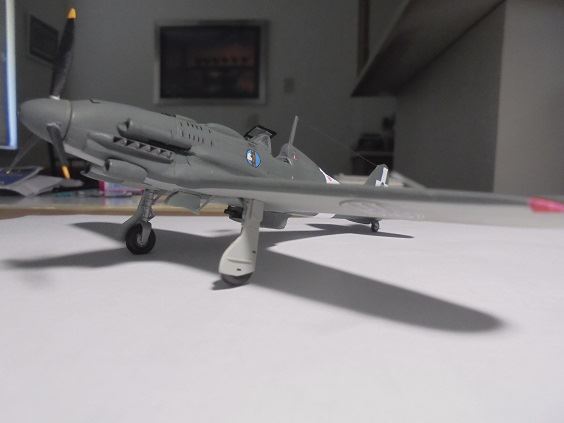
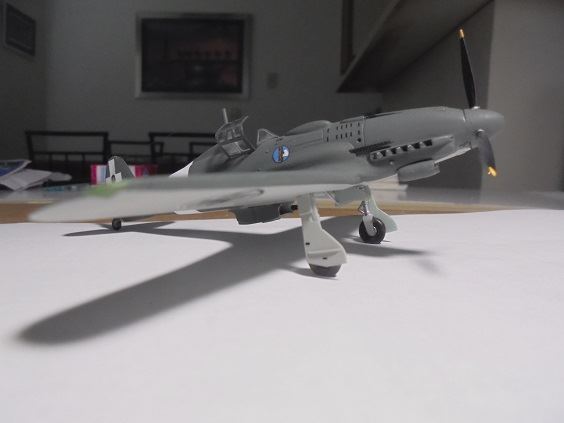
The SEM Model Macchi C.205N-1 & N-2 kits with resin, styrene plastic, brass et. al. parts are complete kits sporting Verde Oliva Scuro 2 & Grigio Azzurro Chiaro 1"Continental" schemes.
The Cunarmodel Macchi C.207 & RS Models Reggiane Re.2007 kits with resin, styrene plastic et. al. parts are complete kits finished "natural metal" given neither were constructed.
January 22, 2020
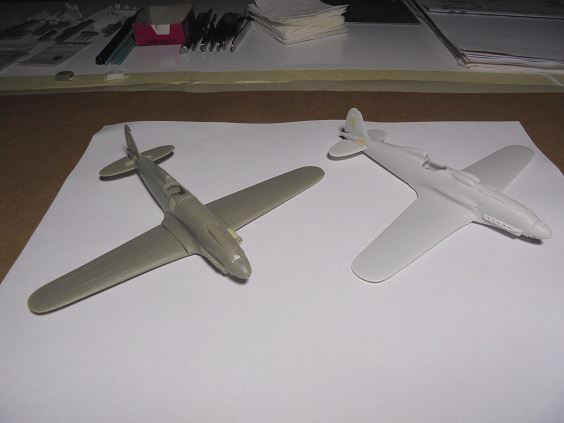
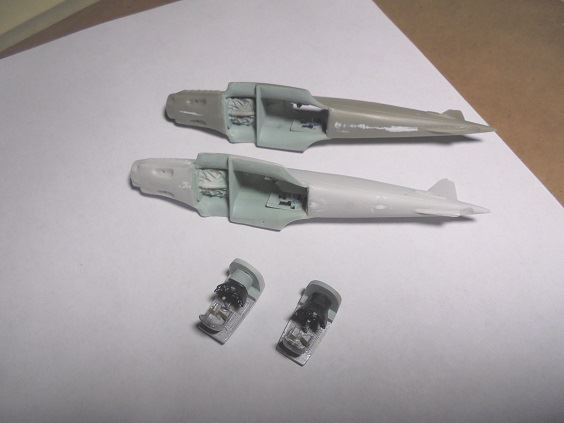
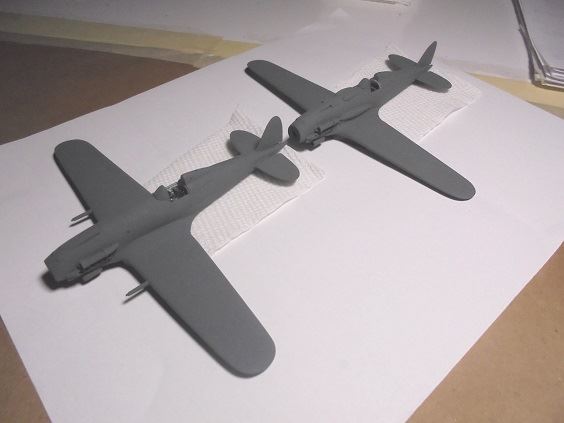
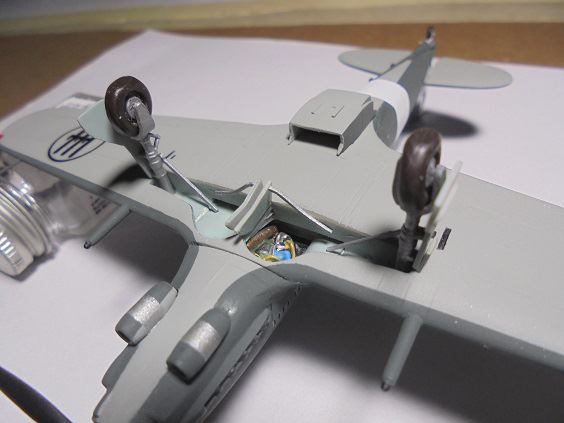
- > SEM Model Macchi C.205N-1/N-2 major model parts separated from sprues, trimmed, filed, sanded, puttied in spots, dry fitted:

January 23, 2020
- > Fuselage interiors & paneling, forward flight deck portions, mainwing landing gear parts & wheel wells, engine coolant radiator housings & supercharger intake insides spray painted Humbrol 78 Matt Cockpit Green + Testors Flat White 50/50 mix + 36% Flat White shading enamels replicating Verde Anticorrosione, set all aside to thoroughly dry before doing spray & hand detail painting.
January 24, 2020
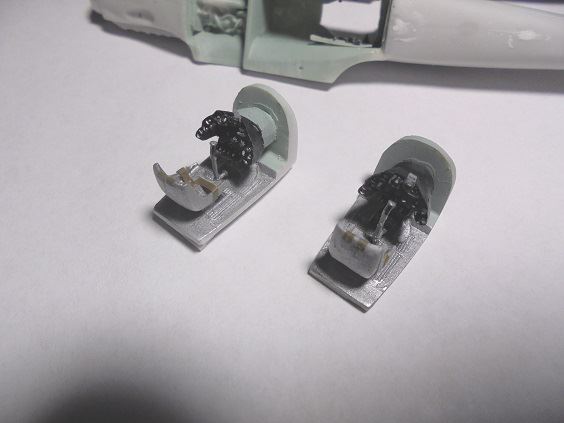
- > Cockpit rear bulkheads, rearward flight deck portions & pilot seats spray painted Testors Flat Aluminum enamel.
- > Instrument panels base spray & hand painted painted Testors Flat Black & White "special mix", hand detailed with White & Aluminum enamels.
- > Cut clear styrene plastic reflectors glued on instrument panel molded-in San Giorgio Tipo C gunsights.
- > Pilot instrument panels glued on extenders connecting to forward flight deck portions.
- > Control columns hand painted Aluminum & Flat Black & White "special mix".
January 25, 2020
- > Instrument panels on fuselage cockpit sides detail painted various Testors enamel colors & Flat Black & White "special mix", glued in place on fuselage cockpit sides.
- > Seat straps fabricated from cut pieces of Humbrol 29 Matt Dark Earth enamel sprayed over Scotch Magic Mending Tape, ends painted Testors Flat Aluminum enamels, glued on seats they then glued on flight decks.
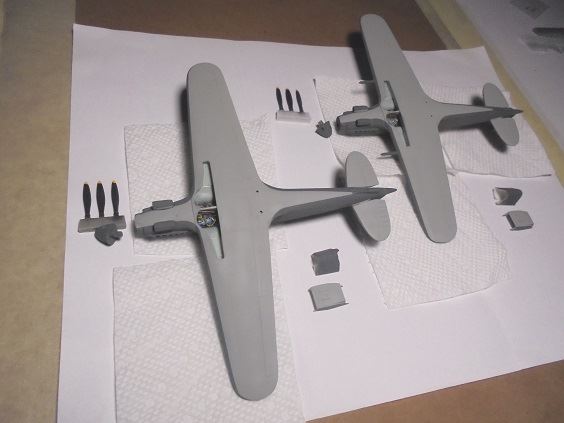
- > Control columns glued on flight decks:


January 26, 2020
- > Fuselage rear engine areas hand base painted Testors Black & White "special mix", details hand painted assorted Testors enamels:
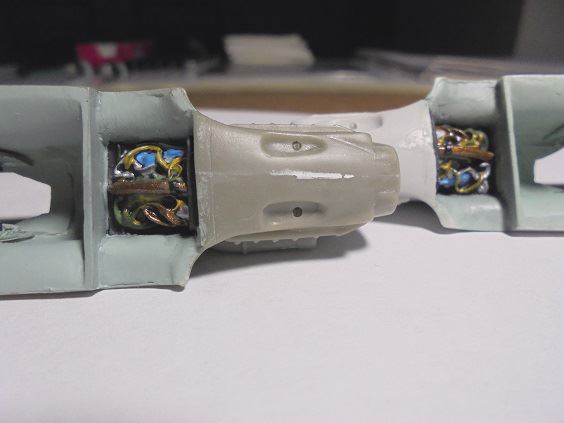
- > Cockpit flight deck assemblies glued in place inside fuselages, nightmarish work

- > Abysmally bad instrument panel fits had to cut them off flight deck mounts, fabricate & glued on them styrene sheet plastic tabs, aligned panels correctly with cockpits whilst gluing tabs on, good results
- > Repainted portions of flight deck & instrument panels, good results
- > Engine air intake pipes glued in place.
- > Abysmally bad fuselage-mainwing fits flight deck bottoms had to be extensively cut & sanded, good fits resulting
- > Fuselage-mainwings glued in place, joins puttied, minimal difficulty, models set aside to thoroughly dry before sanding:


January 27, 2020
- > Fuselage-mainwing seams sanded; additional puttying necessary followed by more sanding, longer than expected work, good results though.
- > Oil cooling cans smooth filed & sanded per period photos, glued in place on fuselages below engines.
- > Pliable clear vacuform cockpit canopies, trimmed off flash, filed & shape sanded.
- > Windscreen pieces cut off & shape sanded, glued on fuselages, good results.
- > Taping windscreens & openable canopy parts tomorrow, tedious work for sure
January 28, 2020
- > Windscreens & canopy parts taped, frames base painted Testors Flat Black & White "special mix" enamels per cockpit interior photos of some C.202s & C.205s.
- > Tailplanes & rudders glued in place, some putty filling & sanding around upper front rudders & sails needed.
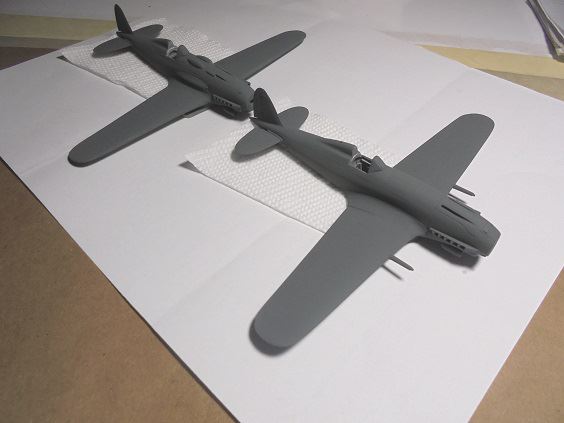
- > Topsides & canopy parts of both models spray painted Humbrol 91 Black Matt Green + Testors Flat White 36% by volume shading replicating Verde Oliva Scuro 2, set aside to dry till Thursday the 30th:
January 29, 2020
- > Propeller spinners & coolant radiator sides spray painted Humbrol 91 Black Matt Green + Testors Flat White 36% by volume shading replicating Verde Oliva Scuro 2.
- > Propeller blades spray painted Testors Flat Black & White "special mix", tips Flat White base & Yellow overspray enamels.
January 30, 2020
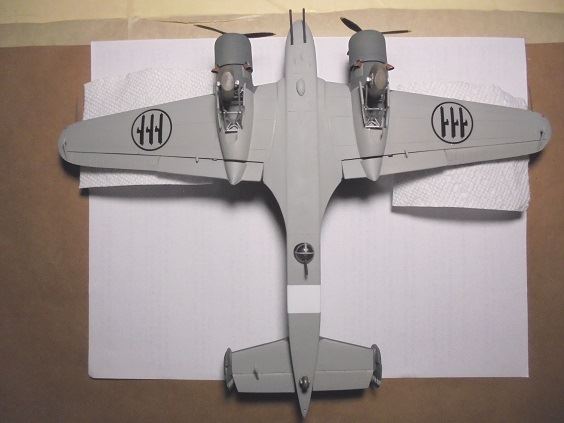
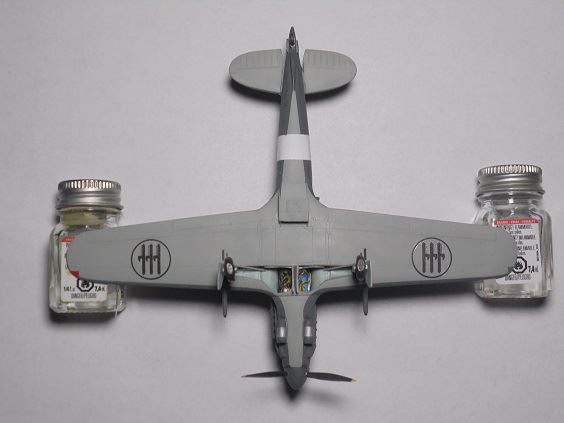
- > All model undersides including coolant radiator bottoms spray painted Testors Model Master 1726 Light Sea Gray + Testors Flat White 36% by volume shading replicating Giallo Azzurro Charo 1:

January 31, 2020
- > White fuselage identification bands & mainwing tip navigation lights masked off & spray painted on with Testors Flat Green & Model Master Insignia Red enamels.
- > Band locations were different for each of the C.205N prototypes per period photographs.
February 1, 2020
- > Engine cowling cooling louvers, machine gun troughs, C.205N-1 brass machine gun parts, C.205N-2 cannon shell & gas ejection ports spray & hand painted Testors Flat Black & White "special mix" enamels.
- > Four painted brass machine gun parts size-trimmed & glued in place on C.205N-1 cowling.
- > Engine exhaust ports masked off & spray painted spot mixed Testors Steel + "special mix" enamels, good results
February 2, 2020
- > Macchi C.205N-2 fuselage tail sail-rudder join putty broke apart whilst putting in upper hinge joint gap resin shim glued on fuselage tail sail-rudder top join.
- > After sanding shim & upper hinge joint gap puttying spayed Humbrol 91 Black Matt Green + Testors Flat White 36% by volume shading replicating Verde Oliva Scuro 2 (VOS2) enamels over sail & rudder, good results
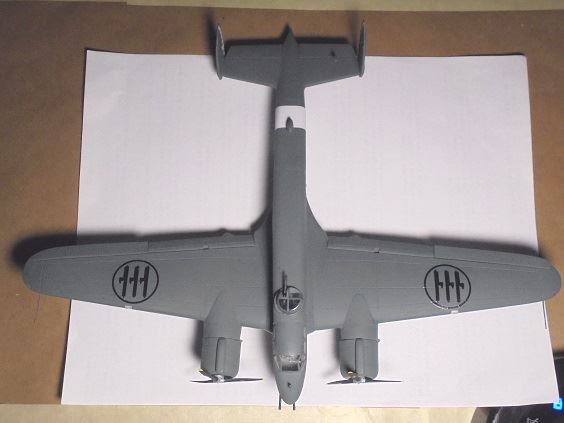
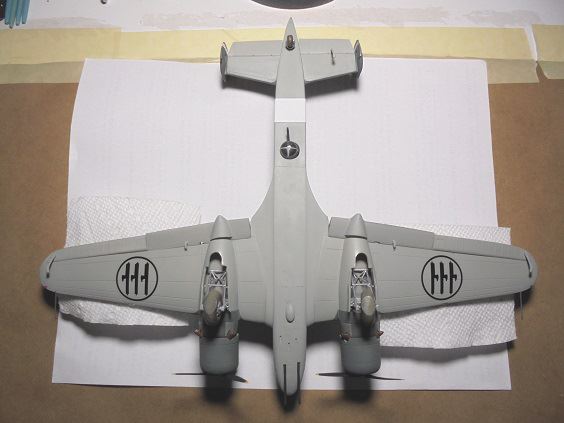
- > All period port-side photos of the C.205N-2 show three equidistantly spaced "bumps" of undetermined purposes laterally spread along the lower rear fuselage between trailing mainwing & tailplane leading edges, none seen starboard
- > "Bumps" glistened in sunlight, wouldn't had if were along the fuselage centerline, assuming they're offset to port glued on similarly shaped spare resin fairings from a Special Hobby FIAT G.55 kit, over sprayed them with VOS2
- > Period photos of port side Macchi C.205N-2 oil cooling can underneath the engine shows "natural metal" center section, spray painted it Testors Flat Aluminum & Steel enamels, did so with starboard can on assumption both were "natural metal"
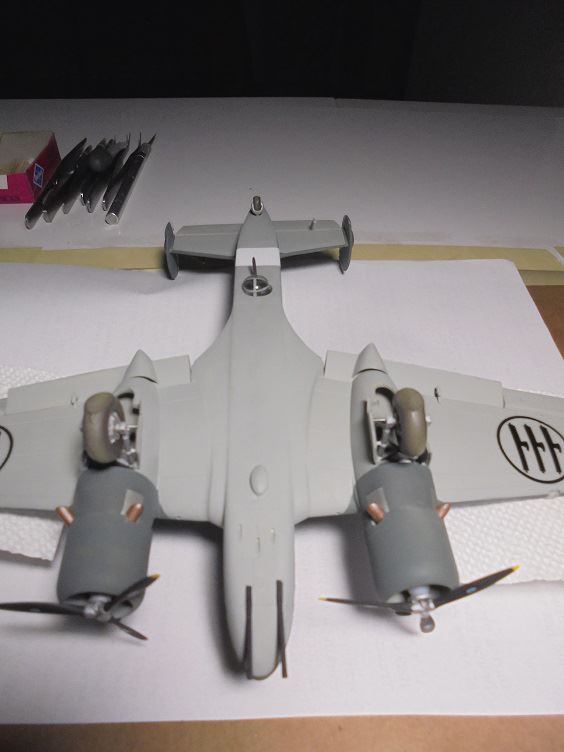
- > Macchi C.205N-1 & N-2 Main landing gear struts sprayed & hand painted Testors Flat Aluminum & Silver enamels.
- > Main landing gear & tail wheels hand painted Testors Flat Black, White, Rubber "special mix" & Aluminum enamels.
- > Main landing gear struts have wheel retaining holes inside wheel u-mounts, fabricated wheel retaining pins from scrap resin, glued them in wheel centers, slid pins in holes, good results
- > Outer main landing gear door parts spray painted Testors Model Master 1726 Light Sea Gray + Testors Flat White 36% by volume shading replicating Giallo Azzurro Charo 1, outer tailwheel door parts VOS2.
- > Macchi C.205N-1 & N-2 had ventilation risers port side in front of windscreens, fabricated them from styrene sheet plastic, painted them VOS2 + Testors Flat Black & White "special mix" enamels.
February 3, 2020
- > Fuselage electrical, compressed air & oxygen receptacle points detail hand painted with Testors Flat Black & White "special mix", Aluminum & White, Model Master Insignia Red enamel paints per Aero Detail 15 Macchi C.200/202/205 pages 68 & 69 for C.205Vs in locations they likely would had been placed on the Macchi C.205N-1 & N-2.
- > Well known & published C.205N-2 period photograph clearly show the engine starter electrical power receptacle below the port side exhaust stacks, C.205N-1's likely starboard per C.205Vs, painted both of them on, former per period photo, later per Aero Detail 15 placement.
- > SKY Models 72-014 Macchi C.202 & 72-034 C.205V white Distintivo di Guerra water decals applied on fuselage rudders; larger 72-014s on C.205N-2, smaller 72-034s on C.205N-1 per period photographs of Real McCoys.
- > All fuselage C.205N-1 model kit decals were applied, mainwing tri-fasci will be tomorrow.
February 4, 2020
- > Macchi C.205N-1 & N-2 oil cooling cans openings hand painted with Testors Bronze enamel.
- > C.205N-1 & N-2 kits lacked portside Pitot tube parts fabricated them from styrene sheet plastic, hand base painted Humbrol 91 Black Matt Green + Testors Flat White 36% by volume shading replicating Verde Oliva Scuro 2, glued them in drilled holes, painting tube tips later.
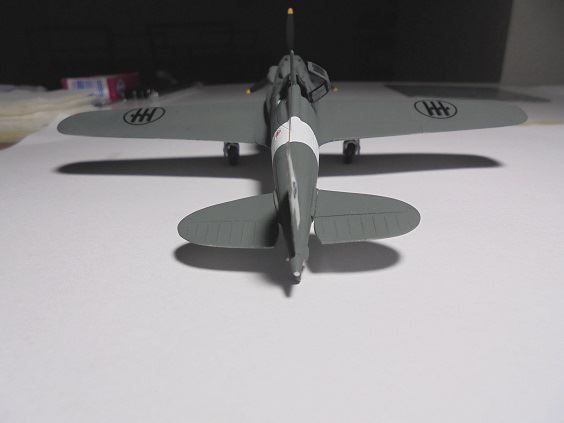
- > All model kit water decals applied on C.205N-1 & N-2 models including mainwing tri-fasci, work took half-again longer than expected, good results nonetheless
- > Red spare tailplane incidence arrow marker water decals taken from a Special Hobby Macchi C.200 kit decal sheet applied on C.205N-1 & N-2 models ala Aero Detail 15 placements for C.202s & C.205Vs assuming they also had them.
February 5, 2020
- > C.205N-1 & N-2 Pitot tube ends hand painted Testors Flat Aluminum enamel, typically paint them Bronze, made exceptions per period photos suggesting metals other than bronze.
- > All mainwing & tail landing gear parts glued in place, great results 
- > Fuselage holes for tailwheel mounts plugged-up drilled them out, glued in mounts.
- > Model kit tailwheel well covers ala those for factory-built C.205V glued in place.
- > Humbrol 91 Black Matt Green + Testors Flat White 36% by volume shading enamels replicating Verde Oliva Scuro 2 (VOS2) spot hand painted around covers.
- > Pre-spray painted mainwing landing gear parts separated from sprues.
- > Wheel mount struts glued in place.
- > Wheel mount strut retractors not provided with model kits fabricated them from styrene sheet plastic, hand painted Testors Flat Aluminum enamel, glued in place behind struts.
- > Mainwing landing gear well covers separated from sprues.
- > Large outboard covers glued on wheel struts, small sliding covers glued on mainwings in front of them.
- > Small inboard mainwing landing gear well covers hinged on fuselage centerline, bow-shaped retractors not provided with model kits fabricated them from styrene sheet plastic, glued them on inside well covers, hand painted them Testors Flat Aluminum, glued covers in place on fuselage centerline.
- > Venturi tubes hand painted Testors Flat Black & White "special mix" enamels, glued in holes drilled in model fuselages.
- > C.205N-1 Venturi located in front of engine coolant radiator ala Macchi C.202s per period photos, C.205N-2's midway down starboard side fuselage below machine gun & cannon access panel ala Macchi C.205Vs, "educated guess" given no readily available starboard side period photos of the C.205N-2
- > Radio masts hand painted VOS2, glued in place in fuselage centerline holes behind cockpit canopy.
- > Painted propeller spinner & blade parts assembled for both models, good results though one blade for each assembly is slightly smaller - mold tooling error
- > Models are complete except for spraying on clear semigloss lacquer coating, rigging radio antennas with EZ Line stretch thread, gluing on cockpit canopy hinged covers, work completed tomorrow.
February 6, 2020
Macchi C.205N-1 & N-2 Models Are Complete, See Posts Below
February 7, 2020
The RS Models Reggiane Re.2007 resin model kit with clear plastic canopy will be finished in post-WWII Aeronautica Militare Italiana all-aluminum livery & cockades.

February 8, 2020
- > Fuselage cockpit inside walls, pilot seat mounting platform, landing gear doors & nosewheel box insides spray & touch-up hand painted Humbrol 78 Matt Cockpit Green + Testors Flat White 50/50 mix + 36% Flat White shading enamels replicating Verde Anticorrosione.
- > Pilot seat, landing gear door outsides & wheel struts, internal fuselage nose jet engine air intake areas forward of cockpit, jet exhaust areas around tailpipe spray painted Testors Flat Aluminum enamel.
- > Forward cockpit & pilot seat mounting platform instrument panels hand painted Testors Flat Black & White "special mix" enamels.
- > Scotch Magic Mending Tape spray painted Humbrol 29 Matt Dark Earth enamel for fabricating pilot seat belts.
February 10, 2020
- > Entire fuselage interior work complete excellent results
- > Cut strips of painted over Scotch Magic Mending tape replicating pilot seat belts glued in place, "buckle" ends hand painted Testors Flat Aluminum enamel.
- > Model lacked rudder control bar, fabricated it from styrene sheet plastic, hand painted Flat Aluminum, glued in place on forward flight deck.
- > Kit joystick disintegrated whilst trimming it fabricated BETTER replacement from styrene sheet plastic, glued it on salvaged kit joystick base, hand painted Flat Aluminum & Testors Flat Black & White "special mix enamels, glued assembly on flight deck in front of rudder control bar.
- > Pilot seat glued in place on flight deck behind joystick assembly.
- > Kit included oxygen bottle & additional flight instrument parts to be mounted adjacent to pilot seat, way too large didn't use them, tossed in spare parts bin.
- > Flight deck port & starboard topside edges, forward cockpit instrument panel part hand painted assorted Testors enamel colors replicating flight instruments.
- > Forward cockpit instrument panel glued on top of forward flight deck port & starboard topside edges behind rudder control bar.
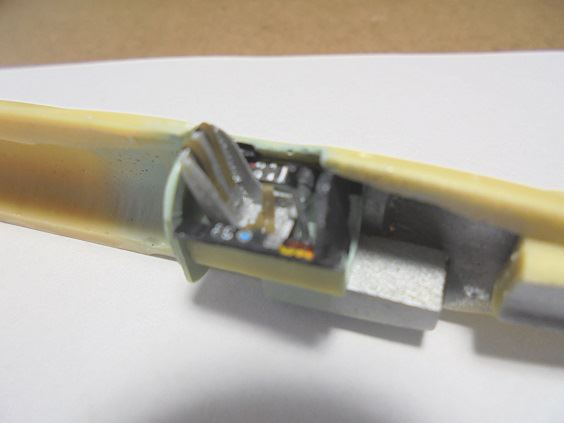
- > Cockpit area fuselage halve interior sides semi-circular slope-molded to support flight deck, no place to glue in fuselage interior bulkhead behind it gouged slots in fuselage halve slopes, trimmed bulkhead sides, glued later in portside slot, good results
- > Glued nose landing gear box in place inside port fuselage halve, good alignment
- > Sprayed & hand painted Humbrol 78 Matt Cockpit Green + Testors Flat White 50/50 mix + 36% Flat White shading enamels replicating Verde Anticorrosione & Flat Aluminum around landing gear box & fuselage bulkhead, sprayed Verde Anticorrosione over starboard side slope slot.
- > Glued in flight deck above landing gear box, good alignment
- > Fuselage nose jet air intake stake insides painted Flat Aluminum, glued in place on port fuselage halve, good alignment
- > Drilled out hole in solid resin jet exhaust "can" part, hand painted insides with spot mixed Testors Steel, Flat Black & White "special mix" enamels, glued in place on port fuselage halve.
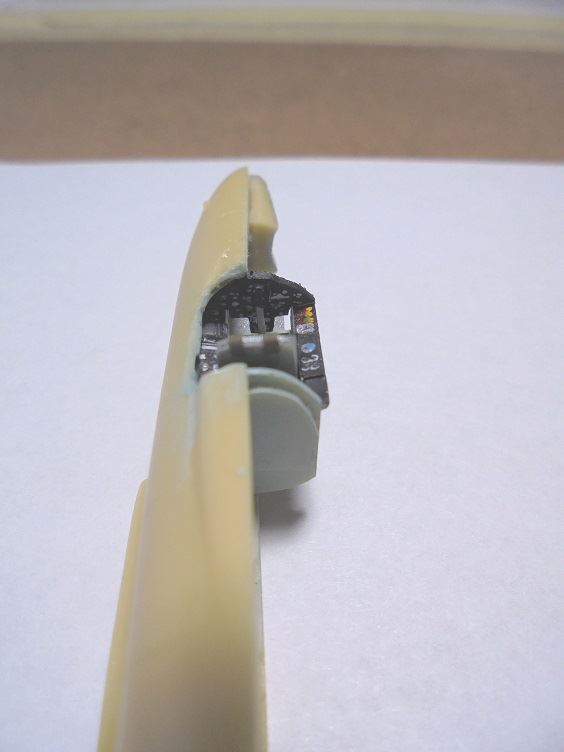
- > Fuselage interior assemblies as described:
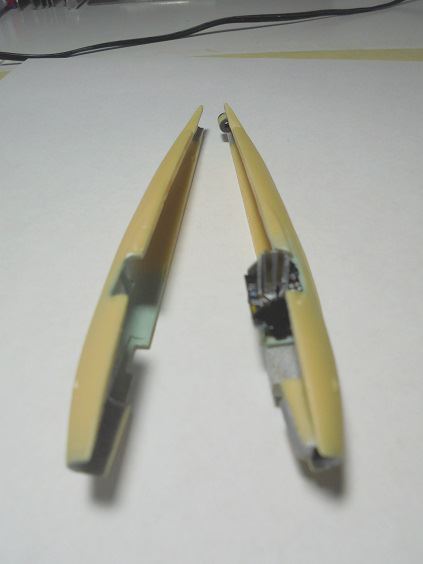
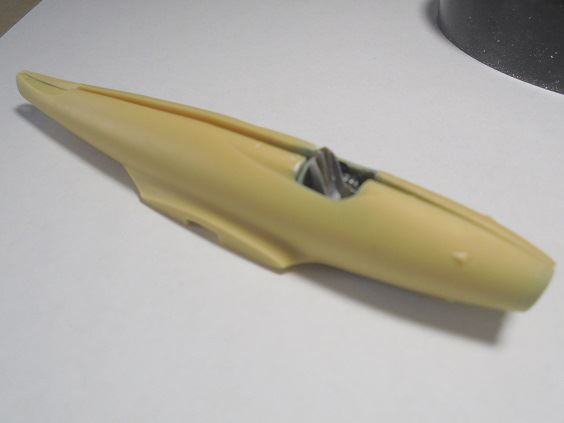
- > Fuselage Halve Test Fits:
February 11, 2020
- > Fuselage halves glued together, seams puttied filled & sanded.
- > Cannon barrel seats drilled out around fuselage nose, OK test fits with "cannons" fabricated from salvaged circular cut plastic pieces out of spare parts bin.
- > Mainwings glued on fuselage, seams putty filled, wing root join trailing edges built up for later shape-sanding.
- > Tailplane & rudder-sail parts glued on upper rear fuselage, large gap between rudder-sail & tailplane parts puttied filled.
February 12, 2020
- > Entire model over-sprayed with Testors Flat Aluminum enamel paint.
- > Lumpy-bumpy fuselage dorsal spine glue join aft of cockpit to rudder-sail revealed after spraying filing & sanding necessary to remove lumps-bumps, resprayed, dorsal spine top now too flat  more sanding necessary to round it, resprayed again, got good results
February 13, 2020
- > Lumpy-bumpy casting defects ventral fuselage-mainwing area revealed after first entire model spraying filled them, good results after smooth sanding, respraying with Testors Flat Aluminum enamel paint.
- > Flash removed from one-piece supposed pliable clear vacuform plastic cockpit canopy, crack formed half-way around starboard canopy 2mm from aft end after trimming, filing, sanding, test fitting canopy over fuselage cockpit filled in crack with cyanoacetate glue, let dry, oil-sanded it over with very fine grit hobby sandpaper removing glue excess, OK results though crack remains visible.
- > Fuselage cockpit walled off, clear canopy masked for painting, sprayed on Testors Flat Black & White "special mix" enamels over canopy frames, either side of cockpit enough to cover area where clear canopy will be glued on.
Valentine's Day February 14, 2020
Reggiane Re.2007 Model Complete, See Post Below
February 16, 2020
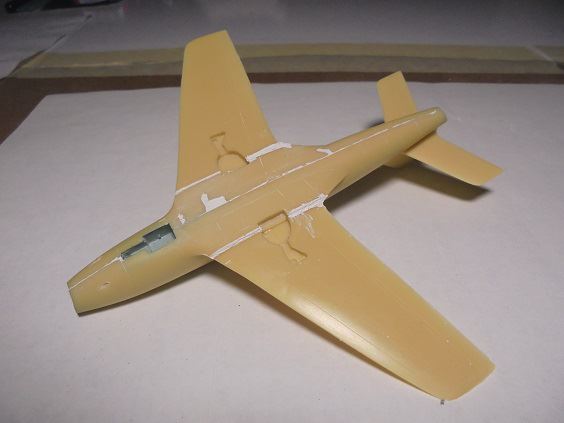
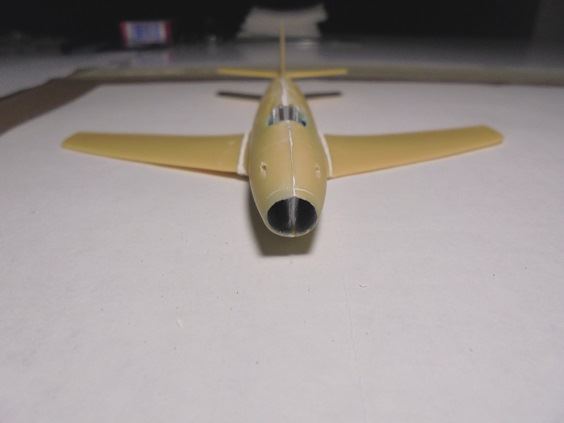
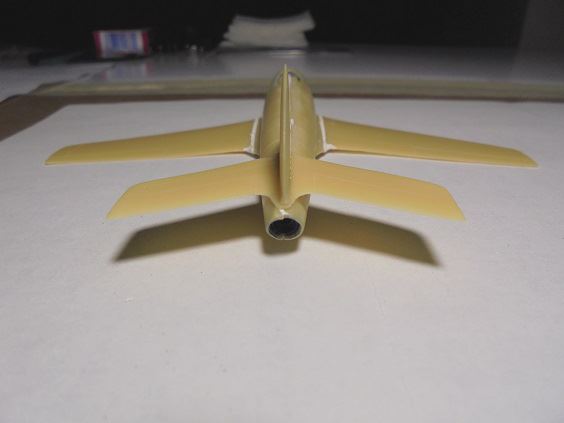
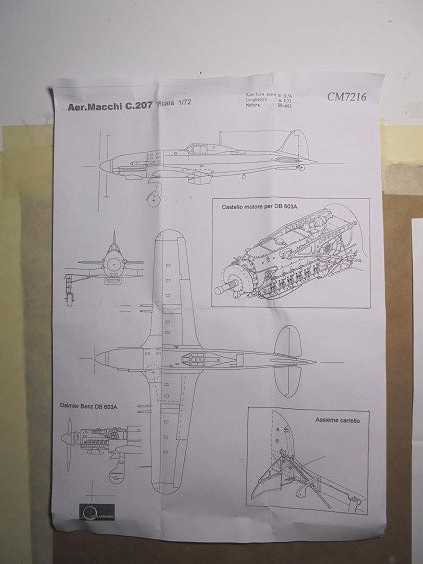
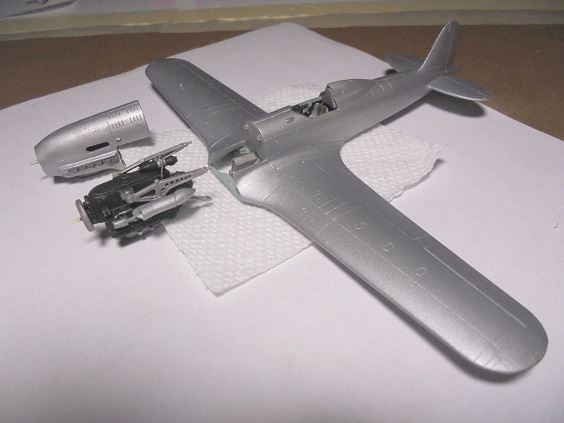
The Cunarmodel Macchi C.207 resin model kit with clear plastic canopy will be finished all-aluminum possibly without any markings on the airframe given the aircraft was never built.
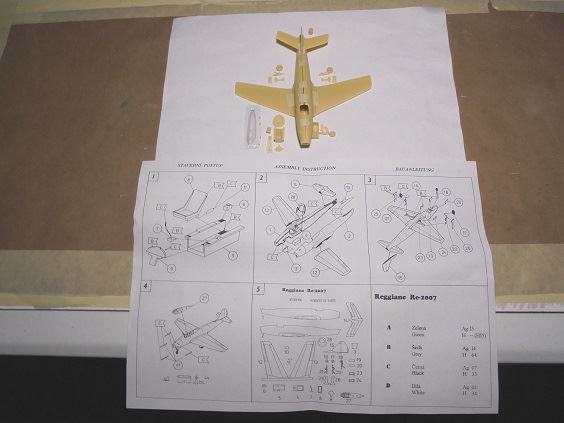
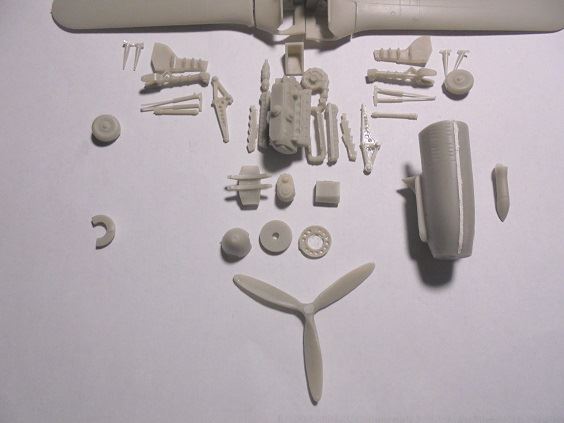
- > Kit Parts Layout:


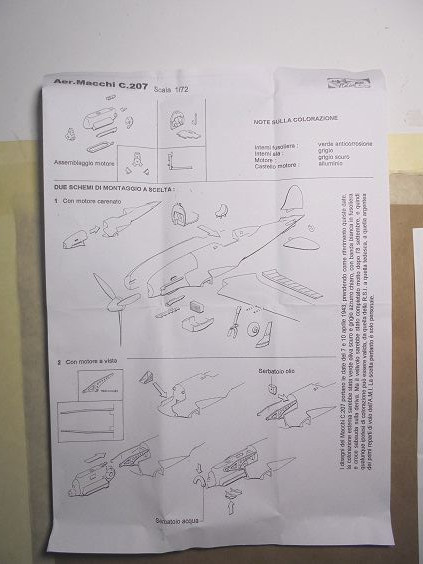
- > Kit Assembly Instructions With Supplemental Drawings Of The Daimler-Benz DB 603 Engine:
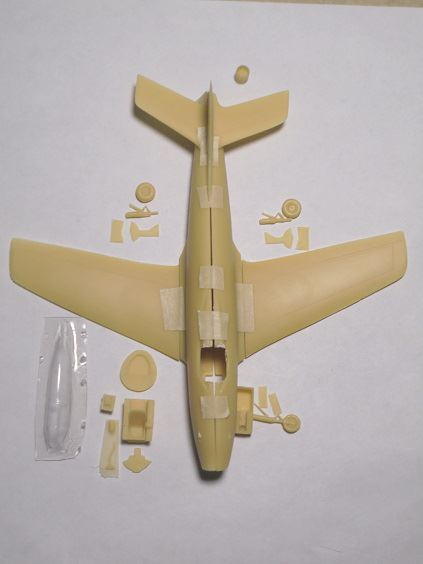
- > Portions of mainwing roots & port fuselage undersides had casting imperfections, they've been puttied over:
- > The kit allows for see-all engine viewing & cowling mounting options, still ascertaining whether either can be modified for interchangeable display:
- > The engine cowling already has been assembled well as seam puttied.
February 17, 2020
- > Fuselage halve interiors, mainwing wheel & flap well interiors, separate flap & mainwing landing gear wheel well cover part interiors spray painted Humbrol 78 Matt Cockpit Green + Testors Flat White 50/50 mix + 36% Flat White shading enamels replicating Verde Anticorrosione.
- > Kit doesn't have ventral fuselage centerline-mounted mainwing landing gear wheel well cover parts must fabricate them from sheet plastic later.
- > Mainwing landing gear struts, cockpit flight deck top, pilot seat, joystick, fuselage halve engine mounting areas spray painted Testors Flat Aluminum enamel, pending further research may need to overspray latter with Flat Steel.
February 18, 2020
- > Molded-in fuselage halve interior areas hand painted with various Testor & Flat Black + White "special mix" enamels per Aero Detail 15 Macchi C.200/202/205 publication locations.
- > Kit lacked tailplane trim wheel, fabricated one from styrene sheet plastic, hand painted it with Testors Flat Aluminum & "special mix".
- > Pilot seat belts fabricated from cut pieces of spray-over Scotch Magic Mending Tape with Humbrol 29 Matt Dark Earth, tips hand painted with Testors Flat Aluminum & "special mix" enamels, glued in place on pilot seat.
- > Pilot seat & joystick glued on flight deck, joystick grip handle hand painted "special mix".
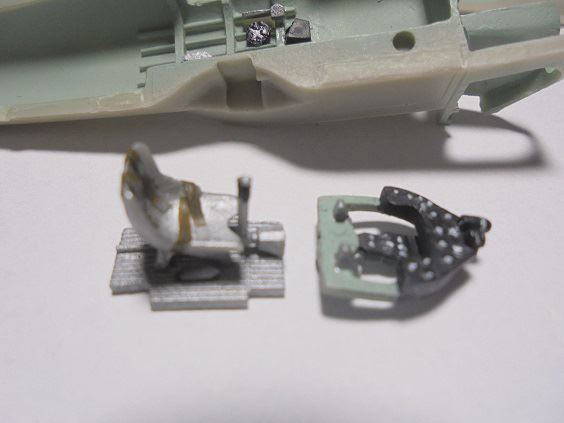
- > One-piece fuselage bulkhead with molded-in instrument panel & rudder bar foot rests spray & hand painted Humbrol 78 Matt Cockpit Green + Testors Flat White 50/50 mix + 36% Flat White shading enamels replicating Verde Anticorrosione & "special mix", instrument panel surface detail & rudder bar foots rests hand painted various Testor enamels per Aero Detail 15 Macchi C.200/202/205 publication locations:
February 19, 2020
- > Pilot head "armor plate" fabricated from styrene sheet plastic, glued in place on port side fuselage halve dorsal fairing, spray painted Testors Flat Steel enamel.
- > Cockpit instrument panel glued on flight deck, assembly glued inside starboard fuselage halve cockpit area.
- > Fuselage halves glued together, rudder-sail glued on fuselage, fuselage halve & rudder-sail seams puttied.
February 20, 2020
- > Puttied fuselage halve seams smooth sanded.
- > Mainwings & tailplanes glued on fuselage, seams puttied.
February 21, 2020
- > Mainwings & tailplanes glued on fuselage, seams smoothed sanded.
- > Entire model, engine cowling, ventral engine coolant radiator housing, main landing gear wheel cover outsides spray painted Testors Flat Aluminum.
February 22 & 23, 2020
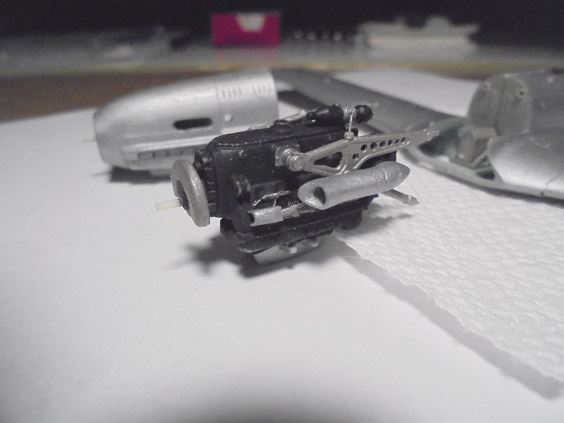
- > Daimler-Benz DB 603 engine fully assembled with Macchi C.202-style single-unit oil cooling radiator.
- > Engine base spray painted Testors Flat Black & White "special mix", engine bearers & coolant reservoir tank Flat Steel, other engine details Flat Steel & Aluminum.
- > Fabricated magneto spark plug wire leads from nylon fishing line hand painted with Flat Aluminum, glued them in place between magnetos & rear molded-in engine spark plug leads.
- > Model kit didn't have engine exhaust stacks, glued on hand painted with "special mix" + Flat Steel spot mix & Flat Aluminum spare resin Macchi-style ones with ram air housings trimmed to fit over engine exhaust headers.
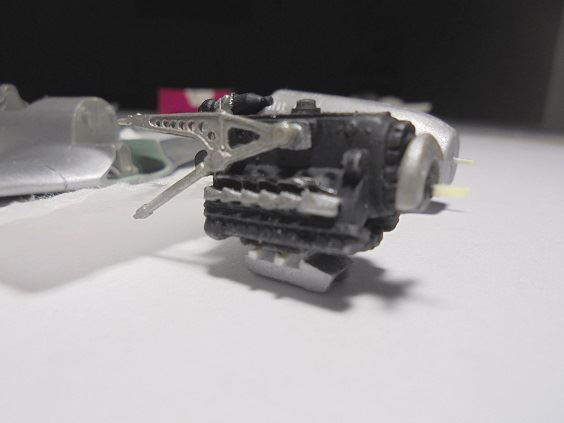
- > Model kit allows displaying mounted engine or engine cowling permanently glued on the fuselage, didn't like that
- > Holes drilled in top engine bearer & fuselage attachment points, cut-to-fit circular resin pins from spare parts bin glued in engine bearer attachment point holes allowing for optional "plug-in" engine mounting on fuselage
- > Holes drilled in engine cowling fuselage facing allowing for optional "plug-on" fuselage mounting
- > Holes drilled in center of engine air compressor center, ram air housing & engine cowling to accommodate shaped-to-fit circular plastic pin for optional display of ram air housing on engine air compressor and/or cowling.
- > Photos of the options will be presented when the model is complete.
- > Engine lubricating oil reservoir tank & mounting spray painted Flat Steel, assembled both, glued mounting on engine fuselage firewall between mainwing wheel wells:

February 24, 2020
- > Propeller unit fully painted with Testors Flat Black & White "special mix" & Flat Aluminum enamels & assembled, KORA Models 72.202 1/72 scale Macchi propeller logos applied on blades.
- > Fuselage dorsal area forward of cockpit windshield, anti-skid strip areas on mainwings adjacent to fuselage-mainwing joins masked off & spray painted "special mix".
- > Testors Flat Olive & Red enamels spray painted on mainwing tips as navigation lights.
February 25, 2020
- > Fuselage electric, air & oxygen receptacle attachment points hand painted various Testors enamel colors per Aero Detail 15 Macchi C.200/200/205 publication references for C.202/205 aircraft.
- > SKY Models 72-014 Macchi C.202 water decals employed to mark fuel & oil point locations & port side cockpit canopy latch control panel.
- > Azur 72-032 Macchi C.200 decals employed to mark tailplane incidence alignments.
- > Aeronautica Macchi "C-207" decals pieced together from several SKY Models 72-014 sheets placed on rudder-sail (wasn't going to do that but did )
February 26, 2020
- > Model kit lacked Pitot tube, fabricated one from styrene sheet plastic, mounted it on port mainwing.
- > Kit also lacked inboard fuselage main landing gear wheel well covers, fabricated them from styrene sheet plastic.
- > Four model kit 20mm cannon barrel housing butt-ends shaped carved & filed, glued on mainwing leading edges.
- > All above parts spray painted Testors Flat Aluminum enamel, wheel well cover insides Humbrol 78 Matt Cockpit Green + Testors Flat White 50/50 mix + 36% Flat White shading enamels replicating Verde Anticorrosione.
- > All landing gear wheels spray & hand painted Testors Flat Black, White, Rubber "special mix", hubs hand painted Flat Aluminum.
- > Fuselage tailwheel glued in place.
- > Main landing gear wheels glued on wheel mount struts, trimmed off not needed casted-in wheel hub retaining pins before doing so struts then glued on inner mainwing wheel well covers.
- > Wheel mount struts & covers too short to glue in wheel wells fabricated & glued on circular extenders from scrap plastic pieces, glued them in wheel wells followed by struts, good results
- > Model kit came with four mainwing landing gear retraction arms only two needed arms were too short others had to be glued on as extenders, didn't use them, fabricated "better" ones out of spare parts bin, spray & hand painted both with Testors Flat Black & White "special mix" & silver enamels, glued them inside mainwing wheel wells and on wheel mount struts.
- > Spot hand painted cannon barrel ends, mainwing shell ejection openings, mainwing landing gear retraction arm wheel well attachment points "special mix".
- > Engine coolant radiator spray painted Testors Bronze enamel, glued in molded-in ventral fuselage well, radiator housing glued on over it.
February 27, 2020
Macchi C.207 Model Complete, See Post Below
Build Progress Reports Will Be Continuously Posted Here, Photos Of Built Models Will Be On Separate Postings
The SEM Model Macchi C.205N-1 & N-2 kits with resin, styrene plastic, brass et. al. parts are complete kits sporting Verde Oliva Scuro 2 & Grigio Azzurro Chiaro 1"Continental" schemes.
The Cunarmodel Macchi C.207 & RS Models Reggiane Re.2007 kits with resin, styrene plastic et. al. parts are complete kits finished "natural metal" given neither were constructed.
January 22, 2020
- > SEM Model Macchi C.205N-1/N-2 major model parts separated from sprues, trimmed, filed, sanded, puttied in spots, dry fitted:
January 23, 2020
- > Fuselage interiors & paneling, forward flight deck portions, mainwing landing gear parts & wheel wells, engine coolant radiator housings & supercharger intake insides spray painted Humbrol 78 Matt Cockpit Green + Testors Flat White 50/50 mix + 36% Flat White shading enamels replicating Verde Anticorrosione, set all aside to thoroughly dry before doing spray & hand detail painting.
January 24, 2020
- > Cockpit rear bulkheads, rearward flight deck portions & pilot seats spray painted Testors Flat Aluminum enamel.
- > Instrument panels base spray & hand painted painted Testors Flat Black & White "special mix", hand detailed with White & Aluminum enamels.
- > Cut clear styrene plastic reflectors glued on instrument panel molded-in San Giorgio Tipo C gunsights.
- > Pilot instrument panels glued on extenders connecting to forward flight deck portions.
- > Control columns hand painted Aluminum & Flat Black & White "special mix".
January 25, 2020
- > Instrument panels on fuselage cockpit sides detail painted various Testors enamel colors & Flat Black & White "special mix", glued in place on fuselage cockpit sides.
- > Seat straps fabricated from cut pieces of Humbrol 29 Matt Dark Earth enamel sprayed over Scotch Magic Mending Tape, ends painted Testors Flat Aluminum enamels, glued on seats they then glued on flight decks.
- > Control columns glued on flight decks:
January 26, 2020
- > Fuselage rear engine areas hand base painted Testors Black & White "special mix", details hand painted assorted Testors enamels:
- > Cockpit flight deck assemblies glued in place inside fuselages, nightmarish work
- > Abysmally bad instrument panel fits
- > Repainted portions of flight deck & instrument panels, good results
- > Engine air intake pipes glued in place.
- > Abysmally bad fuselage-mainwing fits
- > Fuselage-mainwings glued in place, joins puttied, minimal difficulty, models set aside to thoroughly dry before sanding:
January 27, 2020
- > Fuselage-mainwing seams sanded; additional puttying necessary followed by more sanding, longer than expected work, good results though.
- > Oil cooling cans smooth filed & sanded per period photos, glued in place on fuselages below engines.
- > Pliable clear vacuform cockpit canopies, trimmed off flash, filed & shape sanded.
- > Windscreen pieces cut off & shape sanded, glued on fuselages, good results.
- > Taping windscreens & openable canopy parts tomorrow, tedious work for sure
January 28, 2020
- > Windscreens & canopy parts taped, frames base painted Testors Flat Black & White "special mix" enamels per cockpit interior photos of some C.202s & C.205s.
- > Tailplanes & rudders glued in place, some putty filling & sanding around upper front rudders & sails needed.
- > Topsides & canopy parts of both models spray painted Humbrol 91 Black Matt Green + Testors Flat White 36% by volume shading replicating Verde Oliva Scuro 2, set aside to dry till Thursday the 30th:
January 29, 2020
- > Propeller spinners & coolant radiator sides spray painted Humbrol 91 Black Matt Green + Testors Flat White 36% by volume shading replicating Verde Oliva Scuro 2.
- > Propeller blades spray painted Testors Flat Black & White "special mix", tips Flat White base & Yellow overspray enamels.
January 30, 2020
- > All model undersides including coolant radiator bottoms spray painted Testors Model Master 1726 Light Sea Gray + Testors Flat White 36% by volume shading replicating Giallo Azzurro Charo 1:
January 31, 2020
- > White fuselage identification bands & mainwing tip navigation lights masked off & spray painted on with Testors Flat Green & Model Master Insignia Red enamels.
- > Band locations were different for each of the C.205N prototypes per period photographs.
February 1, 2020
- > Engine cowling cooling louvers, machine gun troughs, C.205N-1 brass machine gun parts, C.205N-2 cannon shell & gas ejection ports spray & hand painted Testors Flat Black & White "special mix" enamels.
- > Four painted brass machine gun parts size-trimmed & glued in place on C.205N-1 cowling.
- > Engine exhaust ports masked off & spray painted spot mixed Testors Steel + "special mix" enamels, good results
February 2, 2020
- > Macchi C.205N-2 fuselage tail sail-rudder join putty broke apart whilst putting in upper hinge joint gap
- > After sanding shim & upper hinge joint gap puttying spayed Humbrol 91 Black Matt Green + Testors Flat White 36% by volume shading replicating Verde Oliva Scuro 2 (VOS2) enamels over sail & rudder, good results
- > All period port-side photos of the C.205N-2 show three equidistantly spaced "bumps" of undetermined purposes laterally spread along the lower rear fuselage between trailing mainwing & tailplane leading edges, none seen starboard
- > "Bumps" glistened in sunlight, wouldn't had if were along the fuselage centerline, assuming they're offset to port glued on similarly shaped spare resin fairings from a Special Hobby FIAT G.55 kit, over sprayed them with VOS2
- > Period photos of port side Macchi C.205N-2 oil cooling can underneath the engine shows "natural metal" center section, spray painted it Testors Flat Aluminum & Steel enamels, did so with starboard can on assumption both were "natural metal"
- > Macchi C.205N-1 & N-2 Main landing gear struts sprayed & hand painted Testors Flat Aluminum & Silver enamels.
- > Main landing gear & tail wheels hand painted Testors Flat Black, White, Rubber "special mix" & Aluminum enamels.
- > Main landing gear struts have wheel retaining holes inside wheel u-mounts, fabricated wheel retaining pins from scrap resin, glued them in wheel centers, slid pins in holes, good results
- > Outer main landing gear door parts spray painted Testors Model Master 1726 Light Sea Gray + Testors Flat White 36% by volume shading replicating Giallo Azzurro Charo 1, outer tailwheel door parts VOS2.
- > Macchi C.205N-1 & N-2 had ventilation risers port side in front of windscreens, fabricated them from styrene sheet plastic, painted them VOS2 + Testors Flat Black & White "special mix" enamels.
February 3, 2020
- > Fuselage electrical, compressed air & oxygen receptacle points detail hand painted with Testors Flat Black & White "special mix", Aluminum & White, Model Master Insignia Red enamel paints per Aero Detail 15 Macchi C.200/202/205 pages 68 & 69 for C.205Vs in locations they likely would had been placed on the Macchi C.205N-1 & N-2.
- > Well known & published C.205N-2 period photograph clearly show the engine starter electrical power receptacle below the port side exhaust stacks, C.205N-1's likely starboard per C.205Vs, painted both of them on, former per period photo, later per Aero Detail 15 placement.
- > SKY Models 72-014 Macchi C.202 & 72-034 C.205V white Distintivo di Guerra water decals applied on fuselage rudders; larger 72-014s on C.205N-2, smaller 72-034s on C.205N-1 per period photographs of Real McCoys.
- > All fuselage C.205N-1 model kit decals were applied, mainwing tri-fasci will be tomorrow.
February 4, 2020
- > Macchi C.205N-1 & N-2 oil cooling cans openings hand painted with Testors Bronze enamel.
- > C.205N-1 & N-2 kits lacked portside Pitot tube parts
- > All model kit water decals applied on C.205N-1 & N-2 models including mainwing tri-fasci, work took half-again longer than expected, good results nonetheless
- > Red spare tailplane incidence arrow marker water decals taken from a Special Hobby Macchi C.200 kit decal sheet applied on C.205N-1 & N-2 models ala Aero Detail 15 placements for C.202s & C.205Vs assuming they also had them.
February 5, 2020
- > C.205N-1 & N-2 Pitot tube ends hand painted Testors Flat Aluminum enamel, typically paint them Bronze, made exceptions per period photos suggesting metals other than bronze.
- > All mainwing & tail landing gear parts glued in place, great results
- > Fuselage holes for tailwheel mounts plugged-up
- > Model kit tailwheel well covers ala those for factory-built C.205V glued in place.
- > Humbrol 91 Black Matt Green + Testors Flat White 36% by volume shading enamels replicating Verde Oliva Scuro 2 (VOS2) spot hand painted around covers.
- > Pre-spray painted mainwing landing gear parts separated from sprues.
- > Wheel mount struts glued in place.
- > Wheel mount strut retractors not provided with model kits
- > Mainwing landing gear well covers separated from sprues.
- > Large outboard covers glued on wheel struts, small sliding covers glued on mainwings in front of them.
- > Small inboard mainwing landing gear well covers hinged on fuselage centerline, bow-shaped retractors not provided with model kits
- > Venturi tubes hand painted Testors Flat Black & White "special mix" enamels, glued in holes drilled in model fuselages.
- > C.205N-1 Venturi located in front of engine coolant radiator ala Macchi C.202s per period photos, C.205N-2's midway down starboard side fuselage below machine gun & cannon access panel ala Macchi C.205Vs, "educated guess" given no readily available starboard side period photos of the C.205N-2
- > Radio masts hand painted VOS2, glued in place in fuselage centerline holes behind cockpit canopy.
- > Painted propeller spinner & blade parts assembled for both models, good results though one blade for each assembly is slightly smaller - mold tooling error
- > Models are complete except for spraying on clear semigloss lacquer coating, rigging radio antennas with EZ Line stretch thread, gluing on cockpit canopy hinged covers, work completed tomorrow.
February 6, 2020
Macchi C.205N-1 & N-2 Models Are Complete, See Posts Below
February 7, 2020
The RS Models Reggiane Re.2007 resin model kit with clear plastic canopy will be finished in post-WWII Aeronautica Militare Italiana all-aluminum livery & cockades.
February 8, 2020
- > Fuselage cockpit inside walls, pilot seat mounting platform, landing gear doors & nosewheel box insides spray & touch-up hand painted Humbrol 78 Matt Cockpit Green + Testors Flat White 50/50 mix + 36% Flat White shading enamels replicating Verde Anticorrosione.
- > Pilot seat, landing gear door outsides & wheel struts, internal fuselage nose jet engine air intake areas forward of cockpit, jet exhaust areas around tailpipe spray painted Testors Flat Aluminum enamel.
- > Forward cockpit & pilot seat mounting platform instrument panels hand painted Testors Flat Black & White "special mix" enamels.
- > Scotch Magic Mending Tape spray painted Humbrol 29 Matt Dark Earth enamel for fabricating pilot seat belts.
February 10, 2020
- > Entire fuselage interior work complete
- > Cut strips of painted over Scotch Magic Mending tape replicating pilot seat belts glued in place, "buckle" ends hand painted Testors Flat Aluminum enamel.
- > Model lacked rudder control bar, fabricated it from styrene sheet plastic, hand painted Flat Aluminum, glued in place on forward flight deck.
- > Kit joystick disintegrated whilst trimming it
- > Pilot seat glued in place on flight deck behind joystick assembly.
- > Kit included oxygen bottle & additional flight instrument parts to be mounted adjacent to pilot seat, way too large
- > Flight deck port & starboard topside edges, forward cockpit instrument panel part hand painted assorted Testors enamel colors replicating flight instruments.
- > Forward cockpit instrument panel glued on top of forward flight deck port & starboard topside edges behind rudder control bar.
- > Cockpit area fuselage halve interior sides semi-circular slope-molded to support flight deck, no place to glue in fuselage interior bulkhead behind it
- > Glued nose landing gear box in place inside port fuselage halve, good alignment
- > Sprayed & hand painted Humbrol 78 Matt Cockpit Green + Testors Flat White 50/50 mix + 36% Flat White shading enamels replicating Verde Anticorrosione & Flat Aluminum around landing gear box & fuselage bulkhead, sprayed Verde Anticorrosione over starboard side slope slot.
- > Glued in flight deck above landing gear box, good alignment
- > Fuselage nose jet air intake stake insides painted Flat Aluminum, glued in place on port fuselage halve, good alignment
- > Drilled out hole in solid resin jet exhaust "can" part, hand painted insides with spot mixed Testors Steel, Flat Black & White "special mix" enamels, glued in place on port fuselage halve.
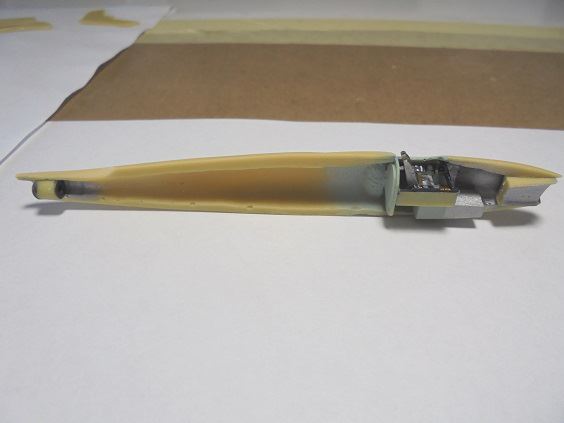
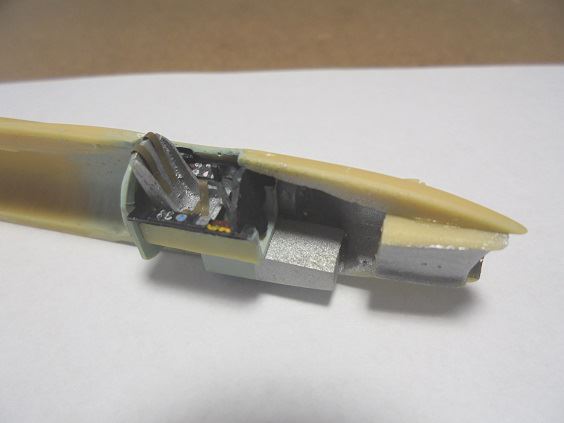
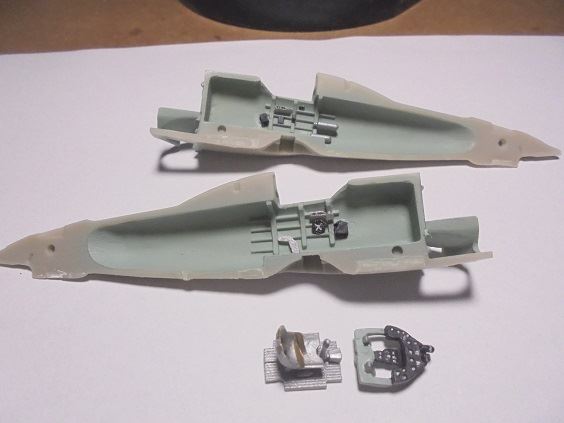
- > Fuselage interior assemblies as described:
- > Fuselage Halve Test Fits:
February 11, 2020
- > Fuselage halves glued together, seams puttied filled & sanded.
- > Cannon barrel seats drilled out around fuselage nose, OK test fits with "cannons" fabricated from salvaged circular cut plastic pieces out of spare parts bin.
- > Mainwings glued on fuselage, seams putty filled, wing root join trailing edges built up for later shape-sanding.
- > Tailplane & rudder-sail parts glued on upper rear fuselage, large gap between rudder-sail & tailplane parts puttied filled.
February 12, 2020
- > Entire model over-sprayed with Testors Flat Aluminum enamel paint.
- > Lumpy-bumpy fuselage dorsal spine glue join aft of cockpit to rudder-sail revealed after spraying
February 13, 2020
- > Lumpy-bumpy casting defects ventral fuselage-mainwing area revealed after first entire model spraying
- > Flash removed from one-piece supposed pliable clear vacuform plastic cockpit canopy, crack formed half-way around starboard canopy 2mm from aft end
- > Fuselage cockpit walled off, clear canopy masked for painting, sprayed on Testors Flat Black & White "special mix" enamels over canopy frames, either side of cockpit enough to cover area where clear canopy will be glued on.
Valentine's Day February 14, 2020
Reggiane Re.2007 Model Complete, See Post Below
February 16, 2020
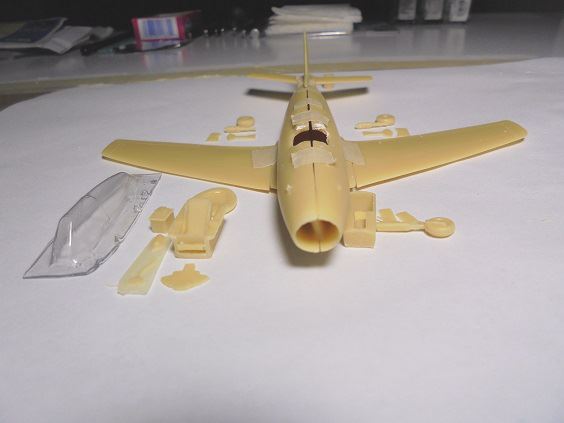
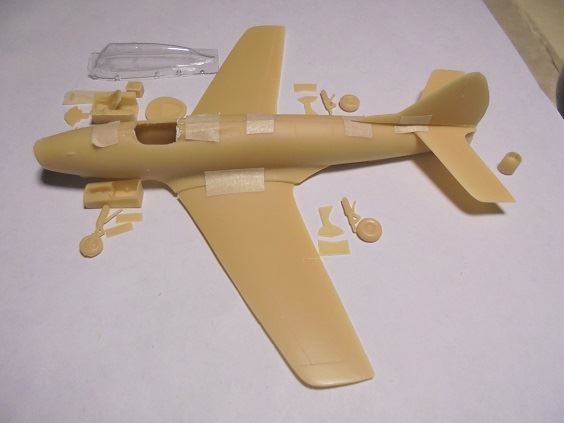
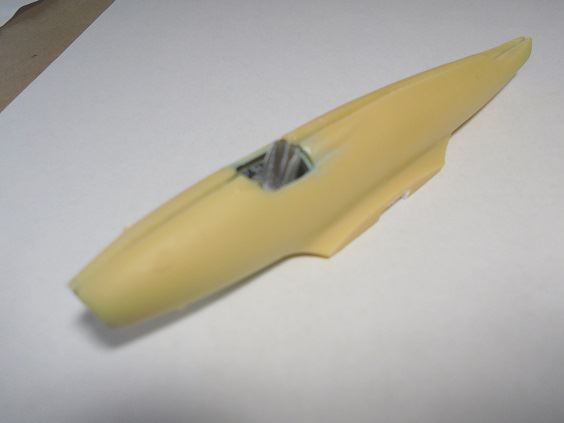
The Cunarmodel Macchi C.207 resin model kit with clear plastic canopy will be finished all-aluminum possibly without any markings on the airframe given the aircraft was never built.
- > Kit Parts Layout:
- > Kit Assembly Instructions With Supplemental Drawings Of The Daimler-Benz DB 603 Engine:
- > Portions of mainwing roots & port fuselage undersides had casting imperfections, they've been puttied over:
- > The kit allows for see-all engine viewing & cowling mounting options, still ascertaining whether either can be modified for interchangeable display:
- > The engine cowling already has been assembled well as seam puttied.
February 17, 2020
- > Fuselage halve interiors, mainwing wheel & flap well interiors, separate flap & mainwing landing gear wheel well cover part interiors spray painted Humbrol 78 Matt Cockpit Green + Testors Flat White 50/50 mix + 36% Flat White shading enamels replicating Verde Anticorrosione.
- > Kit doesn't have ventral fuselage centerline-mounted mainwing landing gear wheel well cover parts
- > Mainwing landing gear struts, cockpit flight deck top, pilot seat, joystick, fuselage halve engine mounting areas spray painted Testors Flat Aluminum enamel, pending further research may need to overspray latter with Flat Steel.
February 18, 2020
- > Molded-in fuselage halve interior areas hand painted with various Testor & Flat Black + White "special mix" enamels per Aero Detail 15 Macchi C.200/202/205 publication locations.
- > Kit lacked tailplane trim wheel, fabricated one from styrene sheet plastic, hand painted it with Testors Flat Aluminum & "special mix".
- > Pilot seat belts fabricated from cut pieces of spray-over Scotch Magic Mending Tape with Humbrol 29 Matt Dark Earth, tips hand painted with Testors Flat Aluminum & "special mix" enamels, glued in place on pilot seat.
- > Pilot seat & joystick glued on flight deck, joystick grip handle hand painted "special mix".
- > One-piece fuselage bulkhead with molded-in instrument panel & rudder bar foot rests spray & hand painted Humbrol 78 Matt Cockpit Green + Testors Flat White 50/50 mix + 36% Flat White shading enamels replicating Verde Anticorrosione & "special mix", instrument panel surface detail & rudder bar foots rests hand painted various Testor enamels per Aero Detail 15 Macchi C.200/202/205 publication locations:
February 19, 2020
- > Pilot head "armor plate" fabricated from styrene sheet plastic, glued in place on port side fuselage halve dorsal fairing, spray painted Testors Flat Steel enamel.
- > Cockpit instrument panel glued on flight deck, assembly glued inside starboard fuselage halve cockpit area.
- > Fuselage halves glued together, rudder-sail glued on fuselage, fuselage halve & rudder-sail seams puttied.
February 20, 2020
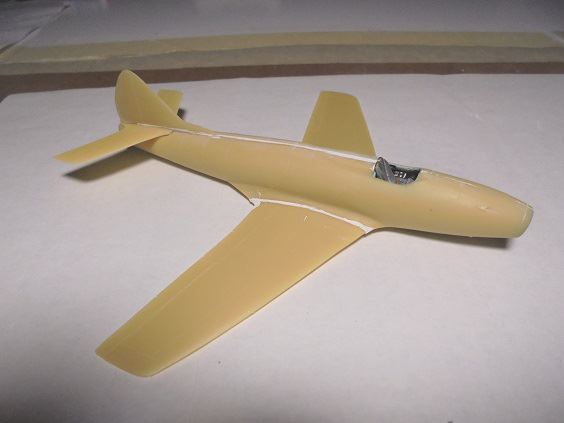
- > Puttied fuselage halve seams smooth sanded.
- > Mainwings & tailplanes glued on fuselage, seams puttied.
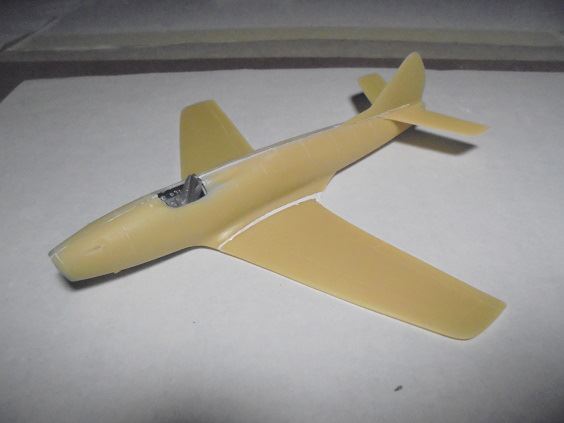
February 21, 2020
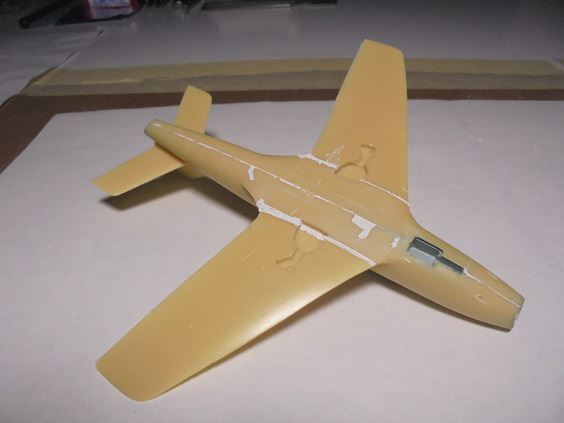
- > Mainwings & tailplanes glued on fuselage, seams smoothed sanded.
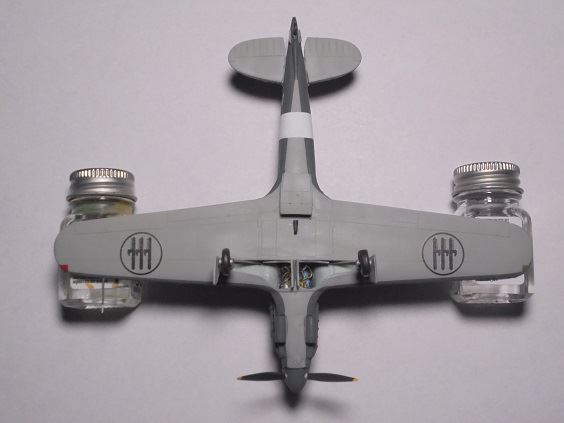
- > Entire model, engine cowling, ventral engine coolant radiator housing, main landing gear wheel cover outsides spray painted Testors Flat Aluminum.
February 22 & 23, 2020
- > Daimler-Benz DB 603 engine fully assembled with Macchi C.202-style single-unit oil cooling radiator.
- > Engine base spray painted Testors Flat Black & White "special mix", engine bearers & coolant reservoir tank Flat Steel, other engine details Flat Steel & Aluminum.
- > Fabricated magneto spark plug wire leads from nylon fishing line hand painted with Flat Aluminum, glued them in place between magnetos & rear molded-in engine spark plug leads.
- > Model kit didn't have engine exhaust stacks, glued on hand painted with "special mix" + Flat Steel spot mix & Flat Aluminum spare resin Macchi-style ones with ram air housings trimmed to fit over engine exhaust headers.
- > Model kit allows displaying mounted engine or engine cowling permanently glued on the fuselage, didn't like that
- > Holes drilled in top engine bearer & fuselage attachment points, cut-to-fit circular resin pins from spare parts bin glued in engine bearer attachment point holes allowing for optional "plug-in" engine mounting on fuselage
- > Holes drilled in engine cowling fuselage facing allowing for optional "plug-on" fuselage mounting
- > Holes drilled in center of engine air compressor center, ram air housing & engine cowling to accommodate shaped-to-fit circular plastic pin for optional display of ram air housing on engine air compressor and/or cowling.
- > Photos of the options will be presented when the model is complete.
- > Engine lubricating oil reservoir tank & mounting spray painted Flat Steel, assembled both, glued mounting on engine fuselage firewall between mainwing wheel wells:
February 24, 2020
- > Propeller unit fully painted with Testors Flat Black & White "special mix" & Flat Aluminum enamels & assembled, KORA Models 72.202 1/72 scale Macchi propeller logos applied on blades.
- > Fuselage dorsal area forward of cockpit windshield, anti-skid strip areas on mainwings adjacent to fuselage-mainwing joins masked off & spray painted "special mix".
- > Testors Flat Olive & Red enamels spray painted on mainwing tips as navigation lights.
February 25, 2020
- > Fuselage electric, air & oxygen receptacle attachment points hand painted various Testors enamel colors per Aero Detail 15 Macchi C.200/200/205 publication references for C.202/205 aircraft.
- > SKY Models 72-014 Macchi C.202 water decals employed to mark fuel & oil point locations & port side cockpit canopy latch control panel.
- > Azur 72-032 Macchi C.200 decals employed to mark tailplane incidence alignments.
- > Aeronautica Macchi "C-207" decals pieced together from several SKY Models 72-014 sheets placed on rudder-sail (wasn't going to do that but did
February 26, 2020
- > Model kit lacked Pitot tube, fabricated one from styrene sheet plastic, mounted it on port mainwing.
- > Kit also lacked inboard fuselage main landing gear wheel well covers, fabricated them from styrene sheet plastic.
- > Four model kit 20mm cannon barrel housing butt-ends shaped carved & filed, glued on mainwing leading edges.
- > All above parts spray painted Testors Flat Aluminum enamel, wheel well cover insides Humbrol 78 Matt Cockpit Green + Testors Flat White 50/50 mix + 36% Flat White shading enamels replicating Verde Anticorrosione.
- > All landing gear wheels spray & hand painted Testors Flat Black, White, Rubber "special mix", hubs hand painted Flat Aluminum.
- > Fuselage tailwheel glued in place.
- > Main landing gear wheels glued on wheel mount struts, trimmed off not needed casted-in wheel hub retaining pins before doing so struts then glued on inner mainwing wheel well covers.
- > Wheel mount struts & covers too short to glue in wheel wells
- > Model kit came with four mainwing landing gear retraction arms only two needed
- > Spot hand painted cannon barrel ends, mainwing shell ejection openings, mainwing landing gear retraction arm wheel well attachment points "special mix".
- > Engine coolant radiator spray painted Testors Bronze enamel, glued in molded-in ventral fuselage well, radiator housing glued on over it.
February 27, 2020
Macchi C.207 Model Complete, See Post Below
Last edited by RetiredInKalifornia on Fri Feb 28, 2020 7:00 am, edited 81 times in total.

Re: Retired In Kalifornia's Aircraft Model Builds In Progress Photos
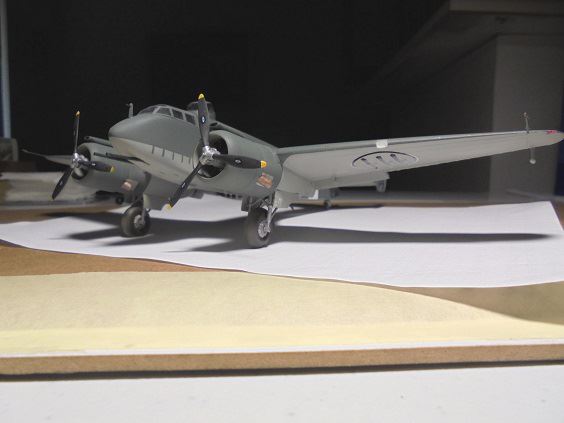
Beautiful job on your SM.89! Article please! And great subjects above, can't wait to see the Re.2007.

-
RetiredInKalifornia
- Generale di Divisone Aerea
- Posts: 566
- Joined: Fri Jun 14, 2019 6:34 pm
Article Sent...
...Read review RS Model Re.2007 kit landing gear is "weak", won't nose-weight it just to be sure, thinking about applying post-WWII Aeronautica Militare (AM) roundels on it. Cunarmodel Macchi C.207 kit has lots of detail parts, too bad it never was built, "silverbird" it will be like the 2007, debating whether to apply AM roundels.
Group II Plastic Builds likely in March include the Hasegawa & Italeri Macchi C.202s & 205V, FROG C.202 "What-If" likely will be last, let me know if your OK my posting it on this discussion thread.
Re: Retired In Kalifornia's Aircraft Model Builds In Progress Photos
The C.207 would have been a significant step up in performance, including at high altitude and the plane probably would have been even faster than the G.56 and it's even more strange that Fiat managed to build the G.56, but Macchi didn't get around building the C.207. The C.207 should be a great build and we don't have a N.1 in the Galley so that should fill-in the whole gap of war-time Macchi designs. The Re.2007 really should be done in ANR markings, I think the kit comes with RA markings. What-ifs are fine.
-
RetiredInKalifornia
- Generale di Divisone Aerea
- Posts: 566
- Joined: Fri Jun 14, 2019 6:34 pm
Agreed...
...But there isn't a C.206 kit on the market which is why I'd asked - nay bugged - SEM Model & Italian Kits Wings to produce oneEditor wrote: ↑Tue Jan 21, 2020 8:57 pmThe C.207 would have been a significant step up in performance, including at high altitude and the plane probably would have been even faster than the G.56 and it's even more strange that Fiat managed to build the G.56, but Macchi didn't get around building the C.207. The C.207 should be a great build and we don't have a N.1 in the Galley so that should fill-in the whole gap of war-time Macchi designs. The Re.2007 really should be done in ANR markings, I think the kit comes with RA markings. What-ifs are fine.
My RS Models Re.2007 kit didn't have decals; knowing its based on post-WWII design sketches rendering it in post-WWII livery, yet to see kit build photos of it done this way.
Starting the SEM Models C.205N builds later this A.M., hopefully get them done by Valentine's Day.
Thanks for letting me post "What-If" C.202 build photos, may build two so as to fully populate the display case I've got for the five others well as my "What-If" five-cannon FIAT G.55. If you don't mind as well do want to parallel post their building progress on Beyond The Sprues, they'd loved the G.55 one.
That's right there's no C.206 on the market ... hmmm possibilities lol
I think a conversion of the N1 is all that's needed to accommodate the larger wing of the C.206 (DB.605) or an engine housing conversion of the C.207 (DB.603).
According to Longhi the Re.2007 was in some form of completion in 1944 and at least until the end of WWII he was actually in possession of two Jumo engines obtained from an Arado flight that was to operate over Italy in 1945. That's why I suggest the model should probably be marked up as a ANR plane, but the roundels would be fine too because I think he pitched the project to the AMI in 1949. I should write up an article on this plane with Stefano because there's allot of confusion about it.
According to Longhi the Re.2007 was in some form of completion in 1944 and at least until the end of WWII he was actually in possession of two Jumo engines obtained from an Arado flight that was to operate over Italy in 1945. That's why I suggest the model should probably be marked up as a ANR plane, but the roundels would be fine too because I think he pitched the project to the AMI in 1949. I should write up an article on this plane with Stefano because there's allot of confusion about it.
-
RetiredInKalifornia
- Generale di Divisone Aerea
- Posts: 566
- Joined: Fri Jun 14, 2019 6:34 pm
This Is What I'd Posted Over 20 Years Ago On My Computer Arts Website...
The Reggiane Re 2007 was the only wartime Italian jet airplane project reportedly underway at the end of WWII, it was to have been powered by a Junkers Jumo 004 turbojet; two engines were dispatched to Italy in April 1945 but never arrived. In July 1945 the British captured the uncompleted prototype and production drawings at Taliedo, they were very interested in this airplane but no further development occurred.Editor wrote: ↑Wed Jan 22, 2020 12:46 pmI think a conversion of the N1 is all that's needed to accommodate the larger wing of the C.206 (DB.605) or an engine housing conversion of the C.207 (DB.603).
According to Longhi the Re.2007 was in some form of completion in 1944 and at least until the end of WWII he was actually in possession of two Jumo engines obtained from an Arado flight that was to operate over Italy in 1945. That's why I suggest the model should probably be marked up as a ANR plane, but the roundels would be fine too because I think he pitched the project to the AMI in 1949. I should write up an article on this plane with Stefano because there's allot of confusion about it.
Information most graciously provided by Mr. Ferdinando D'Amico of Italy who has well researched information concerning this very interesting airplane provides significant insight concerning its true history, here is the information as it was received repeated in its entirety:
"According to the studies of Mr.Sergio Govi, the most important Italian historian of the Reggiane firm (he died two years ago [c.1995], but after having managed to complete and publish his four-volume story of all the Reggiane fighters from the Re.2000 to the Re.2007, a thirty-years research among the documents and the eyewitness accounts of technicians, test pilots and personnel of the Reggiane), the Re.2007 simply never existed if not on paper! The project of the Re.2007 was in fact a fighter drawn around the Jumo 004 engine, and the Germans were interested enough to allow the delivery of such an engine to the Reggiane. However, this took place in late 1944/early 1945 and the jet engine never reached the Italian factory (as correctly pointed out by Mr. Lednicer)."
"However, after the war, although the British captured the drawings of the Re.2007 and were very interested to the project, nothing came out of this, simply because not a single piece of this aircraft had been built. Since the Re.2006 prototype had been completed instead, maybe some confusion was raised by its existence. Several articles had appeared since the end of the war perpetuating the myth of the Re.2007, particularly in the British aviation press (this could be probably explained by copies of the drawings circulating among the experts) and I guess that even the article dealing with Mr. Longhi (ed. note, Roberto G. Longhi was Reggiane's brilliant designer of the Re 2000 fighter series) suffered this fate."
"One final note about the Reggiane Factory. Up to January 1944 the planes were produced by the factory in Reggio Emilia (hence the name "Reggiane"). After the heavy bombardment sustained on January 1944, most of the production was detached to the Caproni Taliedo factory, near Milan. It was there that the prototype Reggiane Re.2006 was built."
Since receipt of Mr. D'Amico's information, fairly detailed drawings have been made available to me through him and Mr. Evan L. Mayerle or drawing a much more accurate rendering of this extremely mysterious airplane, including drawings of the even more mysterious Caproni 2008 jet which was to have been produced after the war. This jet bears an uncanny resemblance to the North American F-86 Sabre; further research will be conducted to determine whether it would qualify for being artfully rendered and exhibited on The Italian Aero Art Page.
-
RetiredInKalifornia
- Generale di Divisone Aerea
- Posts: 566
- Joined: Fri Jun 14, 2019 6:34 pm
Revised Proposed Late 2019 Up To Summer 2020 Model Builds - Updated February 3, 2020
- > Group II Plastics: Two FROG Macchi C.202 "What-Ifs" models will be built.
- > SEM Model still hasn't rereleased their 1/72 scale SM.84 kit, postponed building the Xotic-72 kits till c. May 2020:
Group III:
- > SEM Model still hasn't rereleased their 1/72 scale SM.84 kit, postponed building the Xotic-72 kits till c. May 2020:
Group III:
- FLY Caproni Ca.101 Piaggio VII Engines
- Italian Kits Wings Caproni Ca.135S
- Balaton Modell 1/72 Savoia-Marchetti SM.75
- Valom Caproni Campini N.1
- Xotic-72 Savoia-Marchetti SM.84 (2 Kits)
- SEM Model SM.84 Kit Removed, Uncertain Whether Will Be Able To Obtain One During 2020
Last edited by RetiredInKalifornia on Sun May 24, 2020 9:11 pm, edited 3 times in total.
Re: Retired In Kalifornia's Aircraft Model Builds In Progress Photos
The Caproni Campini N.1 should be a great build. I have the old Delta kit sitting around some place, its a rough kit but I was meaning to build it. It's a great subject - there's a video of it in the video gallery.
-
RetiredInKalifornia
- Generale di Divisone Aerea
- Posts: 566
- Joined: Fri Jun 14, 2019 6:34 pm
Hopefully It WILL Be...
...Valom kit supposedly is better, building it this May hopefully. Want to get the Macchi C.205N models done by end of next week, need to dig out my Squadron Macchi booklet, check on whether their photos of the "Ns" are clearer than those I've seen on the Internet. Am surmising the "Ns" had a narrow triangular band of GAC1 sprayed underneath the rear fuselage ala the C.205Vs, upper fuselage camouflage extended deep downwards on Macchi aircraft per specs I'd read somewhere ages ago. Always perplexed me why wrap camo around the entire fuselage making it stand out against sky-colored mainwings & tailplanes, too easy a gunnery target methinks
-
RetiredInKalifornia
- Generale di Divisone Aerea
- Posts: 566
- Joined: Fri Jun 14, 2019 6:34 pm
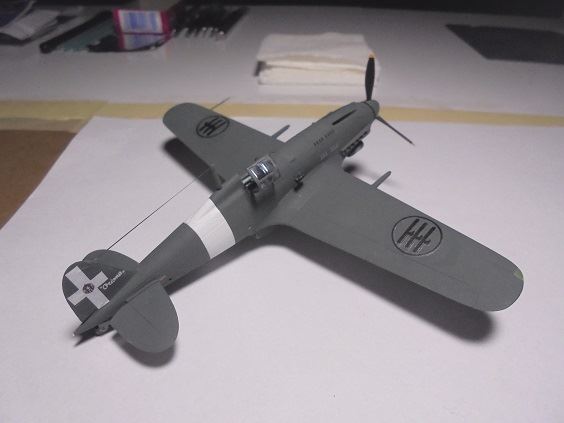
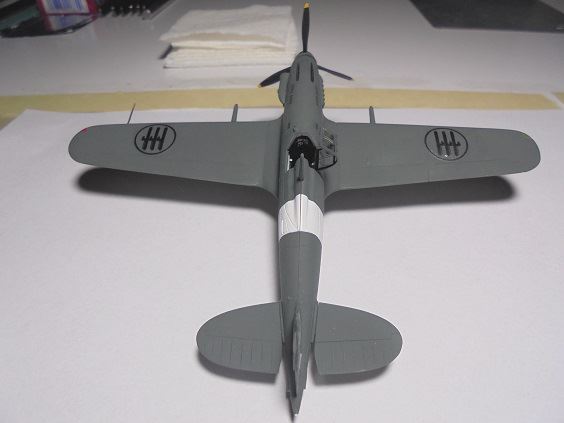
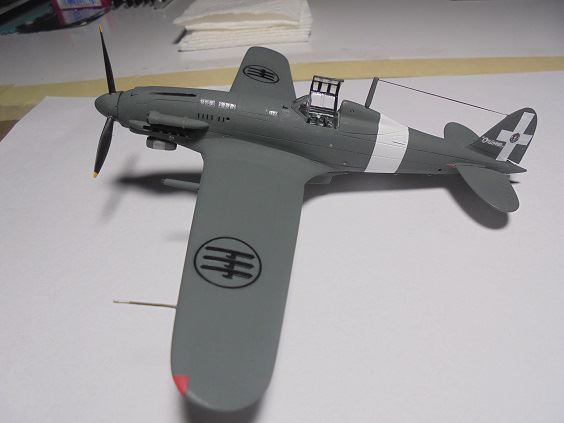
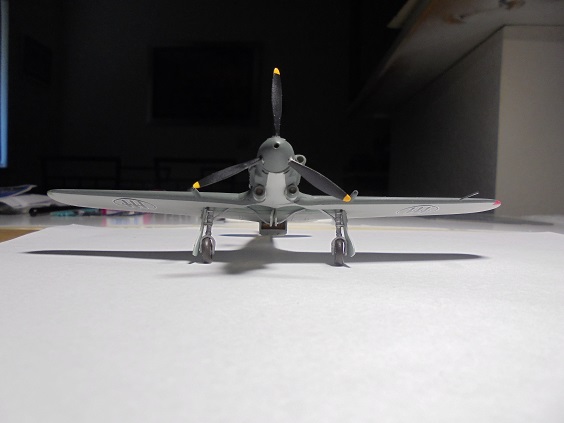
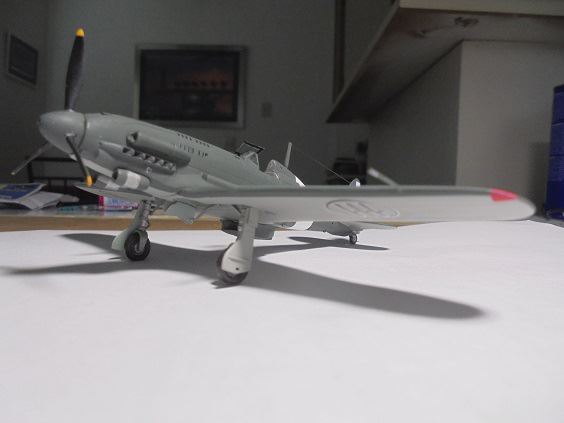
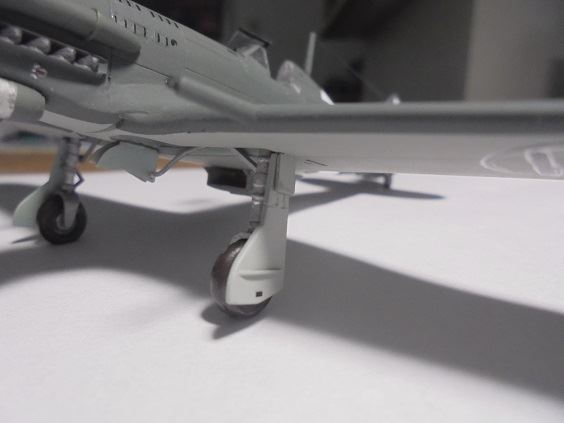
SEM Model Macchi C.205N-1


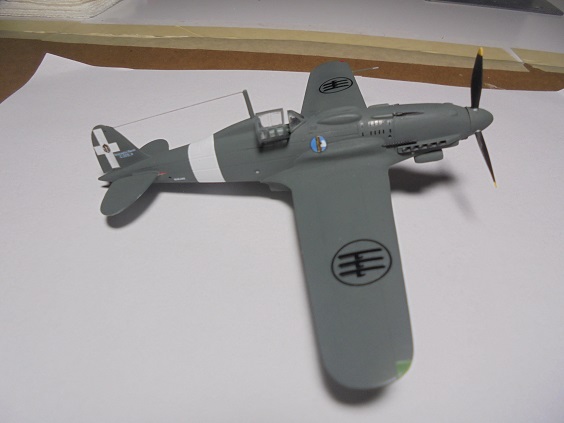


ERRATA February 9, 2020
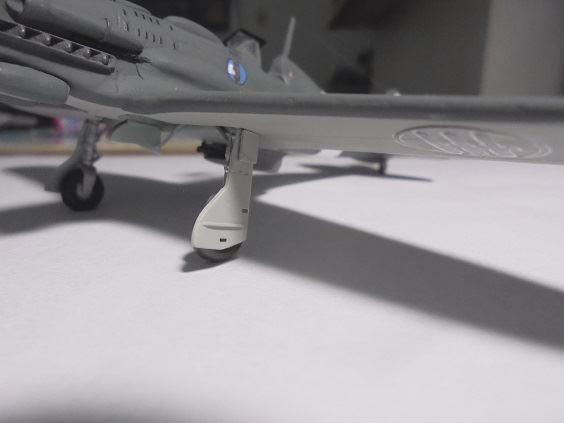
- > Added Fabricated Landing Gear Wheel Air Pressure & Presumed Gear Retraction Mechanism Information Decals On Covers:

Last edited by RetiredInKalifornia on Sun Feb 09, 2020 3:34 pm, edited 6 times in total.
-
RetiredInKalifornia
- Generale di Divisone Aerea
- Posts: 566
- Joined: Fri Jun 14, 2019 6:34 pm
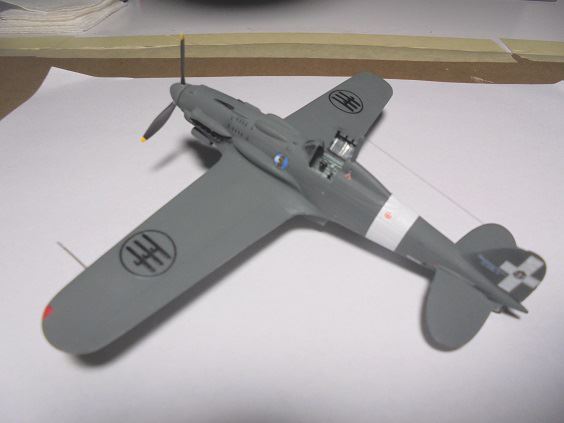
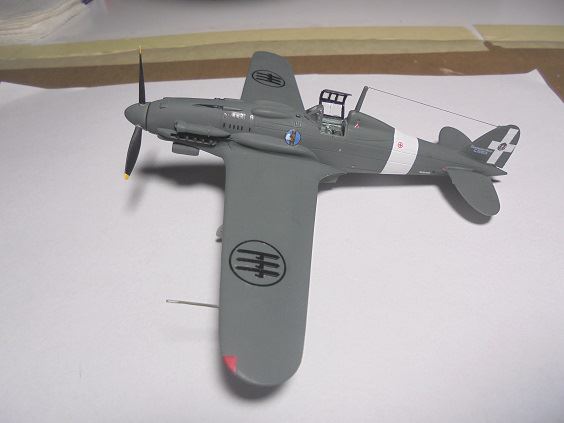
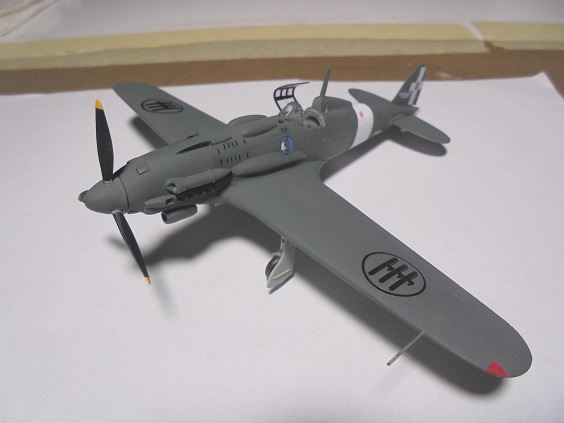
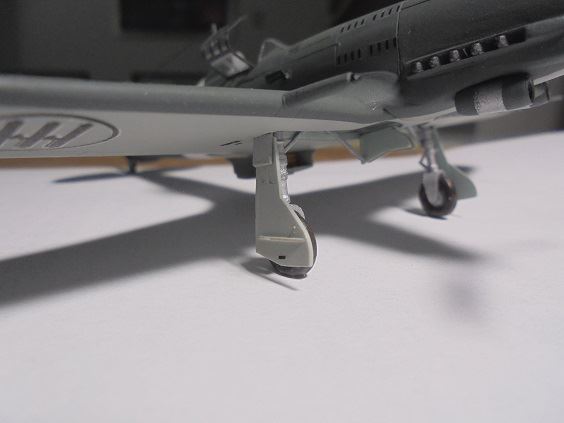
SEM Model Macchi C.205N-2


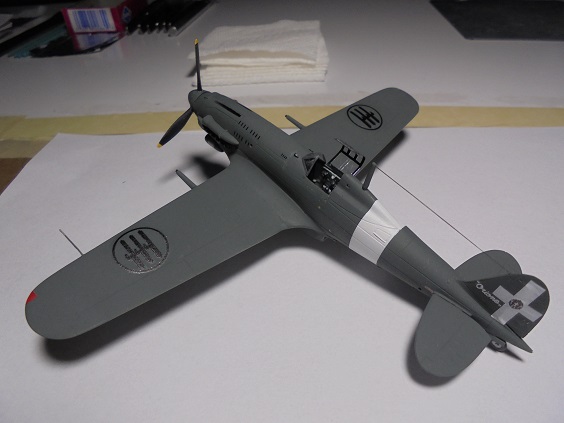

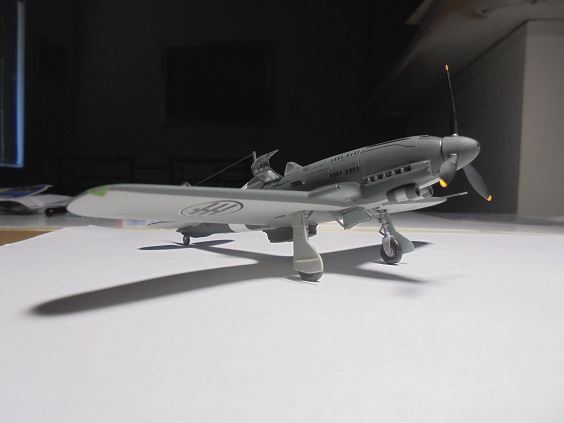
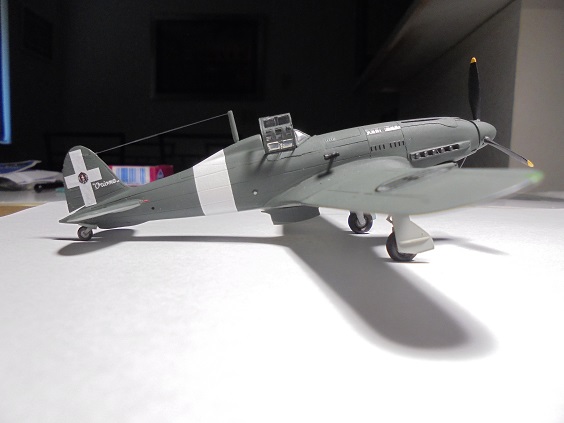


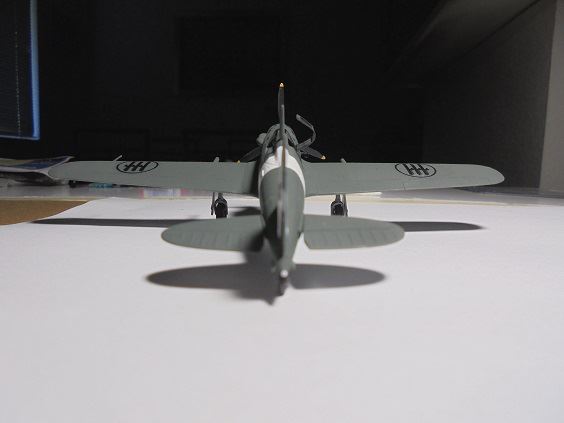
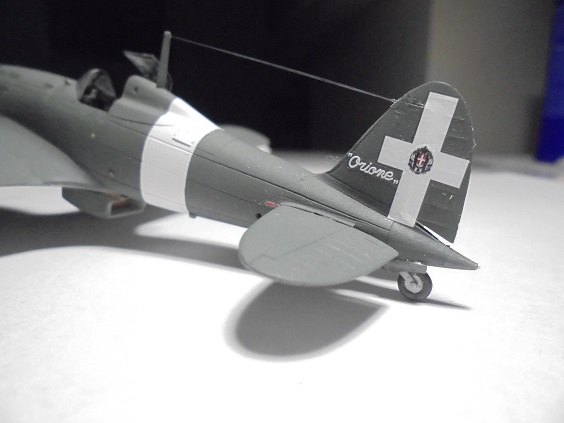
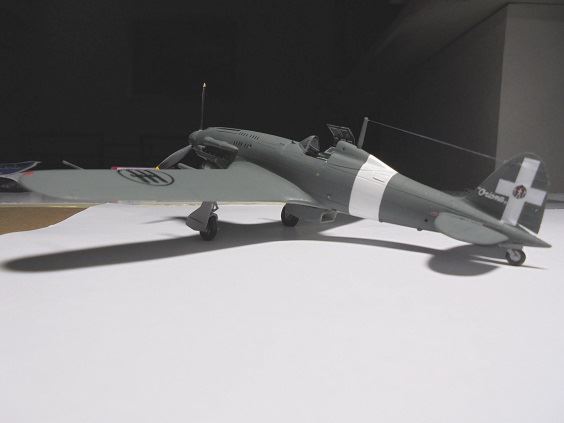

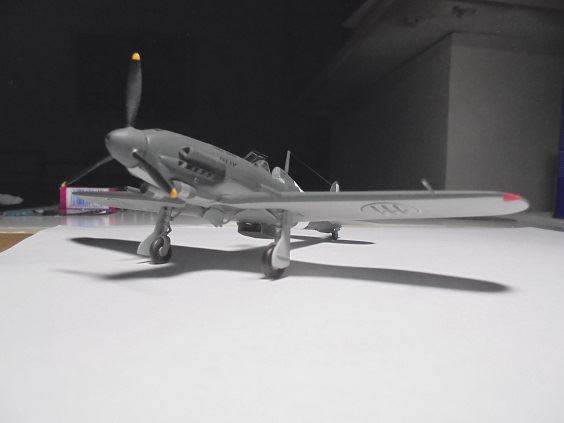
ERRATA February 9, 2020: Added Fabricated Landing Gear Wheel Air Pressure Information Decals On Covers:

Last edited by RetiredInKalifornia on Sun Feb 09, 2020 3:39 pm, edited 3 times in total.